Handloom and heritage silk behave differently from mill cloth: they shrink, fray, shift and carry borders and pallus that must land in exactly the right place. This lesson is the studio method for turning an Ilkal, khun, Udupi cotton or silk saree into a garment without wasting the best part.
What you’ll learn
- How to prepare handloom before cutting.
- How to plan a layout around the border and pallu.
- Which needles, threads, seams and supports to use.
- How to finish handloom so it lasts.
Before you start
- Time: allow an extra day for pre-washing and drying.
- Difficulty: intermediate; you should already be able to stitch a basic kurta or blouse.
- Tools: sharp shears, fine pins or clips, tailor’s chalk, a long ruler, a pressing cloth, fine machine needles (70 to 90), good polyester or silk thread, light interfacing, and lining fabric.
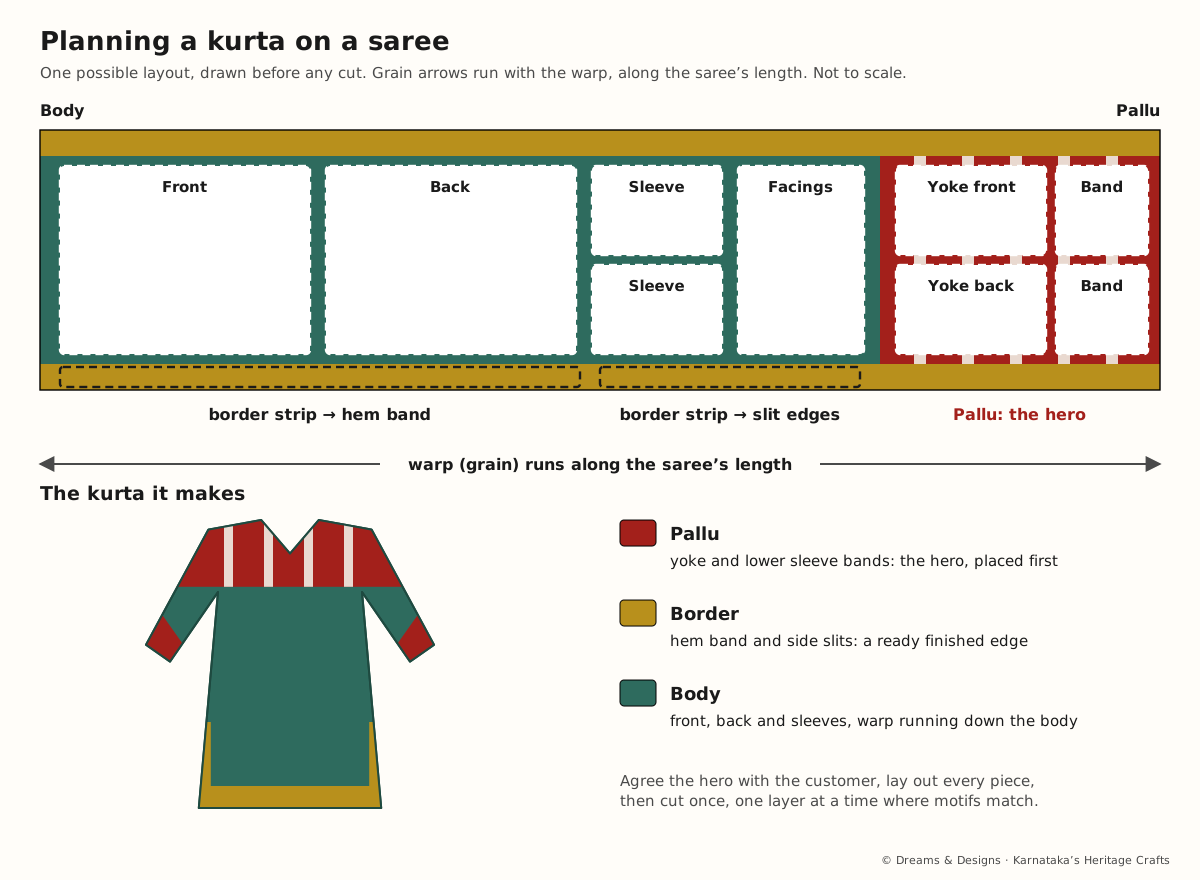
- Agree with the customer before cutting: which part of the saree is the “hero”, what is left over, and whether any part must not be cut.
The core steps
- Measure the cloth. Lay it flat and note the length of the body, pallu and any blouse piece, and the width. Photograph it.
- Test and pre-wash cotton. Test a corner for colour bleeding, then soak, dry in shade and press. For silk, steam-press only, or follow the owner’s care history.
- Find the grain. The warp runs along the borders. Cut main panels with the warp running down the body.
- Plan the layout on the cloth with chalk or paper pieces before any cut. Place the pallu and border first, then the plain panels.
- Stabilise. Fuse light interfacing to the back of necklines, plackets and any loosely woven areas.
- Cut once, carefully. Use shears, not a rotary cutter, on zari, and cut one layer at a time where motifs must match.
- Finish edges at once. Overlock, zigzag, or use French or flat-fell seams, because handloom frays.
- Stitch and press with a pressing cloth, from the back.
Planning the layout: the real skill
Decide the hero
Every heritage saree has one part that matters most – usually the pallu, sometimes the border or a band of motifs. Decide where it will go on the body: yoke, centre front panel, back, hem or sleeves. Everything else is planned around it.
Use the border as a finished edge
A woven border has selvedges. Used as a hem, cuff or placket, it needs no turning and keeps the garment light.
Match and mirror
Checks and stripes on Ilkal and Udupi cotton must match at side seams and centre front. Mark the main line on each piece before cutting. For motifs, mirror left and right sides from the centre.
Count the cloth twice
Lay out every piece, including facings, pockets and bias strips, before the first cut. Handloom sarees are often narrower than mill fabric, so a garment may need a panel or godet.
Keep the leftovers
Agree with the customer what happens to leftover pieces – a matching mask, potli, cushion or children’s garment.
Variations: cloth by cloth
| Cloth | Prepare | Seams |
|---|---|---|
| Ilkal cotton | Pre-wash, press | Overlock or flat-fell |
| Udupi cotton | Pre-wash, press | French seams |
| Khun | Test a corner; gentle wash or steam | Overlock, lined |
| Mysore silk, crepe | Steam-test only | French seams |
| Molakalmuru | Steam-test only | Overlock, lined |
Left-handed cutters
Use left-handed shears; ordinary shears push the cloth away and give a ragged edge on slippery silk. Lay out pieces so you cut with the bulk of the cloth to your right.
Small pieces
Blouses and yokes from a pallu often need single-layer cutting with mirrored pieces. Cut one, flip it face down on the matching motif, and cut the second.
Control: seams, tension and pressing
- Stitch length: a little shorter than usual (about 2.0 to 2.5 mm) on fine cotton and silk, for strength.
- Tension: test on a scrap of the same cloth, folded double. Seams should lie flat without puckering.
- Feed: hold silk gently in front and behind the foot; do not pull. Tissue paper under very slippery silk helps.
- Zari areas: sew slowly, with a new needle, and avoid stitching through heavy zari where you can.
- Pressing: always from the back, with a pressing cloth, at the fibre’s heat. Press seams open, then together, for a crisp line.
Tips, tricks and hacks
- Photograph the saree before you cut, and the layout chalked on it. It protects you and the customer.
- Make a paper or muslin toile first for any heirloom. The real cloth gets cut only once.
- Line Ilkal and khun garments with soft cotton; it improves the fall and protects the inside of the weave.
- Use the blouse piece woven into the saree for facings, piping or a contrast neck.
- Cut bias strips from the plain body for matching piping.
- Use a walking foot on khun and slippery silks so layers do not shift.
- Stay-stitch necklines and curves straight after cutting.
- Fold zari away from the fold lines while you work, so it does not crack.
- Use clips instead of pins on silk, so you do not leave holes.
- Professionals “read” the cloth first: they spend more time looking and planning than cutting.
- Keep a Kasuti-safe zone. If Kasuti will be added later, leave the area free of seams and darts.
Problems and how to fix them
The garment shrank after the first wash.
- Gently steam and stretch seams back to size while damp, if the shrinkage is small.
- Let out seam allowances or add side panels from leftovers.
- Prevention: always pre-wash handloom cotton before cutting.
Colour bled onto the lining.
- Rinse at once in plenty of cold water.
- Replace the lining if the stain stays.
- Prevention: test and pre-wash both outer cloth and lining.
The edges are fraying while you sew.
- Overlock or zigzag every edge before construction.
- Fuse a narrow strip of light interfacing along weak edges.
- Prevention: finish edges straight after cutting, and handle the pieces as little as possible.
The checks do not match at the side seams.
- Unpick and re-pin one side, matching the main line first.
- If there is no spare cloth, add a contrast side panel that hides the mismatch on purpose.
- Prevention: mark the matching line on each piece and cut single-layer.
The pallu ended up in the wrong place.
- Use the remaining pallu parts as cuffs, pocket or yoke trim.
- Talk to the customer honestly before deciding.
- Prevention: agree and photograph the layout with the customer before cutting.
The seams pucker on silk.
- Loosen top tension and test on a scrap.
- Change to a new, finer needle and shorter stitch.
- Prevention: test every new silk on a double-folded scrap first.
Zari is breaking along the stitching line.
- Stitch just beside heavy zari rather than through it.
- Back the zari area with soft interfacing.
- Prevention: plan seams to avoid heavy zari zones.
The garment hangs badly – too stiff or too limp.
- Change the lining weight: softer for stiff khun, firmer for limp cotton.
- Add or remove interfacing at key points.
- Prevention: make a small sample with lining before the full garment.
Beginner mistakes and myths
- Cutting before washing. The most common and most costly mistake.
- Cutting against the grain to “fit” a pattern. The garment will twist.
- Burying the pallu in a seam or a hidden area.
- Too hot an iron on silk or zari.
- Myth: “Handloom is weak.” Most handloom is strong when finished properly.
- Myth: “Silk cannot be machine-stitched.” It can, with the right needle and care.
Practice drills
- Beginner: pre-wash a metre of handloom cotton, measure it before and after, and work out the shrinkage.
- Beginner: sew three seam finishes (overlock, French, flat-fell) on scraps and compare.
- Intermediate: match a check across two pieces and a centre front.
- Intermediate: use a woven border as a hem and a cuff on a sample.
- Advanced: plan a full kurta layout on paper from a measured saree, with the pallu as the yoke.
As a hobby, for earning and for teaching
As a hobby: turning a family saree into a kurta or dress for yourself is a satisfying project. Start with an older cotton saree before you try silk.
For earning: saree conversions are a steady service at many studios. Write down what was agreed (the layout, what happens to leftovers) and photograph the cloth on receipt. Do not promise a finish date before you have seen and tested the cloth.
For teaching: teach planning before cutting. A class where learners lay out paper pieces on a real saree is worth more than one rushed garment.
Care and finishing
- Finish all inside seams neatly; heritage garments are often worn for years.
- Add a small care label: fibre, wash method, and “press on the back”.
- Hand-stitch hems on silk for an invisible finish.
- Give the customer the care advice from Module 6, Caring for handloom, silk and embroidery.
Check yourself
- Do you always pre-wash handloom cotton before cutting?
- Can you find the warp on a saree?
- Do you agree and photograph the layout with the customer first?
- Do you finish edges straight after cutting?
- Do you test stitch and tension on a scrap of the same cloth?
Key terms
- Grain – the direction of the warp threads.
- Pre-wash – washing cloth before cutting to remove shrinkage and loose dye.
- Stay-stitching – a line of stitching that stops a curve from stretching.
- Toile – a test garment in plain muslin or calico.
- French seam – a seam that encloses the raw edges inside a second seam.
- Flat-fell seam – a strong, flat seam with the edges folded under and stitched down.
- Interfacing – a support layer fused or stitched to the back of cloth.