A blouse needs 14 measurements. Six of them go all the way round the body or the arm. These are the ones that decide whether a blouse closes comfortably, so they are worth taking slowly and twice.
What you’ll learn
- Where each of the six round measurements goes.
- How to keep the tape level, and how snug to hold it.
- What each number does in the finished blouse.
- How the same measurements work on different bodies.
The six rounds
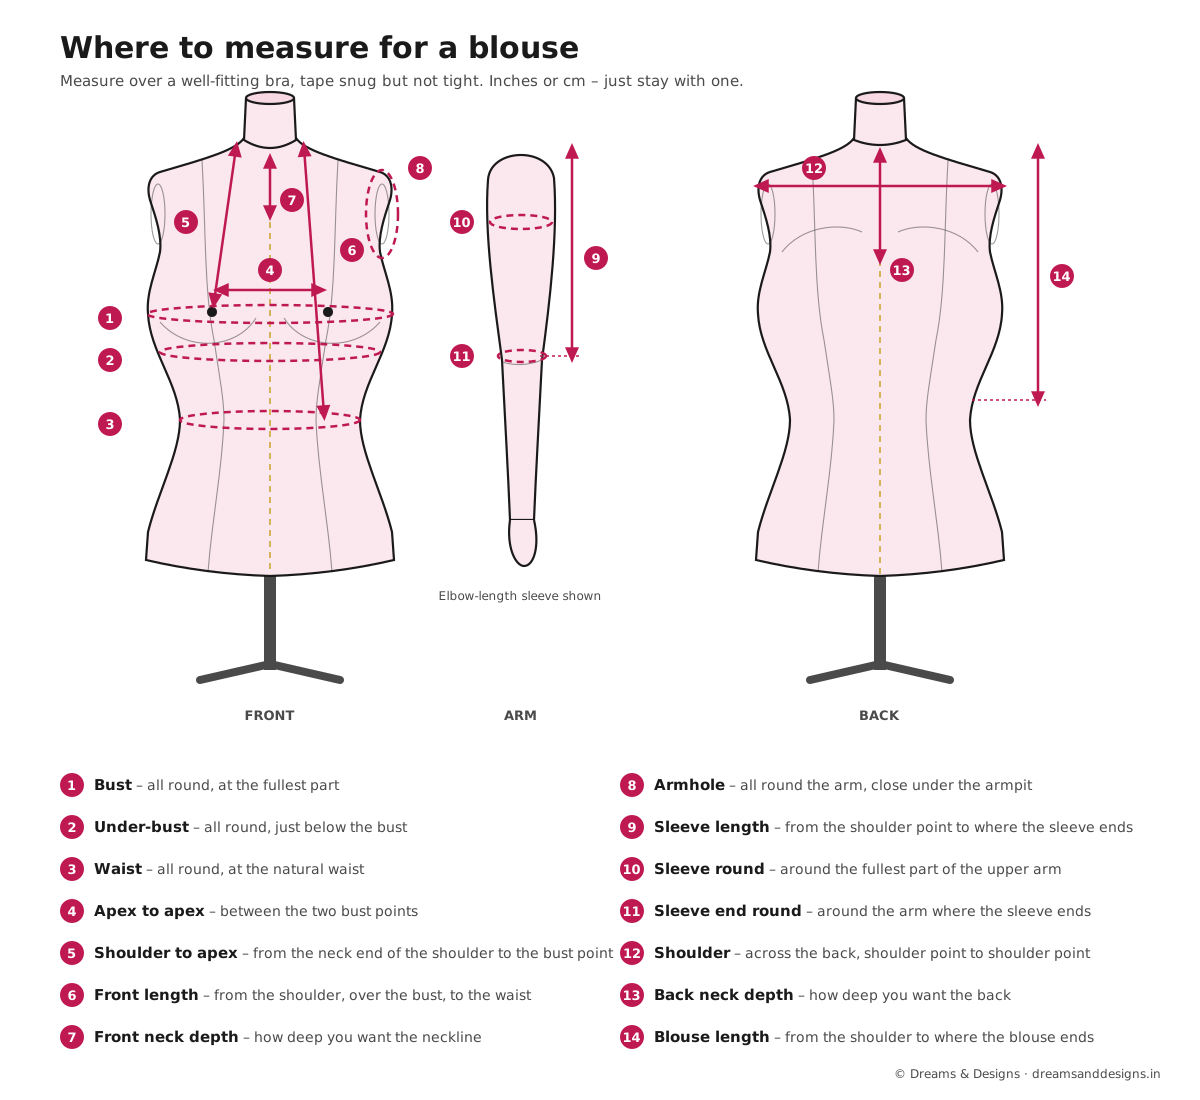
The dashed loops in the diagram go all the way round the body. Keep the tape level all the way round – check in the mirror that it doesn’t dip at the back.
- Bust (1) – around the fullest part.
- Under-bust (2) – just below the bust, where a bra band sits.
- Waist (3) – at the natural waist, the narrowest part. Don’t pull the tummy in.
- Armhole (8) – around the top of the arm, close under the armpit and over the shoulder point.
- Sleeve round (10) – around the fullest part of the upper arm. Keep the arm relaxed, not flexed.
- Sleeve end round (11) – around the arm where you want the sleeve to end.
How to take them well
- Bust: arms down. Take it across the apex at the front, and keep it level across the shoulder blades at the back. It tends to ride up at the back: check it.
- Under-bust: breathe out normally; this one sets how the blouse sits on the ribs. Snug, like a bra band.
- Waist: along the waist marker (Module 1). In a saree blouse, this is where the blouse ends or meets the petticoat, so tell the tailor if your blouse will end higher or lower.
- Armhole: let the arm hang. Pass the tape under the arm, close into the armpit but not pressing up, and over the shoulder point. Too loose, and the blouse gapes; too tight, and it cuts.
- Sleeve round: arm relaxed by the side. Many people want ½–1 in (1–2.5 cm) of room here for movement; tell the tailor, rather than adding it yourself.
- Sleeve end round: first decide the sleeve length, then measure round the arm at that point.
Give body measurements, not the measurements you want the blouse to be. The tailor adds the room (ease) for the style. If you have added room yourself, say so. See Module 6, Ease: why body and garment measurements differ.
What each round does in the blouse
| Measurement | What it controls |
|---|---|
| Bust (1) | The width of the blouse at its fullest; whether hooks close without pulling |
| Under-bust (2) | The fit under the bust; the band in a princess-cut or katori blouse |
| Waist (3) | The width at the bottom edge |
| Armhole (8) | Comfort when you lift your arms; gaping at the front |
| Sleeve round (10) | Whether the sleeve grips or moves freely |
| Sleeve end round (11) | The sleeve opening; whether your hand fits through on a fitted sleeve |
The same rounds on different bodies
- Fuller bust: take the bust and under-bust carefully; the difference between them tells the tailor how much shaping the darts or cups need. A large difference usually needs more shaping, not just a bigger blouse.
- Smaller bust: the bust and under-bust may be close. Say if you want a padded or lined blouse, as it changes the bust.
- Broad back or rounded upper back: the bust may read large because of the back, not the front. Add a back width (across the shoulder blades, armpit to armpit) so the tailor can place the width correctly.
- Fuller upper arms: measure the sleeve round at the fullest point, which may be lower than the armpit. Tell the tailor where.
- Petite: the rounds work the same, but the lengths matter more (next lesson).
- Older bodies: measure in your usual posture. If the bust has moved lower over time, the apex measurements (next lesson) matter as much as the round.
- Pregnancy and nursing: rounds change quickly. Measure close to when the blouse will be worn (Module 6).
- Seated wearers: take the rounds seated if the blouse will be worn seated: the waist round is often larger seated.
- Men and children: the same idea applies to chest, waist and arm rounds (Modules 4 and 5).
Tips, tricks and hacks
- Bust in the bra you’ll wear. A padded or push-up bra can add an inch or two and move the apex.
- Do the bust twice: arms down, then after a breath. Use the lower, relaxed reading.
- Use a mirror for every round. Turn sideways to check the back.
- Armhole hack: some tailors measure it as a straight line, armpit to shoulder point, and double it. Tell the tailor which way you used.
- Write the sleeve round with the arm relaxed. A flexed arm adds about ½ in.
- For a sleeveless blouse, the armhole is the most important round. Take it twice.
- Take a “high bust” too (across the top of the bust, under the arms) if you are making or ordering a padded blouse; some tailors use it to choose the size before shaping.
- Measure both arms. One is often a little fuller. Give the larger.
- Note any jewellery you will wear on the upper arm (vanki, armlets) if the sleeve ends there.
- Breathe out, then read. Never on a held breath.
- Don’t round down. Give the exact number; the tailor will decide.
Problems and how to fix them
The bust reads much larger than my last blouse size.
- Check the tape hasn’t ridden up at the back.
- Check the bra: a different one changes the bust.
- Prevention: measure in the same bra each time, and note the bra on the card.
The under-bust and the bust are the same.
- You may have taken the under-bust too high: move it down to where a bra band sits.
- Check the bust is at the fullest point, not the top.
- Prevention: use the diagram and the mirror for both.
My waist number seems too small.
- You may have pulled the tummy in, or pulled the tape tight. Relax, and try again.
- Check it on the waist marker, not higher.
- Prevention: breathe normally and do the one-finger test.
The armhole number changes every time.
- Keep the arm hanging, and pass the tape at the same height under the arm.
- Use the straight-line method and double it as a check.
- Prevention: measure the armhole of a blouse that fits, laid flat.
The sleeve round is very different on each arm.
- That is normal for many people. Give the larger, and note both.
- Check both are at the fullest point.
- Prevention: measure both arms every time.
I measured over a kurta.
- Measure again in thin clothes.
- If you can’t, say “over a kurta” on the card.
- Prevention: change into a thin top before you start.
The tape dips at the back.
- Ask your helper to hold it level at the back.
- Check in a side mirror or on a phone video.
- Prevention: hold the tape level at the side seams first, then tighten.
Beginner mistakes and myths
- “Add two inches so it’s comfortable.” The tailor already adds ease. Give the body measurement and say how you like the fit.
- “The waist is wherever the blouse ends.” The waist round is at the natural waist; the blouse length is a separate number.
- Measuring the bust across the top of the bust instead of the fullest part.
- Flexing the arm for the sleeve round.
Practice drills
- Six rounds, twice: take all six, rest, take them again. Every pair within ¼ in (5 mm)?
- Bra test: measure the bust in two different bras. Note the difference.
- Arm check: measure both sleeve rounds and both armholes.
As a hobby, for earning, for teaching
As a hobby: these six rounds are what you compare against any pattern’s size chart.
For earning: the bust, under-bust and armhole are where most blouse complaints start. Take them twice, every time, and write the bra on the card.
For teaching: use the diagram on a dress form first. Then pairs measure each other, and compare readings.
Names in the studio
Tailors in Bengaluru often use English names with Kannada or Hindi words mixed in. You may hear:
- Bust / chest: ede (Kannada), chhati (Hindi).
- Waist: sonta (Kannada), kamar (Hindi).
- Arm / sleeve: tolu (Kannada), baanh or aasteen (Hindi).
- Armhole: often just “armhole” or “arm round”.
Spellings vary. If a tailor’s card uses different names, match by the diagram number.
Quick quiz (with answers)
- Where does the under-bust go? Just below the bust, where a bra band sits.
- How should the arm be for the sleeve round? Relaxed, not flexed.
- Who adds ease to these rounds? The tailor. Give body measurements and say how you like the fit.
- Why give a back width on a broad or rounded back? So the tailor places width at the back, not just across the bust.
Check yourself
- Is the tape level all the way round for the bust?
- Did you measure in the bra you will wear?
- Is the under-bust smaller than the bust, at the bra band line?
- Did you take each round twice?
Key terms
- Bust: the round at the fullest part of the chest.
- Under-bust: the round just below the bust.
- High bust: the round above the bust, under the arms.
- Armhole (arm round at the top): the loop at the top of the arm.
- Back width: across the back from armpit to armpit.
Sources and uncertain points
- The six rounds and their numbers are from the first version of this course and its diagram.
- Armhole methods differ between tailors (round loop or straight line doubled). Teacher to check which the studio uses.
- The high bust and back width are added here as optional extras; teacher to check.