Some bodies change week by week: in pregnancy, after birth, while nursing, and during weight change or illness. Measuring for a changing body is about timing and adjustable design as much as numbers. This lesson shows what to measure, when, and how to plan garments that keep up.
What you’ll learn
- The extra rounds to take in pregnancy.
- When to measure for an event during or after pregnancy.
- Adjustable designs that cover several months.
- Measuring kindly during weight change or illness.
Pregnancy: what to measure
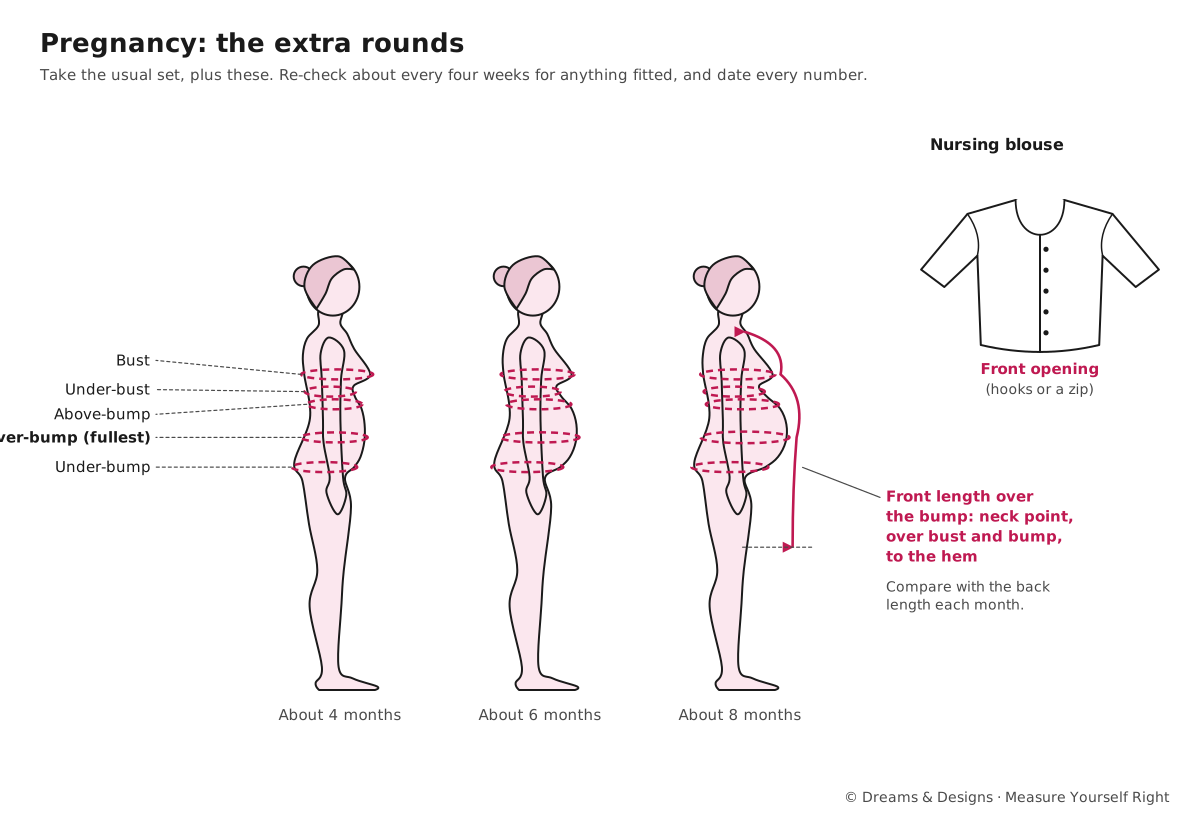
Take the usual set for the garment, plus:
- Bust and under-bust: these often grow in pregnancy, and again when milk comes in.
- Above-bump: round the body just above the bump, where empire-line garments sit.
- Over-bump (fullest): round the fullest part of the bump, tape level all round.
- Under-bump: just below the bump, where many maternity waistbands sit.
- Front length over the bump: from the neck point, over the bust and bump, to where the hem will be. Compare with the back length: the difference grows each month.
Measure seated if you’ll sit for long in the garment, and always comfortably. Stop whenever needed.
When to measure
- Through pregnancy: re-check about every four weeks for anything fitted.
- For an event (a baby shower, a wedding, a festival): measure as close to the event as the tailor can work, and choose an adjustable design.
- After birth: bodies keep changing for months. For a fitted garment, wait until you feel your shape has settled, and use adjustable designs in between.
- While nursing: the bust can change through the day. Measure at a comfortable, typical time and choose easy openings.
Designs that keep up
- Side or back ties, drawstrings and lace-ups on blouses and kurtas.
- Wide side-seam allowances to let out.
- Empire-line kurtas and dresses, fitted above the bump.
- Under-bump waistbands on petticoats, salwars and trousers; drawstring-plus-elastic.
- Front openings, zips or hidden slits for nursing.
- Stretch fabrics for fitted pieces.
- Pre-stitched sarees with adjustable waists.
Most of all, measure kindly. A changing body is not a problem: it is simply the body the garment is for, today. Keep the conversation about the garment and how it should feel.
Weight change, illness and medication
- Weight change in either direction changes the rounds first, then the lengths over the bust and tummy. Re-measure when garments start to feel different.
- Illness and treatment can change the body quickly. Measure gently, in short sessions, and choose soft fabrics and adjustable closures.
- Surgery or devices: measure around dressings, ports or stomas as they will be, and ask what openings help.
- Swelling can vary through the day; measure at the time the garment will mostly be worn.
- Keep it private: measurements are personal. Talk about the garment, never the weight.
Tips, tricks and hacks
- Date every measurement and note the week of pregnancy.
- Measure the bump level all round; it tends to drop at the back.
- A maternity bra changes the bust; measure in it.
- Measure a maternity garment that fits as a check (lesson Measuring other garments that fit).
- Ask for extra hem length at the front; the bump lifts the hem.
- Nursing openings: say which side you prefer, or both.
- Festive blouses: princess-cut with side ties adjust well.
- Keep pre-pregnancy measurements; they help plan garments for later.
- Comfort first: sit, take breaks, keep water nearby.
- Get help with lengths; bending to read the tape is hard later in pregnancy.
Problems and how to fix them
The blouse fitted last month and is tight now.
- Let out the side seams if allowance was left.
- Add side ties or a panel.
- Prevention: wide seam allowances and adjustable closures from the start.
The kurta hem rises at the front.
- Let down the front hem.
- Choose an empire line that falls from above the bump.
- Prevention: give front length over the bump and back length.
The petticoat or salwar cuts in.
- Move the waist under the bump.
- Use a wider, softer elastic or a drawstring.
- Prevention: give an under-bump round.
The garment for the event no longer fits on the day.
- Use the adjustable features.
- Ask for a last-minute fitting.
- Prevention: measure close to the event and choose adjustable designs.
Nursing is awkward in a fitted blouse.
- Add a hidden front zip or opening.
- Wear a nursing layer under a looser blouse.
- Prevention: plan the opening before cutting.
My postpartum shape keeps changing.
- Choose wrap and drawstring styles for now.
- Re-measure every few weeks.
- Prevention: delay fitted garments until your shape has settled.
Measuring is uncomfortable.
- Measure seated or lying, in short sessions.
- Measure a garment that fits instead.
- Prevention: let the person lead, and stop when asked.
Beginner mistakes and myths
- Measuring once at the start of pregnancy for something worn at the end.
- “Get back in shape” talk. There is no shape to get back to; there is the body now.
- Forgetting the front length over the bump.
- Measuring only the waist and not the under-bump.
As a hobby, for earning, for teaching
As a hobby: adapting your own garments with ties and panels through pregnancy is a satisfying, practical project.
For earning: maternity and nursing alterations and festive outfits are a real need; offer adjustable designs and planned re-measuring.
For teaching: teach adjustable features as part of every pattern; they help more people than you expect.
Garment by garment in pregnancy
- Blouses: bust and under-bust change most. Princess cuts with side ties, or blouses with wide side seams, last longest. Note the bra.
- Kurtas: empire lines, A-lines and side slits give room; give the front length over the bump.
- Sarees: tie the petticoat under the bump; drawstring plus elastic. A pre-stitched saree with an adjustable waist is quick to wear.
- Salwars and trousers: under-bump or over-bump waistbands; stretch panels.
- Lehengas: lace-up or drawstring waists; a longer choli if you prefer more coverage.
- After birth: nursing openings in blouses and kurtas; soft, adjustable waists.
Partners, family and others
- Partners and family may help with measuring; the pregnant person decides who measures and where.
- For a family event, measure everyone else as usual and the pregnant person last, closest to the date.
- Weight change in men shows first in the stomach round and the trouser waist; re-measure them, not the shoulders.
- Children’s changes are growth, not weight; see Module 5.
Practice drills
- Bump rounds: on a dress form or with a willing person, mark above-, over- and under-bump lines and measure each.
- Front against back: measure front length over the bump and back length; note the difference.
- Plan a garment: choose adjustable features for a blouse to be worn at seven months.
Quick quiz (with answers)
- Name the three bump rounds. Above-bump, over-bump (fullest) and under-bump.
- How often should fitted garments be re-checked in pregnancy? About every four weeks.
- Why give front length over the bump? The bump lifts the front hem; the tailor adds front length.
- Name two designs that adjust. Any two of: side ties, drawstrings, lace-ups, wide seams, empire lines, under-bump waistbands, nursing openings.
For readers abroad
Maternity ready-made sizes abroad usually follow your pre-pregnancy size, with room built in for the bump. Check the brand’s chart: some ask for your current bust and over-bump rounds. Made-to-measure maternity festive wear from India works best with adjustable designs, given shipping time.
Care and record keeping
- Keep a dated series of cards through pregnancy; they help plan the next garment.
- Store adjustable garments with their ties and laces loosened, so they don’t stretch.
- After pregnancy, many adjustable garments can be taken in and worn again; keep their seam allowances.
Projects to try
Adding side ties to a blouse you own; a drawstring petticoat with an under-bump waist; a nursing opening hidden in a kurta placket.
Common mistakes
- Measuring the bump with the tape dipping at the back. Check in a side mirror.
- Using pre-pregnancy blouse numbers for the bust and under-bust.
- Choosing a fitted design for an event weeks away, with no adjustable features.
- Measuring standing for a garment that will be worn mostly seated, such as at a long ceremony.
- Measuring too soon after birth for a fitted garment meant to last.
Check yourself
- Did you take above-, over- and under-bump rounds?
- Did you date the measurements and note the week?
- Does the design adjust?
- Did you plan when to re-measure?
Key terms
- Over-bump: the round at the fullest part of the bump.
- Under-bump: the round just below the bump.
- Empire line: a garment fitted just under the bust.
- Nursing opening: a hidden opening for feeding.
Sources and uncertain points
- General maternity-wear practice. “Every four weeks” is a working rule, not a standard; bodies differ a great deal.
- This lesson gives no medical advice. For anything about health, ask a doctor or midwife.
- Teacher to check: the studio’s maternity and nursing options.