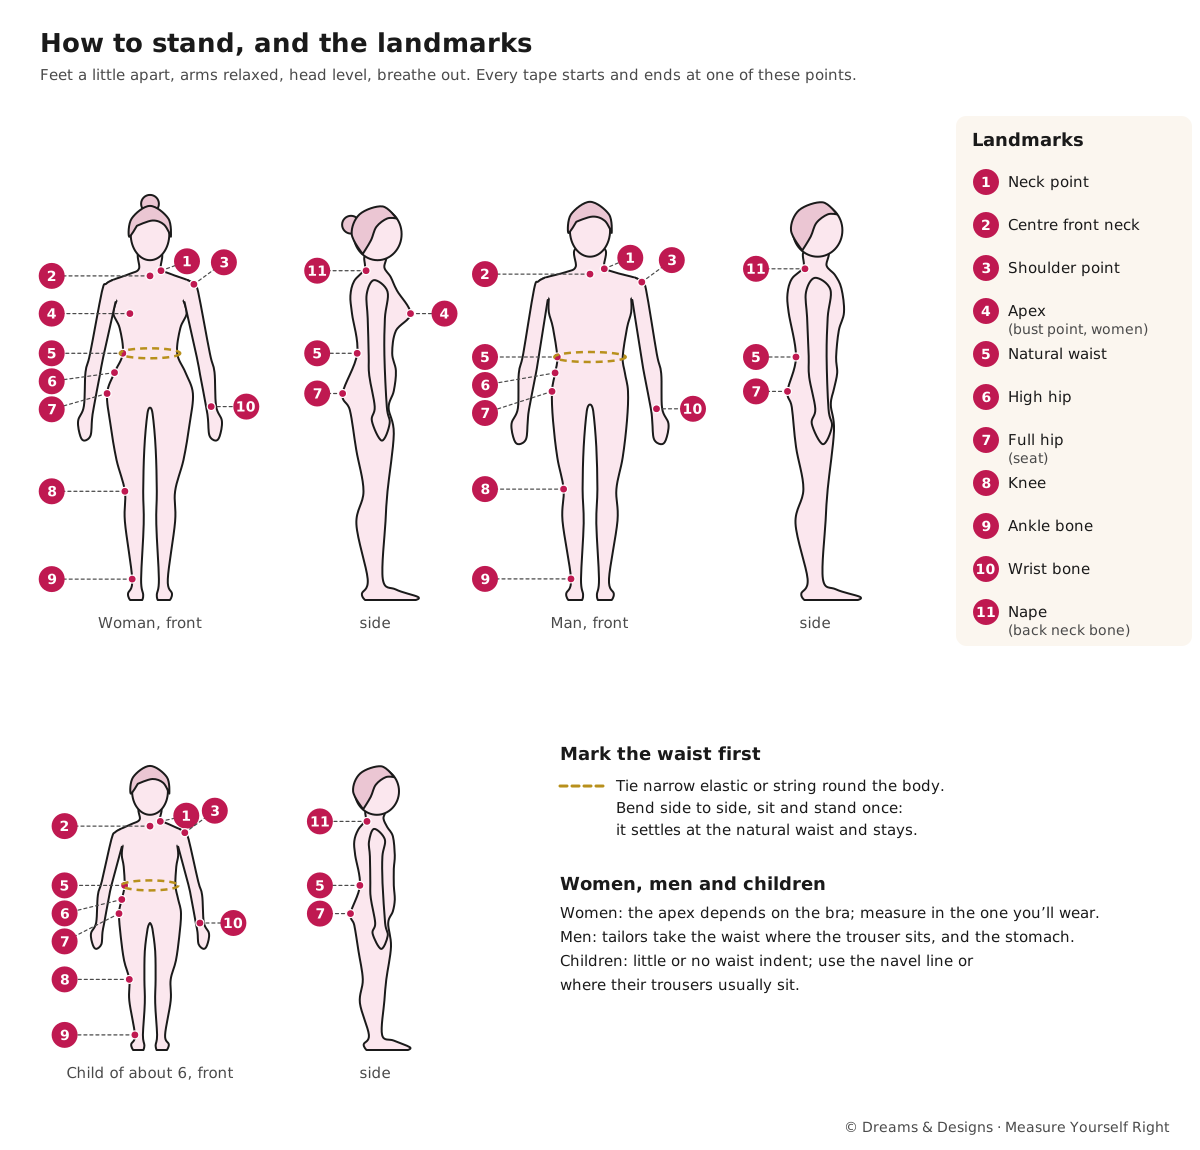
Every measurement starts and ends at a landmark: a point on the body that a tailor can find again. Find the landmarks first, and every measurement in this course becomes simple. This lesson shows how to stand, and where the landmarks are on women, men and children.
What you’ll learn
- The measuring posture, and why it matters.
- Where the main landmarks are, and how to find each one.
- How to mark the natural waist so it can’t move.
- How landmarks differ a little on men, women and children.
The measuring posture
- Feet a little apart, weight on both, on a flat floor. Barefoot, unless you are measuring a length that needs footwear.
- Arms hanging relaxed at the sides. Lift them only when a measurement asks you to.
- Head level, eyes looking straight ahead. Not down at the tape.
- Breathing normal. Measure on a relaxed breath out.
- Your usual posture, not a soldier’s one. A garment is worn by the body as it really stands.
The landmarks
| Landmark | How to find it |
|---|---|
| Neck point (shoulder at the neck) | Where the shoulder line meets the side of the neck. Shrug gently: it’s where the neck ends and the shoulder starts. |
| Shoulder point | The outer edge of the shoulder bone. Lift the arm sideways: the small dip that forms is just in from it. |
| Nape | The bone that sticks out most at the back of the neck when you bend the head forward. |
| Centre front neck | The hollow at the base of the throat, between the collar bones. |
| Apex (bust point) | The fullest point of the bust, in the bra you will wear. |
| Natural waist | The narrowest part of the body between ribs and hips. Bend to the side: it’s where the crease forms. |
| High hip | About 3–4 in (8–10 cm) below the natural waist, over the hip bones. |
| Full hip (seat) | The fullest part of the hips and seat, seen from the side. |
| Wrist bone | The bony bump on the little-finger side of the wrist. |
| Ankle bone | The bony bump on the outer side of the ankle. |
Mark the waist
Tie a length of narrow elastic or string round the body, and let it settle. Bend side to side and sit down and stand up once: it will roll to the natural waist and stay there. Now every measurement that starts or ends “at the waist” uses the same line, front, side and back.
If the garment will sit somewhere else (a saree petticoat tied lower, low-rise trousers, a men’s trouser worn under the stomach), tie a second marker where it will actually sit, and note which is which.
Women, men and children
- Women: the apex depends on the bra, so measure in the one you’ll wear. The waist is usually easy to find.
- Men: the natural waist may be higher than where trousers are worn. Tailors take both: waist (where the trouser sits) and stomach (the fullest part of the belly).
- Children: younger children have little or no waist indent. Use the line of the navel, or where their trousers usually sit (Module 5).
Tips, tricks and hacks
- Stick small dots of masking tape or round stickers on the landmarks before you start. Everyone measures from the same points.
- Use a washable fabric pen on a thin fitted T-shirt to mark landmarks you will use again.
- The shrug test finds the neck point; the lift test finds the shoulder point.
- Find the full hip from the side in the mirror; from the front it’s easy to choose too high a line.
- Look at the side seam of the waist marker: it should be level, not dipping at the back.
- Take a side photo of the posture (dressed) so you can stand the same way next time.
- Relax the shoulders with three slow breaths before measuring the shoulder and back.
- Stand on a hard floor, not a thick rug, for length measurements to the floor.
- For a child, make a game of the marker: “a belt for a superhero”.
- Write down the posture if it isn’t standing: “seated in wheelchair”, “standing with stick”.
Problems and how to fix them
I can’t find my natural waist.
- Use the side-bend crease, or the waist marker method above.
- Use a line about 1 in (2.5 cm) above the navel as a starting guide, and check it with the marker.
- Prevention: on straight or fuller figures, agree the waist line with the tailor and mark it the same way every time.
The waist marker keeps rolling up or down.
- Use a wider, softer elastic.
- Tie it over a thin fitted T-shirt rather than bare skin.
- Prevention: measure the waist round first, while the marker is fresh, then the lengths.
My shoulders are different heights.
- That is very common. Measure both sides, and note which is lower.
- Take the shoulder-to-waist length on both sides.
- Prevention: a tailor can add a little shaping or padding to balance them; tell them up front.
I keep standing straighter than I normally do.
- Walk around the room, then stop and measure.
- Ask your helper to talk to you while measuring.
- Prevention: measure as you will wear the garment, in your natural posture.
The neck point is hard to see.
- Wear a thin necklace or chain: where it rests at the side is close to the neck point.
- Tie long hair up.
- Prevention: stick a dot of tape there once you have found it.
The full hip seems to be in two places.
- Measure both, and give the larger one as the hip.
- Note the distance from the waist to each.
- Prevention: tell the tailor the shape, e.g. “fuller at the thigh”; it helps them place the width.
A child won’t stand still.
- Measure in short bursts, with play in between.
- Measure what you can now, and the rest later.
- Prevention: see Module 5, Measuring children: from baby to teen.
Beginner mistakes and myths
- “The waist is where my jeans sit.” That is your trouser line. The natural waist is usually higher.
- “Shoulder means the shoulder point.” In this course, a length starting at the “shoulder” starts at the neck point unless it says shoulder point.
- Standing to attention. The garment then fits a posture you don’t keep.
Practice drills
- Dot the landmarks on yourself with stickers, then check each in the mirror.
- Find them on someone else (with permission): neck point, shoulder point, nape, waist.
- Tie the marker and measure the waist three times on three different days. Are they the same?
As a hobby, for earning, for teaching
As a hobby: once you know your landmarks, commercial patterns and size charts start to make sense.
For earning: landmarks are what make your measurements repeatable. A client re-measured months later by someone else should get the same numbers.
For teaching: have learners find landmarks on a dress form first, then on themselves. It is less personal, and builds confidence.
Landmarks on different bodies
- Petite and tall: the landmarks are the same; only the distances change. Don’t use “standard” distances such as “the hip is 8 in below the waist”: measure them.
- Curvy figures: the natural waist is easy to see; the full hip may sit lower than expected. Find it from the side.
- Straight figures: the waist is less clear. Use the side-bend crease and the marker, and agree the line with your tailor.
- Fuller tummy: the natural waist may be above the tummy; trousers and petticoats may sit below it. Mark both lines.
- Fuller bust: the apex may sit lower or further apart than a standard block expects; dot it in the bra you’ll wear.
- Athletic shoulders: the shoulder point can be hard to see under muscle; use the arm-lift test.
- Older bodies: a rounded upper back moves the nape forward; find it with the head gently bent, then measure in natural posture.
- Pregnancy: the waist disappears as the bump grows; use under-bump and above-bump lines instead (Module 6).
- Seated: the waist marker may ride up when sitting; tie it seated if the garment is worn seated.
Names you may hear
Tailors use English names with local words. You may hear kandha (Hindi) or bhuja (Kannada) for shoulder, kamar (Hindi) or sonta (Kannada) for waist, and chhati (Hindi) or ede (Kannada) for chest. Spellings vary; ask your tailor what they call each point.
Quick quiz (with answers)
- How do you find the neck point? Shrug gently: it’s where the neck ends and the shoulder starts.
- How do you find the natural waist? Bend to the side; it’s where the crease forms. Tie a marker and let it settle.
- Where is the full hip? At the fullest part of the hips and seat, seen from the side.
- Why measure in your usual posture? The garment is worn by the body as it really stands.
Check yourself
- Can you find your neck point and shoulder point without help?
- Is your waist marker level all the way round?
- Do you know where your full hip is, seen from the side?
- Are you standing as you normally do?
Key terms
- Landmark: a point on the body that can be found again.
- Neck point: where the shoulder meets the neck.
- Shoulder point: the outer edge of the shoulder bone.
- Nape: the prominent bone at the back of the neck.
- Apex: the bust point.
- Natural waist: the narrowest part between ribs and hips.
- Seat: another name for the full hip, used especially in menswear.
Sources and uncertain points
- General tailoring practice. The high hip distance (3–4 in below the waist) varies with height.
- Teacher to check: the landmark names match those used in the D&D studio.