The back is where a blouse gets its personality – it shows the most when you wear a saree. This lesson names the classic backs, explains how deep you can go while the blouse still stays on, and shows how a tailor builds each one so it sits flat and secure.

What you’ll learn
- The classic back designs and their names.
- How deep a back can be, and what holds a deep back in place.
- How dori, keyhole, window and button backs are built.
- How to balance the back with the front neck and sleeves.
The classic backs
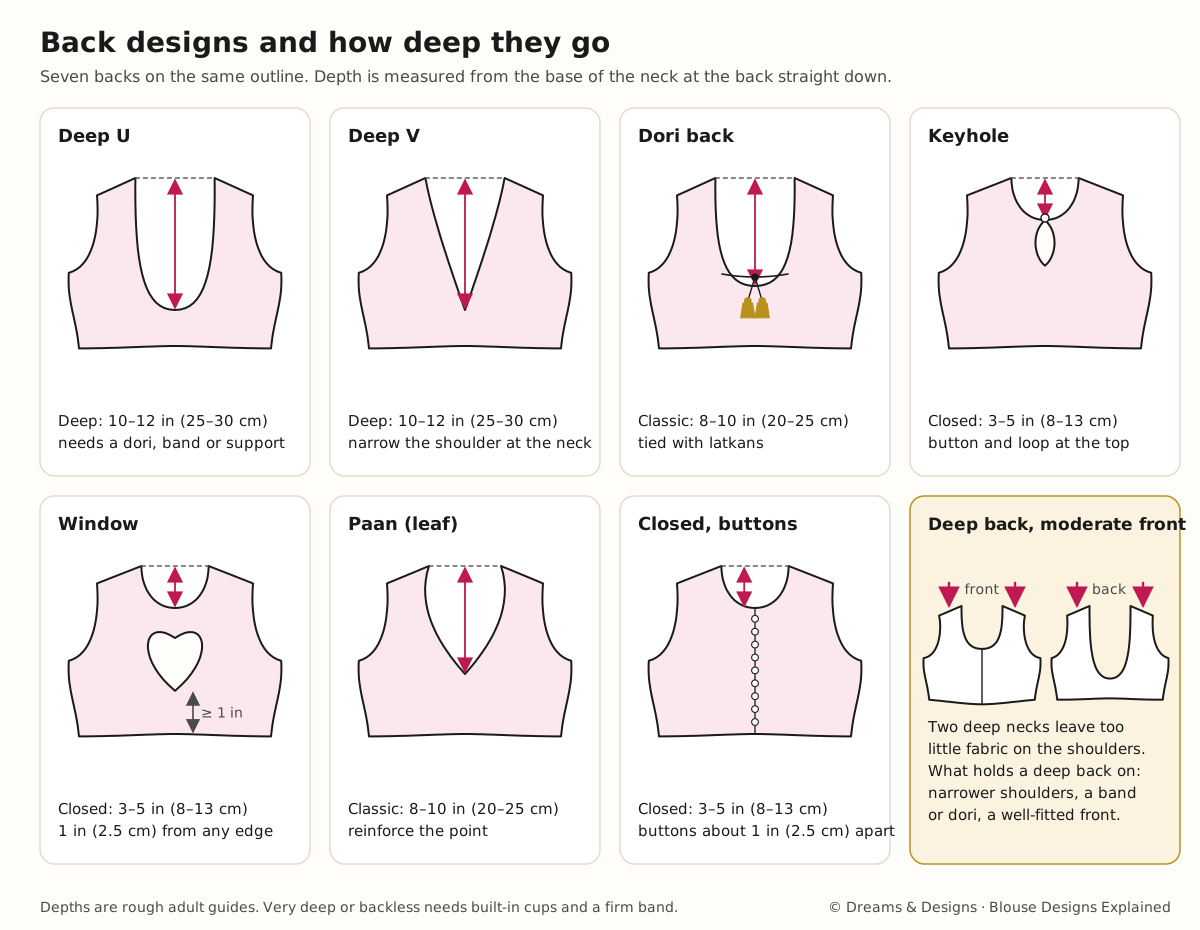
- Deep U or deep V – the classic open back.
- Dori back – an open back tied with a cord (dori), finished with latkans (tassels). You can tighten or loosen it.
- Keyhole – a small opening, often round or tear-shaped, usually with a button at the top.
- Window or cut-out – a shaped opening in an otherwise closed back.
- Paan (leaf) back – an opening shaped like a betel leaf.
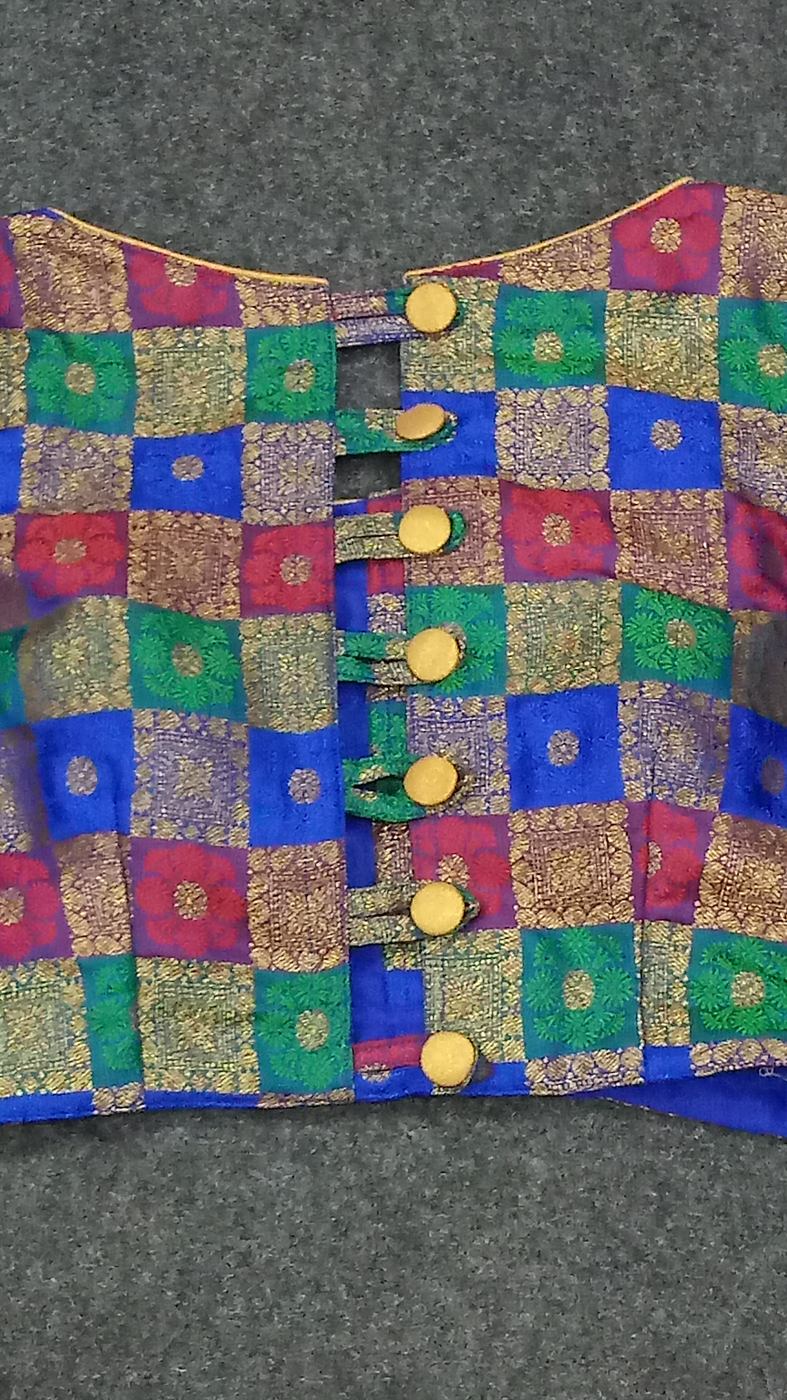
- Closed back with buttons – a high back closed with fabric loops and buttons; graceful and covered.
Photo: a back design from our studio
How deep can it go?
Back neck depth (measurement 13) is measured from the base of the neck at the back straight down. As a rough guide for an adult:
- Closed or high: 3–5 in (8–13 cm).
- Classic saree back: 8–10 in (20–25 cm).
- Deep: 10–12 in (25–30 cm). Usually needs a dori, a band or a padded front to stay up.
- Very deep or backless: past the bra line. Needs built-in cups (Module 5) and a firm band.
What holds a deep back on
The deeper the back, the less fabric there is to hold the shoulders in place. Three things do the work:
- Narrower shoulders that sit closer to the neck.
- A band or dori across the back below the opening.
- A well-fitted front, often padded or with katori cups, so the blouse is held by the bust and not by the shoulders.
The rule tailors use: deep back, moderate front. Two deep necks leave too little fabric on the shoulders.
How each back is built
Deep U or V
Cut the shape on the back fold. Stay-stitch at once. Face or pipe it, clip and understitch. Narrow the shoulder by about 0.5 in (1.5 cm) at the neck end for deep cuts.
Dori back
Sew a small fabric loop or a buttonhole at each side of the opening, at the bra line and sometimes at the neck. Thread the dori through, or stitch the dori ends firmly into the seam. Finish the ends with latkans (Module 6, Mirror work, dori, latkans and trims).
Keyhole
Draw the keyhole shape on the back facing, stitch round it, cut it out, clip, turn the facing through and press. A button and loop close the top.
Window or cut-out
The same method as the keyhole, anywhere on the back. Keep at least 1 in (2.5 cm) of fabric between the window and any edge, or it loses strength.
Paan back
A leaf-shaped opening, pointed at the bottom. Reinforce the point with tiny stitches before clipping.
Closed back with buttons
The back opens down the centre; one side has rouleau (fabric tube) loops, the other buttons. Use a facing or a placket. Space the buttons evenly, about 1 in (2.5 cm) apart.
Variations
- Sheer back: net or organza over the back, with a deep opaque neck below.
- Double dori: two cords, at the neck and the bra line.
- Criss-cross straps: fabric straps crossing the open back.
- Embroidered back: a solid back used as a canvas for aari, zardosi or Kasuti.
- Potli buttons: small round fabric or metal buttons in a row down a closed back.
- Back zip: a concealed zip down the centre back for a smooth, modern fit.
Planning, control and backs in Indian fashion
Planning a back
- Decide the occasion: a temple visit wants a moderate or closed back; a sangeet can take a dramatic one.
- Decide the support: will the wearer use a bra, clear straps, or built-in cups?
- Mark the bra line and the shoulder blades on the toile.
- Draw the shape on the toile on the wearer, with chalk or tape. Look at it in a mirror with the saree pallu over the shoulder; the pallu covers part of the back.
- Plan the closure: front hooks, a back zip, buttons or a dori.
- Plan the embroidery around the opening, keeping 0.5–1 in (1.5–2.5 cm) clear of the edge.
Control
- Handle a cut deep back as little as possible until it is stay-stitched.
- Press facings in small sections over a ham, following the curve.
- When tying a dori at the trial, tie it at the tension the wearer will actually use, not tighter.
In Indian fashion, past and present
Tied open backs have a long history in the kanchli of Rajasthan and Gujarat, the kapdu of Kutch and the kanchali of the Banjara. Closed backs with buttons were popular in the early 20th century. From the 1960s onwards, film costumes made deep and dori backs fashionable with sarees, and today the back is the most designed part of a blouse, often carrying names, motifs or whole scenes in embroidery for weddings.
Tips, tricks and hacks
- Look at it from behind in a mirror with a hand mirror, or a photo, at every trial.
- Cut the front first and fit it; then decide how deep the back can go.
- Stay-stitch deep backs at once; they stretch more than any other edge.
- Add a hidden band of fabric at the bra line inside a very deep back.
- Use bra hooks on the band of a backless blouse; they are strong and flat.
- Interface window edges so the shape stays sharp.
- Keep latkans light on silk; heavy latkans pull the back down.
- Sew dori ends in firmly, with several rows of stitching, or the knot tears out.
- Mark the bra line on the toile so the back hides the bra strap where wanted.
- Professionals pre-shape deep back facings with steam so they hug the back.
- Clear bra straps or a strapless bra are needed for very deep backs; plan with the wearer.
Problems and how to fix them
The deep back stands away from the body.
- Take in the shoulders at the neck end.
- Add a dori or band to pull the edges in.
- Prevention: stay-stitch and narrow the shoulder for deep cuts.
The shoulders slip off.
- Bring the front neck higher, or narrow the shoulders.
- Add a strap holder inside the shoulder.
- Prevention: deep back, moderate front.
The bra shows.
- Add a band or dori at the bra line to cover it.
- Build cups into the front (Module 5) so no bra is needed.
- Prevention: mark the bra line at the first trial.
The keyhole or window has a wavy edge.
- Unpick the facing, clip closer, turn and press again.
- Add interfacing to the facing.
- Prevention: stitch with short stitches round curves and clip well.
The dori tears out of the seam.
- Re-stitch with a reinforcing patch behind it.
- Move the dori to a sewn loop instead of the seam.
- Prevention: stitch dori ends with several rows, through a reinforced area.
The buttons pull and gap.
- Move the buttons slightly to relieve the strain.
- Let out the side seams.
- Prevention: space buttons closely over the fullest part of the back.
The back is uneven, one side higher.
- Check the shoulders: one may be lower. Adjust that side.
- Re-mark the back on the fold.
- Prevention: measure both shoulders; cut on the fold.
Beginner mistakes and myths
Mistakes
- Choosing a deep back and a deep front together.
- Forgetting the bra line.
- Cutting a window too close to the edge.
- Heavy latkans on a light fabric.
Myths
- “A deep back is only for slim people.” Any body can wear one; the support changes.
- “Dori backs always look casual.” With silk dori and zari latkans they are very dressy.
- “Closed backs are plain.” They are the best canvas for embroidery.
Practice drills
- Keyhole: make a faced keyhole with a loop and button on a scrap.
- Dori back: on a toile, add loops and a dori; fit and adjust.
- Window: cut and face a heart or diamond window.
- Button back: make ten rouleau loops and sew them evenly.
As a hobby, for earning, for teaching
As a hobby: a new back design is the quickest way to make a simple blouse special.
For earning: back designs are the most requested custom feature. A catalogue of the backs you make, photographed well, helps customers choose.
For teaching: teach the keyhole first (it teaches facing), then dori, then window, then buttons.
Care and finishing
- Untie dori before washing, or remove detachable latkans.
- Close hooks and buttons before washing to stop snags.
- Store deep-back blouses folded, not hung, so the back does not stretch.
Check yourself
- Can you name six back designs?
- Do you know the classic saree back depth?
- Can you say three things that hold a deep back on?
- Can you face a keyhole?
Key terms
- Dori: a cord used to tie a back.
- Latkan: a tassel or hanging ornament at the end of a dori.
- Rouleau: a thin fabric tube, used for loops.
- Paan: betel leaf; a leaf-shaped back.
- Potli button: a small round button.
Sources and uncertain points
- Back names and both figures come from the original D&D lesson.
- Teacher to check: the depth guides and the window and keyhole methods.