The katori and princess cuts are the two favourite ways to give a blouse a smooth, structured shape. Both take the shaping out of darts and put it into seams. This lesson explains how each is built, which suits which body and fabric, and how to sew the seams so the curves are smooth.
What you’ll learn
- How a katori blouse is divided into panels, and why.
- How a princess seam runs, and the two kinds.
- How both are made from a darted pattern.
- How to sew curved seams smoothly.
Before you start
- Prerequisites: Module 5, Darts: the classic blouse shaping. Both cuts are darts turned into seams.
- Difficulty: intermediate. Time: a toile in each takes an afternoon.
- Fabric: firm silk, brocade, cotton silk, khun with a good lining. Avoid very soft fabrics for a first try.
The katori cut
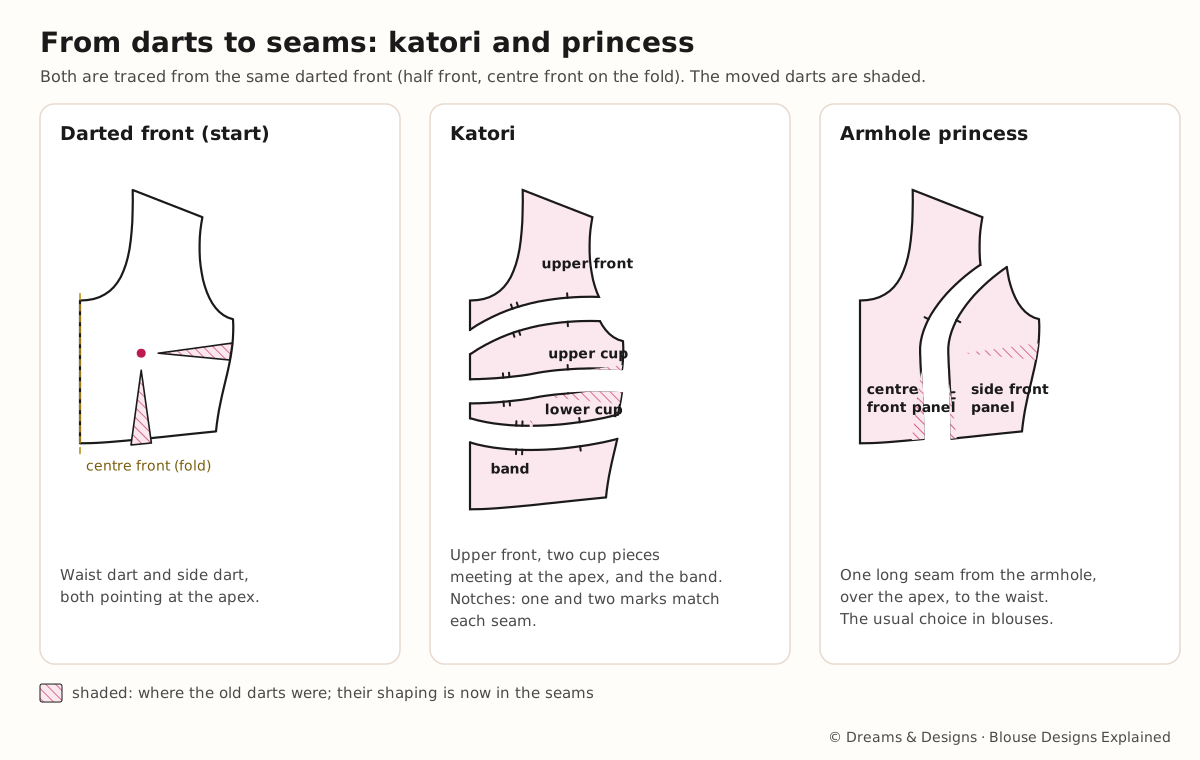
Katori means a small bowl. In a katori blouse the front is divided into:
- an upper front from the shoulder to just above the bust;
- the katori (the cup), usually two pieces on each side, upper and lower, meeting at the apex;
- a band (belt or patti) under the bust to the waist edge.
The seams around and through the cup do all the shaping, so the cup is round like a bowl. The result is a lifted, rounded, very fitted bust. It suits silk and bridal blouses, and wearers who want shape without a separate padded bra.
The princess cut
A princess seam is a long curved seam that runs over the bust point from the top of the blouse to the waist edge. There are two kinds:
- Shoulder princess: from the middle of the shoulder over the apex to the waist.
- Armhole princess: from the front armhole over the apex to the waist. Easier to fit, and the usual choice in blouses.
The seam follows the body in one smooth line. Princess cuts suit every body, are excellent for fuller busts (the seam can be shaped exactly) and make a good frame for embroidery.
Step by step: from darts to seams
- Start with a fitted darted front pattern.
- Draw the new seam lines through the apex: for princess, from armhole (or shoulder) to waist; for katori, the upper line above the bust, the band line under it and the cup line through the apex.
- Move the darts into the new lines with the slash or pivot method.
- Cut the pattern apart along the lines; smooth (true) every curve.
- Add notches on each seam so pieces match, and seam allowances, often about 0.5 in (1.5 cm).
- Make a toile and fit it. Curved seams are easy to adjust at the trial.
- Sew curved seams slowly, matching notches, with the more curved piece on top. Clip the inner curve; notch the outer curve; press over a ham.
Variations
- Single-piece katori: one cup piece per side, simpler, less rounded.
- Katori with padding: cups lined with foam or soft pads (next lesson).
- Princess with back seams: matching seams on the back for a very close fit.
- Princess crop top: the seams run to below the waist for a lehenga top.
- Corset style: many panels, sometimes with light boning in the seams.
- Contrast panels: a different fabric in the side panels or cups as a design feature.
- Uneven bust: separate left and right cup patterns.
Planning, control and fitting the cups
Planning: which cut for whom
| If the wearer wants… | Choose | Why |
|---|---|---|
| A lifted, rounded bust | Katori | The cup seams build a bowl shape |
| A smooth, long line | Princess | One seam from top to waist |
| Support for a full bust | Princess, or katori with a firm band | Seams can be shaped exactly |
| An embroidered front | Princess | Fewer seams to cross the work |
| Easy future alterations | Princess | Each seam can be adjusted |
Fitting the cups at the trial
- The cup seams should cross exactly at the apex. If they sit high or low, re-mark at the trial.
- The band should sit flat and level all round, not riding up at the front.
- Check the cups from the side: no flat spots, no points.
- Ask the wearer to sit and lift her arms: the band should stay put.
Control
- Sew one seam on each side, then compare before going on.
- Press every seam before crossing it with the next.
- Keep the same seam allowance throughout; a small difference on a curved seam changes the shape.
In Indian fashion, past and present
The katori blouse grew up in Indian tailoring, and its name is Indian. The Rajasthani kanchli is built in a similar way, with shaped bust panels, and is much older. The princess line came from Western dressmaking and became popular in Indian blouses from about the late 20th century. Today both are standard requests for silk, bridal and designer blouses.
Tips, tricks and hacks
- Notch generously. Two notches on the back seams, one on the front, so pieces never go in the wrong place.
- Stay-stitch the curves before joining.
- Sew from the top down on both sides for symmetry.
- Clip every 0.5 in on tight curves.
- Press each seam over a ham before crossing it with another seam.
- Grade seam allowances (trim one layer narrower) in the cups to reduce bulk.
- Cut the band on the straight grain so it holds firm.
- Use interfacing on the band of a katori blouse.
- Professionals keep a fitted katori block per regular customer; next time, only the style lines change.
- Topstitch princess seams on cotton for a sporty look; leave them plain on silk.
- Match patterns at the seam on stripes and checks before cutting.
Problems and how to fix them
The cup is pointed, not rounded.
- Soften the curve of the cup seam at the apex.
- Press over a ham with steam.
- Prevention: true the curves before cutting; never leave a sharp angle at the apex.
The cup is too big; it wrinkles.
- Take a little from the cup seam at the apex.
- Re-cut a smaller cup pattern.
- Prevention: fit a toile; check the apex measurements.
The princess seam is wavy.
- Unpick and re-sew, matching notches and easing evenly.
- Clip the inner curve more.
- Prevention: stay-stitch and sew slowly with the curvier piece on top.
The seams don’t sit over the apex.
- Move the seam line at the trial and re-cut.
- Check apex to apex and shoulder to apex.
- Prevention: pass every seam line through the measured apex.
The band is loose or rides up.
- Take in the band at the side seams.
- Interface the band.
- Prevention: fit the under-bust measurement closely.
Seams are bulky where they cross.
- Grade and trim allowances.
- Press seams in opposite directions where they meet.
- Prevention: plan the pressing direction before sewing.
Left and right look different.
- Compare pieces and re-cut the odd one.
- Check notches matched.
- Prevention: cut pairs folded together; label every piece.
Left-handed, and fabric notes
Left-handed?
Curved seams are easiest when the bulk of the work sits to the left of the needle for most machines. Left-handed sewers can guide the fabric with the left hand in front of the foot and steady with the right; the method is the same. Cut pattern pieces with left-handed scissors, keeping the pattern on your right.
Fabric notes
- Brocade: overlock each panel edge before joining; brocade frays fast.
- Silk: pin only inside seam allowances; use a fine, new needle.
- Velvet: cut every panel with the pile running the same way; tack seams by hand first.
- Stripes and checks: plan where they meet at each seam; chevrons at a princess seam can look striking.
Beginner mistakes and myths
Mistakes
- Cutting in silk without a toile.
- Missing notches.
- Not clipping curves.
- Mixing up left and right cup pieces.
Myths
- “Katori is only for bridal blouses.” It suits everyday silk and cotton too.
- “Princess cut can’t be altered.” It can be, at each seam, which can be even easier than a dart.
- “Katori needs padding.” It can be padded, but often isn’t.
Practice drills
- Paper first: turn a darted front into an armhole princess and a katori on paper.
- Curved seam: sew two curved scraps together smoothly.
- Princess toile: make and fit an armhole-princess toile.
- Katori toile: make and fit a katori toile.
As a hobby, for earning, for teaching
As a hobby: princess seams open up a whole world of fitted tops and dresses beyond blouses.
For earning: katori and princess blouses are popular requests, especially for weddings; doing them well sets a studio apart.
For teaching: teach princess before katori: one seam before three.
Care and finishing
- Finish curved seams with overlocking or binding.
- Press curved seams over a ham; store blouses folded with tissue in the cups.
- Never press the cups flat.
Check yourself
- Can you name the panels of a katori blouse?
- Do you know the two kinds of princess seam?
- Can you turn darts into a princess seam on paper?
- Do you clip and press curves over a ham?
Key terms
- Katori: the cup panels of a blouse; literally a small bowl.
- Band / belt / patti: the panel under the bust.
- Princess seam: a long seam over the apex.
- Notch: a matching mark on a seam.
- Grading: trimming seam allowances to different widths.
Sources and uncertain points
- General Indian blouse-cutting practice.
- Teacher to check: the katori panel layout (some systems use one cup piece, some two, some three), seam allowances, and D&D’s own katori draft.