A dart folds fabric away in one place. Pleats, gathers and tucks fold it in many small ways, adding texture and softness. On a blouse they shape the bust, add fullness to sleeves and peplums, and turn plain fabric into a design. This lesson covers the main techniques, and a short introduction to draping a blouse on the form.
What you’ll learn
- How to turn darts into pleats, gathers and tucks.
- The kinds of pleat, gather and tuck, and where each goes on a blouse.
- How to add fullness with slash and spread.
- The basics of draping a blouse on the form.
Before you start
- Prerequisites: darts and dart manipulation (Module 5, Darts: the classic blouse shaping).
- Difficulty: intermediate. Time: a sample of each takes about 20 minutes.
- Fabric: soft, light fabrics gather best (voile, georgette, chiffon, soft silk); crisp fabrics hold pleats best (cotton, taffeta, organza).
The three families
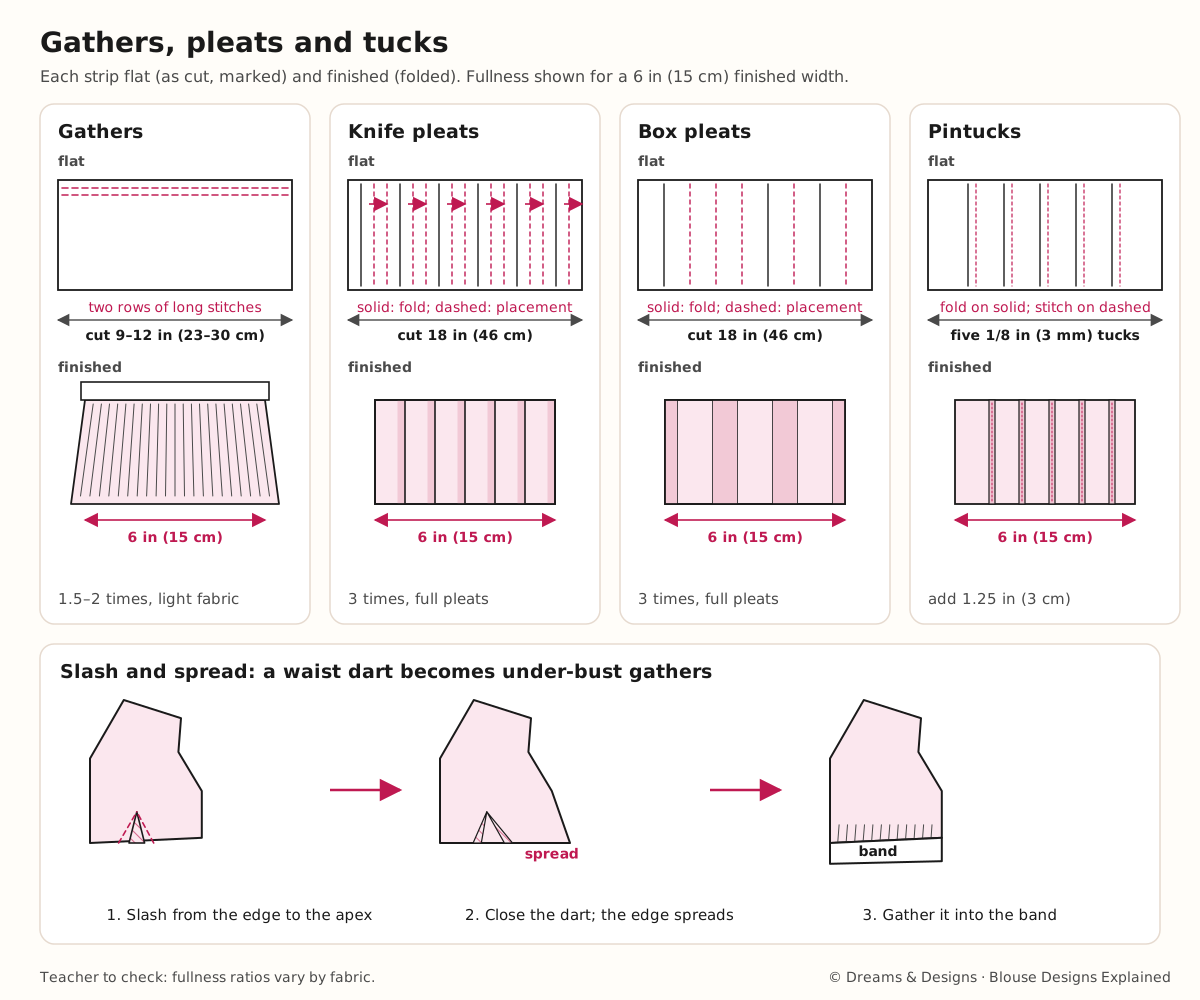
- Gathers: fabric drawn up on a thread into many tiny soft folds. Used for puff sleeves, under-bust fullness, peplums.
- Pleats: folds pressed or stitched in place in a planned pattern. Knife pleats (all one way), box pleats (two folds away from each other), inverted box pleats (two folds towards each other).
- Tucks: narrow folds stitched along their length. Pintucks are very narrow tucks, used in rows as decoration on yokes and sleeves.
Step by step: gathers instead of a waist dart
- On the pattern, close the waist dart and open the same amount at the under-bust seam (slash and spread). The pattern now has a wider edge under the bust.
- Add a little extra width for softer gathers.
- Cut, then run two rows of long machine stitches inside the seam allowance, 1/8 in (3 mm) apart, leaving long threads.
- Pull the bobbin threads gently to draw the fabric up to the length of the band it joins.
- Spread the gathers evenly, concentrated under the apex.
- Pin and stitch to the band with the gathered side on top, just inside the gathering rows.
- Remove any visible gathering threads and press the seam towards the band, never across the gathers.
More ways to manipulate fabric
Shirring and smocking
- Shirring: several rows of gathering, often with elastic thread in the bobbin. Stretchy and comfortable: good for back panels and children’s blouses.
- Smocking: fabric gathered into tiny pleats and held with decorative stitches. Traditional on children’s yokes.
Ruching
Fabric gathered along a seam on both edges so it wrinkles softly. Lovely on a sweetheart neckline or a side panel.
Cording and quilting
Cord stitched into channels, or wadding stitched between layers, gives raised lines and structure. Quilted blouses suit winter and jacket styles.
Godets, gussets and flounces
- Godet: a triangle set into a seam to add flare, as in a peplum.
- Gusset: a small diamond or triangle under the arm for movement.
- Flounce: a circular or spiral piece that ripples when sewn to a straight edge: frills on sleeves, necks and peplums.
Surface manipulation
Heat-set pleating (factory-pleated polyester), crushing, folding and bonding, and laser-cut patterns are done by machine or specialist suppliers. They are real techniques but not usually done in a tailoring studio; buy pre-pleated fabric if you need it.
Draping a blouse on the form
- Pad the form to the wearer’s measurements with wadding and a cover, so it matches her body.
- Mark the grain on a square of muslin (cheap cotton): a straight line for the lengthwise grain and one across.
- Pin the muslin at the centre front and the neck, grain lines straight.
- Smooth the fabric over the bust towards the shoulder and side; fold the extra into darts, pleats or gathers where you want them.
- Mark the seam lines with a pencil or tape.
- True it onto paper: unpin, lay flat, smooth every line with rulers, add seam allowances.
Draping lets you design shapes that are hard to draft flat: asymmetric gathers, cowl necks, draped yokes.
In Indian fashion
- Saree pleats are the most famous fabric manipulation in India: knife pleats folded by hand at every draping.
- Bengal puff sleeves use gathers.
- The Kutchi kediyu is gathered thickly under the chest.
- Anarkali and angarakha styles use pleats and gathers below a fitted bodice.
- Pintucked cotton yokes are a classic of Indian kurtas and blouses.
- Today, Indian designers use pleated organza, ruched necklines and draped blouses on sarees and lehengas.
Planning and control
Planning where the fullness goes
- Under the bust: gathers or small pleats replace the waist dart, for a soft, empire look.
- At the shoulder or yoke: gathers below a yoke give a relaxed, folk look.
- At the neckline: ruching on a sweetheart neck, or a gathered keyhole.
- In the sleeves: puffs, bishops and frills.
- At the waist: a peplum of pleats, gathers or godets.
- As decoration only: pintucks on a yoke or sleeve, which don’t shape the blouse at all.
Keep the fullness where it suits the design and away from places that need a close fit, such as the shoulders of a deep-back blouse.
Control
- Draw gathers up gradually, a little from each end, and wrap the threads round a pin in a figure of eight to hold them while you pin.
- Fold and press pleats one at a time, from the same side.
- Sew tucks all in the same direction, at the same speed, with the same guide on the foot.
Tips, tricks and hacks
- Gather with two rows, never one; they control the folds.
- Use a longer stitch for gathering, and a strong bobbin thread.
- Pull from both ends towards the middle.
- Gathers need 1.5 to 2 times the final length in light fabric, less in heavy.
- Pleats need 3 times the final width for full knife pleats.
- Mark pleat lines with snips in the seam allowance.
- Press pleats with a damp cloth and let them cool before moving.
- Sew pintucks with a twin needle and a pintuck foot for speed.
- Tack pleats across the top before joining.
- Professionals stay the gathered seam with tape so it doesn’t stretch.
- Test on a scrap of the real fabric first; every fabric gathers differently.
Problems and how to fix them
The gathers bunch in one place.
- Loosen and spread them again with a pin.
- Pin at quarters before stitching.
- Prevention: mark quarters on both edges.
The gathering thread breaks.
- Re-run the rows with a stronger thread.
- Gather over a cord with a zigzag stitch.
- Prevention: use strong bobbin thread and gather in sections.
Pleats won’t stay pressed.
- Edge-stitch the pleat folds.
- Press with a damp cloth and let them cool.
- Prevention: use a fabric that holds a crease.
Pintucks are uneven.
- Unpick and re-stitch the uneven ones.
- Use a pintuck foot as a guide.
- Prevention: mark every tuck line before sewing.
The puff sleeve looks flat.
- Add more fullness to the sleeve head.
- Add a support layer of organza or net.
- Prevention: use crisper fabric or a support layer.
The flounce doesn’t ripple evenly.
- Clip the inner edge more so it lies straight.
- Re-cut the flounce with a more circular shape.
- Prevention: cut flounces on a true circle.
The seam with gathers is lumpy.
- Trim and grade the seam.
- Press the seam towards the flat side.
- Prevention: stitch just inside the gathering rows.
Beginner mistakes and myths
Mistakes
- Too much fullness in heavy fabric.
- Pressing flat over gathers.
- Gathering with one row.
- Not marking pleat lines.
Myths
- “Gathers add bulk to any body.” Placed well, gathers give a soft, balanced line.
- “Smocking is only for children.” Smocked panels appear on adult blouses too.
- “Draping is for experts only.” A first drape is simple and teaches a lot.
Practice drills
- Sampler: make a sampler with gathers, knife pleats, box pleats and five pintucks.
- Dart to gathers: convert a waist dart into under-bust gathers on paper and in fabric.
- Puff sleeve: slash and spread a sleeve and gather it.
- First drape: drape a blouse front on a padded form.
As a hobby, for earning, for teaching
As a hobby: pintucks and smocking are relaxing, and transform plain cotton.
For earning: ruched, pleated and gathered details let a studio offer designer blouses from the same basic blocks.
For teaching: samplers first, then the dart-to-gathers exercise, then a draped design.
Care and finishing
- Iron gathers by pushing the iron point into them, not across.
- Re-press pleats after washing.
- Heat-set pleats on polyester: wash cool; heat may undo them.
Check yourself
- Can you name three kinds of pleat?
- Do you gather with two rows?
- Can you turn a dart into gathers?
- Do you know what a godet and a flounce are?
- Can you describe the steps of draping?
Key terms
- Gathers, pleats, tucks, pintucks: the three families of fold.
- Shirring, smocking, ruching: gathered textures.
- Godet, gusset, flounce: inserted and circular pieces.
- Muslin: cheap cotton for draping and toiles.
- Truing: smoothing a drape onto paper.
Sources and uncertain points
- General draping and pattern-cutting practice.
- Teacher to check: the fullness ratios (1.5–2 times for gathers, 3 times for knife pleats), which vary by fabric.