The opening decides how easily a blouse goes on, how smooth it looks and how long it lasts. Most Indian blouses close with hooks at the front, but backs, zips, buttons and ties all have their place. This lesson compares them and shows how to sew each one so it holds.
What you’ll learn
- The main closures and where each is used.
- How to plan the overlap and the spacing.
- How to sew hooks and eyes, buttons and loops, and a zip.
- How to choose a closure for comfort and for the wearer’s needs.
The closures compared
| Closure | Where | Good for |
|---|---|---|
| Hooks and eyes (or bars) | Centre front, centre back | The traditional blouse; adjustable, flat |
| Buttons and loops | Back, sometimes front | Decorative closed backs |
| Buttons and buttonholes | Front | Shirt and jacket blouses |
| Concealed zip | Side or back | Smooth fitted fronts, padded and princess blouses |
| Dori and ties | Back, side | Adjustable fit, open backs, maternity |
| Magnetic or Velcro | Front | Adaptive wear, limited hand movement |
The overlap
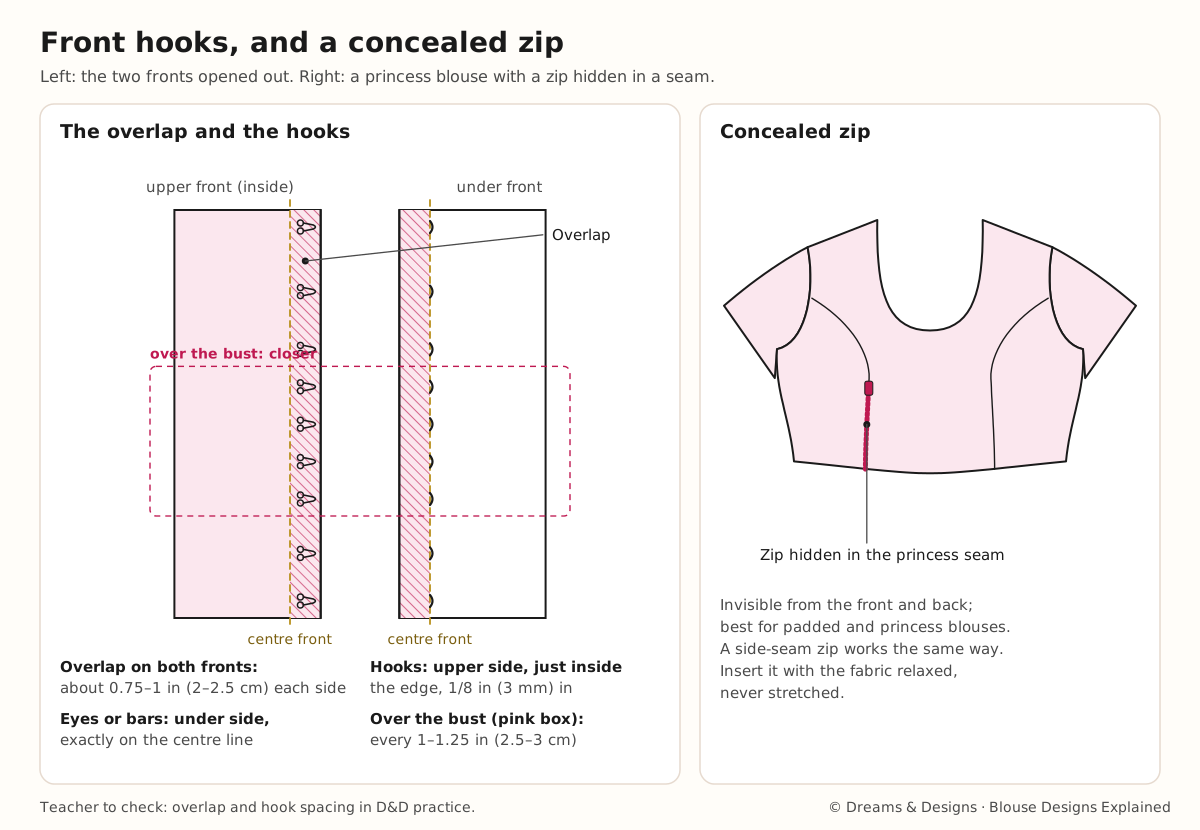
A front-opening blouse needs one side to sit under the other, so the body does not show between the hooks. Tailors add an overlap (extension) on both fronts, often about 0.75–1 in (2–2.5 cm) each side. The hooks go on the upper (outer) side, just inside the edge; the eyes or bars go on the under side, on the centre line.
Traditionally the right front laps over the left on women’s blouses (as on women’s shirts), but many Indian tailors close blouses either way. Keep the same way for a customer’s blouses so she is used to it.
Step by step: hooks and eyes on a front
- Mark the centre front on both sides and the positions of the hooks: the first just below the neck, the last just above the waist edge, the others evenly between.
- Space them closely over the bust, about every 1–1.25 in (2.5–3 cm). Gaps open where the strain is greatest.
- Sew the hooks on the upper side, 1/8 in (3 mm) in from the edge, through the facing only so the stitches do not show on the right side. Stitch round both rings and across under the hook end.
- Sew the eyes or bars on the under side, exactly on the centre line, matching each hook.
- Test-close the blouse flat before the trial: the centre lines should meet exactly.
Buttons, loops and zips step by step
Rouleau loops and buttons
- Cut bias strips about 1 in (2.5 cm) wide; stitch into a tube and turn it with a loop turner.
- Cut loops to fit the button, plus seam allowance.
- Tack the loops to the right side of one back edge, evenly spaced, before the facing is sewn. The facing seam then holds them firmly.
- Sew the buttons on the other side, on a short thread shank, matching the loops.
A concealed zip
- Leave the seam open where the zip will go; finish the edges.
- Use a concealed (invisible) zip foot.
- Press the zip teeth open with a cool iron.
- Stitch each side as close to the teeth as the foot allows, from the top down.
- Close the zip and sew the seam below it.
Ties
Cut ties on the straight grain, double-folded and stitched, or use ready dori. Stitch the ends into the seam with several rows.
Variations and choosing
- Back hooks: as front hooks, on a back opening; harder to close alone.
- Side zip: invisible from front and back; best for padded and princess blouses.
- Hidden placket: a strip behind hooks on fuller busts, so no gaps show.
- Nursing: front zips or overlapping panels.
- Adaptive: magnetic closures (check strength), large hooks, Velcro (soft side towards skin).
- For the wearer alone: front closures are easiest; back closures need help.
- Left-handed wearers may find a left-over-right lap easier; ask.
Planning, control and closures in Indian fashion
Planning the closure with the design
- Decide the closure before cutting, because it changes the pattern: a front opening needs overlaps; a side zip needs a straight, strong side seam; a back opening needs a facing or placket.
- Princess and katori blouses look smoothest with a side zip or front hooks hidden in the centre seam.
- Embroidered fronts are often better with a back or side opening, so the work is not interrupted by hooks.
- Who dresses the wearer? A bride may have help; an older wearer living alone needs a front closure.
Control
- Sew hooks with small, close stitches, pulled firm but not so tight that they pucker the fabric.
- Insert zips with the fabric relaxed, never stretched.
- Check closure lines against a ruler before the final press.
In Indian fashion, past and present
Old cholis and kanchlis were tied with strings, which also made them adjustable. Metal hooks and eyes became standard with the tailored blouse in the 20th century and are still the most common closure. Zips arrived with ready-made and designer blouses; today side and back zips are popular for fitted and padded blouses, and decorative potli buttons have come back for closed backs.
Tips, tricks and hacks
- Use strong thread (button thread or doubled thread) for hooks.
- Buy hooks a size up for heavy fabrics.
- Black hooks on dark blouses, silver on light, so they disappear.
- Interface the closure edges so they do not stretch.
- A hook at the very top keeps the neck closed; a hook at the very bottom keeps the edge straight.
- Thread bars (a bar made of buttonhole stitches) are flatter and neater than metal eyes.
- Sew buttons on a shank so the loop has room.
- Zip tape pre-shrink: press it with steam before sewing on cotton.
- Professionals sew hooks after the final trial, once the overlap is confirmed.
- Keep a few spare hooks sewn inside the side seam for future repairs.
- A small press stud at the top of a zip stops it slipping open.
Problems and how to fix them
Gaps between hooks over the bust.
- Add hooks between the existing ones.
- Add a hidden placket behind the opening.
- Prevention: closer spacing over the bust, and enough bust ease.
The hooks show on the right side.
- Re-sew them through the facing only.
- Move them a little further in from the edge.
- Prevention: catch only the inner layers when sewing.
The front edges don’t meet at the neck or waist.
- Move the hook or eye at that point to bring the lines together.
- Check the neck and waist are level on both sides.
- Prevention: mark the centre lines and test-close before the trial.
The zip ripples.
- Unpick and re-sew, holding the fabric flat without stretching.
- Add a strip of fusible stay tape to the seam edges.
- Prevention: stay the edges before sewing a zip.
The buttons pull open.
- Shorten the loops slightly.
- Use larger buttons.
- Prevention: test loop size with the actual button before sewing them all.
Hooks tear out.
- Re-sew through a small patch of interfacing.
- Move the hook to a stronger spot.
- Prevention: interface the closure edges and use strong thread.
The wearer can’t close the back alone.
- Change to a side zip if the design allows.
- Add a front closure inside a design line.
- Prevention: ask about closures when taking the order.
Beginner mistakes and myths
Mistakes
- No overlap, so skin shows between hooks.
- Evenly spaced hooks with gaps over the bust.
- Thin thread for hooks.
- Sewing hooks before the final trial.
Myths
- “Zips are modern; hooks are traditional, so hooks are better.” Each suits a different blouse.
- “Hooks can’t be adjusted.” Moving the eyes adjusts the fit slightly.
- “Back openings are more elegant.” Only if the wearer is comfortable with them.
Practice drills
- Ten hooks: sew ten hooks and thread bars on a scrap.
- Rouleau loops: make and set eight loops with buttons.
- Concealed zip: insert one in a side seam.
- Front opening: plan, mark and close a full blouse front.
As a hobby, for earning, for teaching
As a hobby: replacing tired hooks and adding a placket can save a favourite blouse.
For earning: adaptive and nursing closures are a service many customers need and few tailors offer well.
For teaching: teach hooks and thread bars first; they are needed on almost every blouse.
Care and finishing
- Close all hooks and zips before washing.
- Check hooks after every few wears; re-sew loose ones at once.
- Remove decorative buttons before machine washing or dry cleaning, if they are delicate.
Check yourself
- Do you add an overlap to a front opening?
- Do you space hooks more closely over the bust?
- Can you make a rouleau loop?
- Can you sew a concealed zip flat?
- Do you ask the wearer which closure suits her?
Key terms
- Overlap / extension: extra width so one front sits under the other.
- Thread bar: a stitched bar used instead of a metal eye.
- Placket: a strip behind or along an opening.
- Concealed zip: a zip that disappears into the seam.
- Shank: the short stem under a button.
Sources and uncertain points
- General tailoring practice.
- Teacher to check: the overlap width and hook spacing; which side laps over in D&D practice.
- Magnetic closures can affect some medical devices; anyone with an implanted device should check with their doctor.