Chiffon slides, georgette stretches, organza frays, velvet creeps and satin shows every pin hole. None of them is hard once you know the tricks. This lesson is the practical guide: how to cut, mark, stitch, seam and press each one.
What you’ll learn
- How to cut slippery fabric straight.
- Needles, threads and stitch lengths for each fabric.
- Seams that look good on sheer cloth.
- How to press without shine, marks or flattened pile.
Before you start
- Difficulty: intermediate. Make one cotton garment first.
- Time: allow about half as long again as for cotton.
- Kit: new fine needles (60–70 for sheers, 70–80 for crepe and satin, 80–90 for velvet), fine glass-head or silk pins, sharp shears or a rotary cutter, tissue or pattern paper, a pressing cloth, a velvet board or thick towel.
Cutting slippery fabric, step by step
- Cover the table with a cotton sheet or paper. Fabric grips cloth better than a smooth table.
- Find the grain. Pull a weft thread and cut along the line, or line the selvedge up with the table edge.
- Cut single layer, flipping the pattern for the second piece. Folded chiffon shifts.
- Sandwich if needed. Lay fabric on paper, pin pattern on top, and cut through all layers.
- Pin within the seam allowance only; or use weights instead of pins on satin.
- Mark with tailor’s tacks or thread, not chalk that won’t brush off.
Stitching
- Shorter stitch (about 2 mm) on sheers; normal on velvet.
- Polyester or fine silk thread.
- Start on tissue so the machine doesn’t swallow the edge.
- Hold the thread tails as you start.
- Use a straight-stitch plate or a single-hole foot if you have one.
- Walking foot for velvet and crepe; it stops layers creeping.
Seams and hems
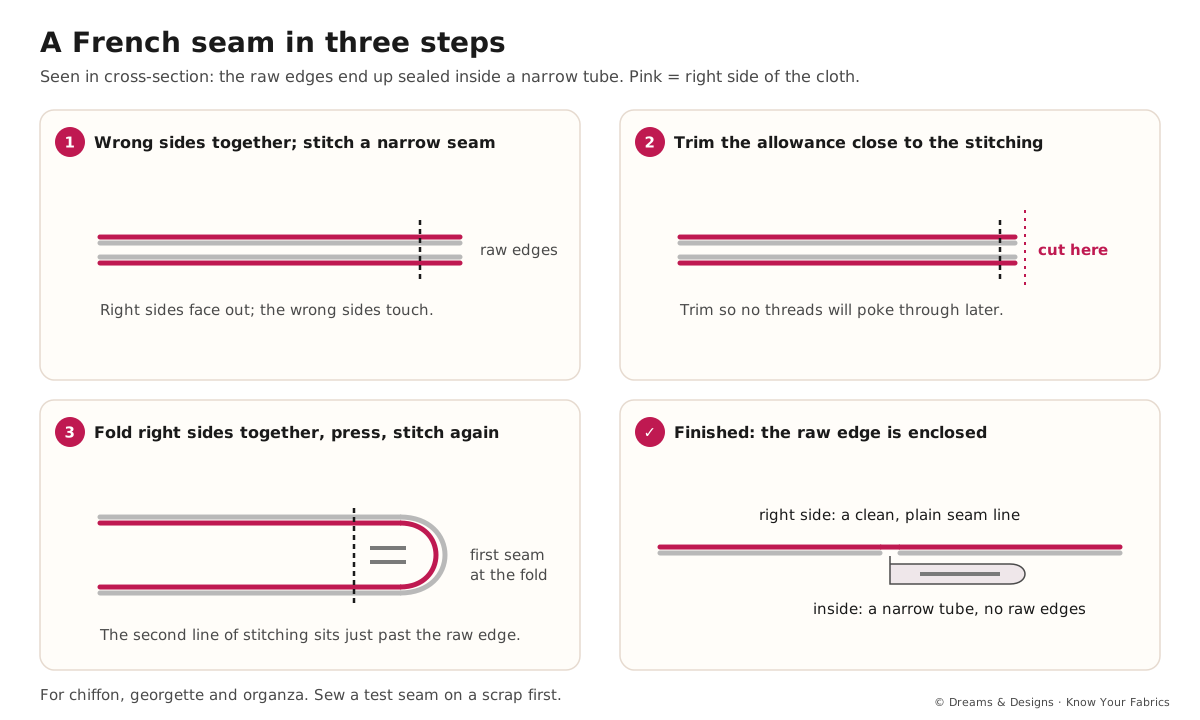
- French seam for chiffon, georgette and organza: neat inside and invisible from outside.
- Rolled hem (by hand or with a rolled-hem foot) or pico on dupattas and saree edges.
- Overlock velvet edges; it frays and sheds.
- Bias binding in self-fabric or organza for sheer necklines.
The one habit that matters most: sew a test seam on a scrap of the same fabric, with the same layers, every time. Adjust needle, stitch length and tension on the scrap, never on the garment.
Fabric by fabric
| Fabric | Main problem | Main fix |
|---|---|---|
| Chiffon | Slides, frays | Cut on paper, French seams, rolled hems |
| Georgette | Stretches on the bias | Stay-stitch, hang 24 hours before hemming |
| Crepe | Shrinks with steam, ripples | Pre-steam, walking foot |
| Organza | Frays, shows seams | French seams, narrow hems |
| Satin | Pin holes, snags, slips | Pins in seam allowance, new needle, weights |
| Velvet | Creeps, pile crushes | Hand-baste, walking foot, steam not press |
| Net | Catches, melts | Tissue under, low heat |
Tips, tricks and hacks
- Spray starch chiffon before cutting, then wash it out; it behaves like cotton for a while.
- Tape the edge: a strip of paper tape along a sheer edge holds it steady for stitching; tear it away after.
- Hang bias garments overnight before hemming; the hem drops.
- Use a pressing cloth of silk organza; you can see through it.
- Press velvet face down on a towel or a spare piece of velvet.
- Baste velvet seams by hand, then machine.
- Cut velvet with the pile running down for a lighter shade, up for richer colour – but all pieces the same way.
- Sew satin with a new needle every garment.
- Pre-shrink crepe by steaming the whole length.
- Keep hands smooth; rough skin snags satin and chiffon.
Problems and how to fix them
The fabric gets pulled into the machine
- Start on a tissue strip.
- Use a smaller needle and a single-hole plate.
- Prevention: always start sheers with tails held and tissue under.
Seams pucker
- Lengthen the stitch slightly and loosen top tension.
- Hold the fabric gently taut (not stretched) in front and behind the foot.
- Prevention: test on a scrap first, with the same layers.
The pieces are off grain after cutting
- Recut if you have fabric.
- Stay-stitch and ease to the pattern before sewing.
- Prevention: cut single layer on paper.
The hem is uneven after a day
- Hang it again and re-mark from the floor.
- Trim and re-hem.
- Prevention: hang bias and georgette 24 hours before hemming.
Velvet layers have crept
- Unpick and hand-baste.
- Use a walking foot, stitching in the direction of the pile.
- Prevention: baste every velvet seam.
Shiny marks after pressing
- Steam lightly from the back; some shine lifts.
- Brush the area gently.
- Prevention: always use a pressing cloth and a lower setting.
Pin holes show on satin
- Steam gently; small holes may close.
- Move the seam if possible.
- Prevention: pin only in the seam allowance, or use weights and clips.
Beginner mistakes and myths
- Cutting folded chiffon to save time.
- Using an old needle (“it still sews”).
- Pressing velvet like cotton.
- Myth: “Sheer fabrics need very tight tension.” They need balanced, slightly looser tension.
Practice drills
- Beginner: sew three French seams on chiffon scraps.
- Intermediate: roll-hem a 1-metre chiffon dupatta edge by hand.
- Advanced: make a lined velvet clutch with matched pile.
As a hobby, for earning, for teaching
As a hobby: start with a chiffon scarf; it teaches cutting and rolled hems in an afternoon.
For earning: neat French seams and invisible hems on party wear are what separate a professional finish from a home one.
For teaching: demonstrate cutting on paper live; learners rarely believe it works until they see it.
Check yourself
- Can you cut chiffon straight on a single layer?
- Can you sew a French seam?
- Do you know why bias garments hang before hemming?
- Can you press velvet without crushing it?
Key terms
- French seam: a seam enclosed within itself.
- Rolled hem / pico: narrow finished edges.
- Walking foot: a foot that feeds both layers evenly.
- Tailor’s tack: a thread mark.
Variations: hand sewing, left-handed and no special feet
- By hand: a small running stitch with a back stitch every few stitches works beautifully on chiffon and georgette; hand rolled hems are the finest finish of all.
- Left-handed: for hand-rolled hems, roll the edge towards you and work from left to right; for the machine, nothing changes.
- No walking foot: hand-baste velvet and crepe seams, and stitch slowly with lighter presser-foot pressure.
- No rolled-hem foot: stitch 5 mm from the edge, fold on the stitching, stitch again, trim close, fold once more and stitch.
Planning the order of work
- Pre-treat (steam or wash) and rest the fabric flat overnight.
- Cut single layer on paper, all pieces in one session.
- Stay-stitch necks and bias edges at once.
- Fuse or sew interfacing before any construction.
- Sew test seams on scraps of the same layers.
- Construct, pressing each seam as you go with a cloth.
- Hang overnight, then hem.
Control: tension, pressure and speed
- Tension: start balanced; loosen the top slightly if seams pucker.
- Pressure: lighten the presser foot for velvet and crepe, if your machine allows.
- Speed: slow and steady; fast sewing pulls sheers out of line.
- Hands: guide, don’t pull; one hand in front of the foot, one behind.
Care and finishing
- Chiffon, georgette: cold hand wash or dry-clean; dry flat; press low with a cloth.
- Organza: press on low; steam can soften silk organza’s crispness.
- Satin: press on the reverse only.
- Velvet: steam from the back; hang on padded hangers; dry-clean if heavily embroidered.
- Net: never hot; store loosely so it doesn’t crush.
Sequins, embroidered net and heavy embellishment
- Mark seam lines with thread on the right side.
- Remove sequins or beads from the seam allowance by cutting the threads (not the fabric); keep them to replace later.
- Secure loose ends next to the seam with a dab of fray stopper or a few hand stitches.
- Stitch with a zipper foot or a heavy-duty needle, slowly.
- Hand-sew the removed sequins back over the seam so it disappears.
- Line fully so nothing scratches the skin.
Never press sequins on the face; many are plastic and melt.
Pressing guide
| Fabric | Heat | Steam | How |
|---|---|---|---|
| Polyester chiffon, georgette | Low | Light | Reverse, organza cloth |
| Silk chiffon, georgette | Low to medium | Test first | Reverse, cloth |
| Crepe | Low to medium | Yes, pre-shrink | Press, don’t drag |
| Satin | Low | Little | Reverse only |
| Velvet | Medium | Yes | Face down on towel or velvet board; hover |
| Nylon net | Lowest | No | Through a cloth, quickly |
Quality checks before handing over
- Seams straight, without puckers, from the outside.
- No shine marks or pressed-in seam outlines.
- Hems even when hung, measured from the floor.
- No pin holes on satin; no crushed pile on velvet.
- Linings sitting smoothly, not peeping at the hem.
- Loose threads trimmed, inside and out.
Sources and uncertain points
- General tailoring practice; needle sizes are typical, not fixed. Teacher to check against D&D’s own studio method.