Murgi is Gavanti that climbs. It is a double running stitch worked in a zig-zag between two rows, so the finished band looks like the steps of a ladder. Like Gavanti it is reversible, and if your Gavanti is secure you can learn Murgi in one sitting.
What you’ll learn
- How Murgi uses the same out-and-back idea as Gavanti, on a diagonal.
- How to set up two guide rows and keep every slope the same.
- How to fit a band to a length, and turn it round a corner.
- How to keep the back as neat as the front.
What Murgi is
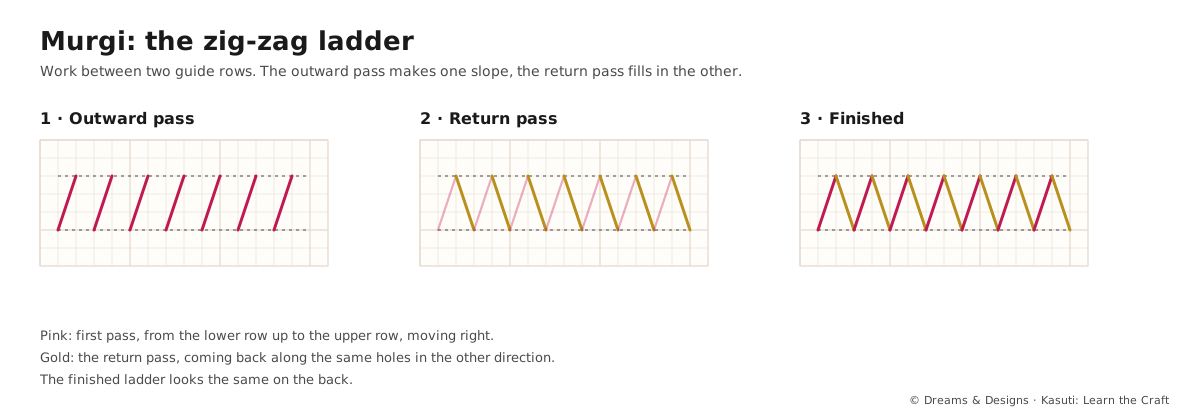
Murgi is a zig-zag double running stitch. Instead of running along one straight line, it moves up and down between two parallel rows of holes. On the way out you make every “up” slope, leaving the “down” slopes as gaps. On the way back you fill the gaps. The result is a continuous zig-zag, with even “rungs”, that looks the same on both sides of the cloth.
You may also see it spelt Muragi.
Where it is used: zig-zag borders and bands, frames around motifs, and ladder-like lines inside larger motifs. A Murgi band between two Gavanti lines is one of the most common Kasuti borders, and it is the centre of Module 6, Project 2: a Murgi band with a buti.
Why it matters
- It is the second reversible stitch. Together with Gavanti, it is what people check when they turn a piece over.
- It gives movement to a design. A straight Gavanti border is calm; a Murgi band looks lively without being heavy.
- It trains your eye for diagonals, which you need for diamonds, gopura steps and corners.
What you need
- 14-count Aida for practice, as for Gavanti.
- Stranded cotton, 2 strands on 14-count Aida. Diagonals can look thinner than straight stitches; try 3 strands if your band looks sparse.
- A size 24 tapestry needle, a hoop, small scissors, and graph paper for planning the band.
The count
A Murgi band has two measurements: its height (how far apart the two guide rows are) and the width of each slope (how far along each diagonal travels). For your first band, use guide rows 2 squares apart and slopes 2 squares across, so every diagonal climbs 2 and moves 2. On plain-weave cloth, count 2 threads for every square. Whatever you choose, every slope must be identical, or the zig-zag will lean.
Step by step: a straight band
- Mark the guide rows. Count two rows 2 squares apart, and mark the start with a pin or a tacking thread.
- Start without a knot, leaving a 1–1.5 cm tail on the back (see Module 4, Start, end and join a thread).
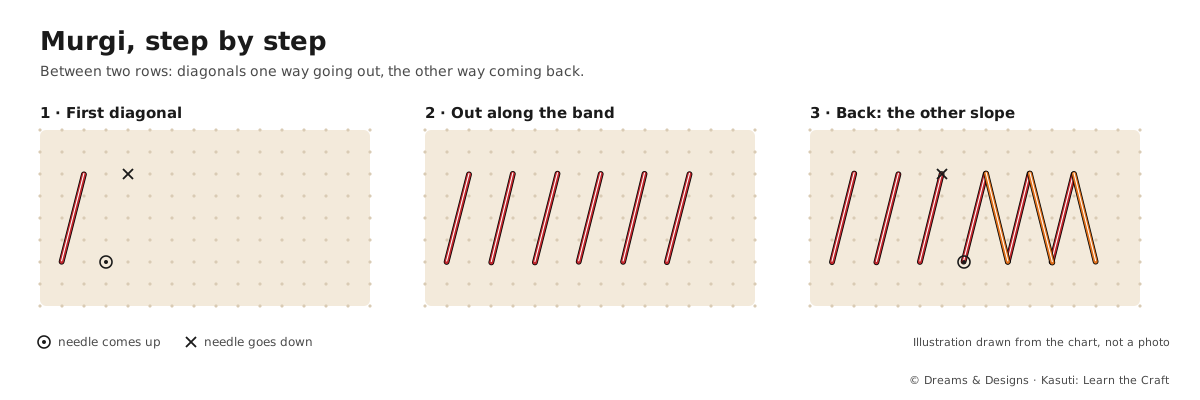
- Pass 1, the first slope. Come up on the lower row. Go down on the upper row, 2 squares to the right. That is your first diagonal.
- Along the band. On the back, move the needle down to the lower row, 2 more squares to the right, and come up there. Make the next diagonal up to the upper row. Repeat to the end of the band. You now have a row of separate slopes, all leaning the same way.
- Turn. Come up again in the hole where your last slope began, so the thread on the back lies behind that slope.
- Pass 2, the other slope. Work back along the band, filling each gap with a slope the other way. Every return stitch uses the same holes as the pass 1 slopes on either side.
- Check both sides: a continuous zig-zag, even rungs, sharp points, and the back a mirror of the front.
Lengths, corners, routes and tension
Making the band fit
One full zig and zag is one repeat. With 2-square slopes, one repeat is 4 squares long. Plan your band on graph paper so its length is a whole number of repeats. If the space is 41 squares, either use 40 and centre the band, or change the slope width. Never squeeze or stretch the last few slopes to make it fit.
Turning a corner
- Chart the corner first. Draw both bands and the corner on graph paper before you stitch.
- The neatest corners put a point of the zig-zag exactly on the corner diagonal, so the two bands meet in a clean mitre.
- Work out from the corner in both directions if you can, so any leftover length falls at the ends, not at the corner.

Murgi with Gavanti
A Murgi band is often framed by a Gavanti line above and below. Stitch the Gavanti frame first, then the Murgi inside it. Check your chart: some designs leave one square between the frame and the points; others let the points share the frame’s holes.
Routes through a motif
Inside a motif, Murgi lines behave like Gavanti lines. Plan the route in pencil, work any short branch out and back as you meet it, and never carry thread across bare cloth on the back.
Tension
Diagonal stitches pull the cloth on the bias, where it stretches most. Keep the fabric drum-tight in a hoop and pull each slope only until it lies flat. Use the same tension on both passes, or the up-slopes and down-slopes will look different.
Tips, tricks and hacks
- Two colours while learning. Pass 1 in one colour, pass 2 in another. You will see the ladder build itself.
- Tack the guide rows with a contrasting sewing thread on cloth that is hard to count. Pull the tacking out when the band is done.
- Count the slope, not the gap. Say “up two, along two” for every stitch. A rhythm keeps you on count.
- Plan in repeats. Mark every fifth repeat on your chart, so you can check your place quickly.
- Start in the middle of a long border and work out to each end, so both ends match.
- Watch the middle hole on Aida. A 2 × 2 diagonal passes over a hole in its middle. Go over it, not into it.
- Let the needle hang every few stitches. Twisted thread makes diagonals look thin and ropy.
- Use a short thread, about 40–50 cm, as for Gavanti.
- Try a taller band once you are confident: rows 3 squares apart, slopes 3 across. Taller bands show off the zig-zag on a garment.
- Stack two bands with their points facing, and you get a row of diamonds. Many Kasuti borders are built this way.
- Photograph the back after every band. Points that don’t meet show more clearly in a photo.
Problems and how to fix them
The points don’t meet: there are small gaps at the top or bottom.
- A return stitch missed the shared hole. Unpick it and put it into exactly the hole the pass 1 slope used.
- If a pass 1 slope is one square short or long, unpick back to it and redo it; don’t correct it on the return.
- Next time, check every point against the guide row as you go.
The zig-zag leans or looks uneven.
- Some slopes are wider than others. Count a few and find the odd one out.
- Unpick back to the first wrong slope and re-stitch.
- Next time, keep a steady “up two, along two” count, and check every five repeats.
The back doesn’t mirror the front.
- On the back, the thread jumped somewhere other than behind a slope. Unpick that section and re-work it.
- At the turn, make sure you came up where the last slope began.
- Next time, turn the work over after the first few repeats of every band.
The band is wavy, or the fabric pulls out of shape.
- Diagonals were pulled too tight. Ease them gently from the back with the needle tip.
- Dampen the finished piece and press from the back on a towel to settle it.
- Next time, use a hoop and lighter tension.
The band doesn’t fit the space: you are left with half a repeat.
- If only a little is left, end on a full point and centre the band by adding equal space at each end.
- If a lot is left, change the slope width so a whole number of repeats fits.
- Prevention: count the space and plan the repeats on graph paper first.
The corner looks muddled.
- Unpick back to the last full repeat before the corner.
- Chart the corner on graph paper, with a point on the mitre line, and re-stitch from the chart.
- Prevention: always chart corners before you stitch; never improvise them on the cloth.
The thread runs out halfway along the band.
- Stop with 8–10 cm left and weave it back under the last few slopes on the back.
- Start the new thread by weaving it under a few stitches of the same band, and come up in the right hole.
- Next time, stitch one repeat, see how much thread it uses, and cut enough for the whole pass.
The band looks thin or sparse.
- Add a strand: 3 strands on 14-count Aida fill the diagonals better.
- Use steeper or shorter slopes, which pack more thread into the band.
- Test both on a scrap before you start the real piece.
Left-handed?
- Work pass 1 right to left, making the slopes that lean the other way, then fill the gaps on the way back. The finished zig-zag is exactly the same.
- Don’t mirror the chart. Only your working direction changes.
- You can also turn the hoop upside down and work “left to right” on the turned piece.
Beginner mistakes and myths
Mistakes
- Learning Murgi before Gavanti. The out-and-back idea is easier on a straight line first.
- Not marking guide rows, so the band slowly drifts up or down.
- Pulling diagonals tight, which puckers the bias of the cloth.
- Starting a border at one end and finding the other end doesn’t fit.
- Carrying the thread across the back to start the next band.
Myths
- “Murgi is a different stitch from Gavanti.” It is the same double running idea, on a zig-zag path.
- “Only one slope shows on the back.” Done properly, the back shows the full zig-zag, just like the front.
- “Murgi is too hard for beginners.” It is a beginner-to-intermediate stitch. If your Gavanti is secure, you are ready.
Practice drills
- Three bands: three Murgi bands, each 10 repeats long, rows 2 squares apart, in two colours.
- The framed band: one Murgi band between two Gavanti lines.
- The diamond row: two bands with points facing, making a row of diamonds.
- The corner: a Murgi border that turns one corner, charted first.
As a hobby, for earning, for teaching
As a hobby: Murgi bands make cheerful borders on cushion covers, table runners, bag straps and cards. Try one band in several colours to see how much the colour changes the mood.
For earning: a Gavanti-framed Murgi band is a classic border for blouse sleeves, dupatta edges and saree borders. Clean, matching points on both sides are what a buyer looks for; photograph the back for every listing (Volume 2).
For teaching: teach Murgi straight after Gavanti, with two colours and pre-marked guide rows. Drills 1 and 2 make one class; the corner makes a good homework task.
Care and finishing
- Pull out tacking threads and remove pen marks before pressing.
- Trim tails only after they are woven in for 2.5–5 cm.
- Press from the back, on a folded towel, with a damp pressing cloth, so the diagonals stay raised.
- Test colour-fastness on a scrap before washing anything wearable; wash by hand, don’t wring, and dry flat (see Module 7, Caring for Kasuti).
Check yourself
- Is your zig-zag continuous on both sides?
- Are all the slopes the same width and height?
- Do the points meet cleanly at the top and bottom?
- Are there no knots and no travelling threads on the back?
- Does your band end on a full repeat?
If all five are yes, you have mastered Kasuti’s second reversible stitch.
Key terms
- Murgi (also Muragi): the zig-zag or ladder double running stitch.
- Guide rows: the two parallel rows of holes the zig-zag runs between.
- Slope: one diagonal stitch of the zig-zag.
- Point: where two slopes meet on a guide row.
- Repeat: one full zig and zag.
- Mitre: the diagonal line where two borders meet at a corner.
- Bias: the diagonal direction of a woven cloth, where it stretches most.
Sources and uncertain points
- Main source: D&D’s own ebook, chapters 6, 10, 13 and 14, with general embroidery practice.
- Sources differ on how Murgi looks: most describe straight diagonals between two rows, as taught here; some show a stepped, staircase-like zig-zag. Both are worked out and back.
- We have not found a reliable explanation of the name Murgi. If you know one from your family or teacher, tell us.
- The 2-square band in this lesson is a learning size, not a traditional rule.