Most saree and kurta fabric isn’t woven evenly enough to count. The net method gives you a temporary counting grid on top of any cloth, so you can stitch true Kasuti on a blouse, a kurta yoke or a dupatta, then pull the grid away.
What you’ll learn
- When you need the net method, and when you don’t.
- How to choose waste canvas or net, and work out the finished size.
- How to tack, stitch and remove the net cleanly.
- How to plan placement on a garment.
- How to fix the most common net-method problems.
What it is, and why it matters
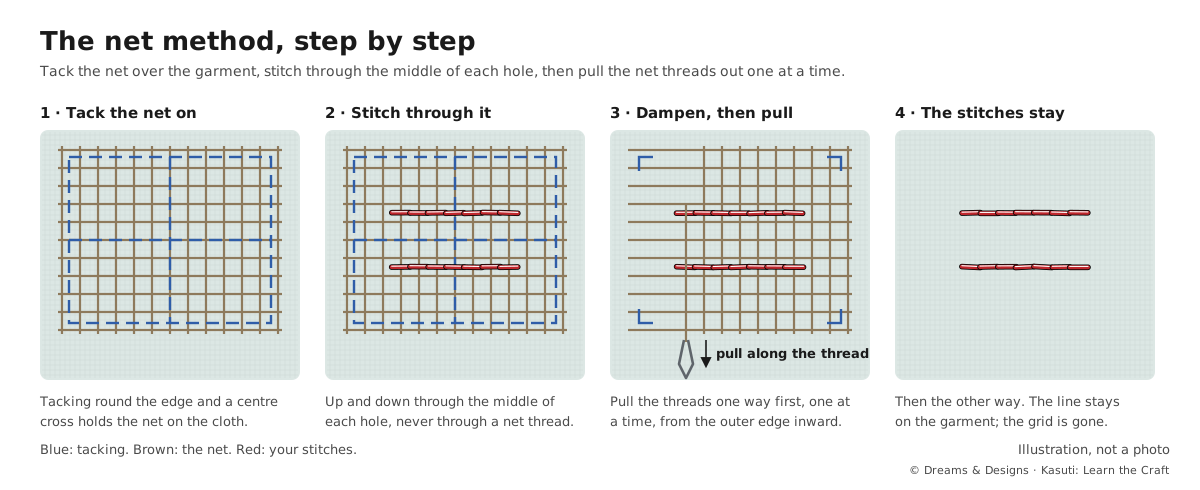
The net is a temporary counting guide. You tack it on top of the garment, stitch through both layers using the net’s holes as your grid, and then pull the net threads out one at a time. The stitches stay on the garment; the grid is gone.
It matters because most people want Kasuti on clothes they wear, not on Aida. With this method, any plain cloth – a cotton kurta, a silk blouse, a chiffon dupatta – can carry counted work.
What you need
- Waste canvas (made for this job, held stiff with a starch that softens in water) or a loose, even, square-mesh cotton net.
- The garment or garment piece, washed and pressed.
- A sharp crewel or chenille needle – you now need to pierce the garment cloth.
- Stranded cotton: 2 strands to start, 3 for a bolder line.
- Tacking thread in a contrasting colour, pins, tweezers, a spray bottle of water and a hoop.
The count
Each hole of the net is one count, just like a block of Aida. The net decides the size of your motif. Count how many holes there are in 2.5 cm (one inch). Then:
finished width (inches) = stitches across ÷ holes per inch
A motif 40 counts wide on a 10-count canvas comes out 4 inches (10 cm) wide. On a 14-count canvas, the same chart comes out a little under 3 inches (about 7 cm).
Step by step
- Tack a piece of waste canvas or loose, even cotton net over the area to embroider.
- Stitch your design through both layers, counting the net’s holes.
- When you’ve finished, dampen the area lightly and pull the net threads out one at a time with tweezers.
Careful: never use Aida as a removable guide – its threads aren’t made to be pulled out, and your stitches will loosen. Aida is a fabric you keep.
Each step in detail
- Plan the placement. Mark the centre of the area on the garment with a tacking cross. Cut the net at least 3 cm bigger than the design on every side.
- Line up the grain. Lay the net so its lines run with the straight grain of the garment. Waste canvas often has a coloured thread every few holes; line those up with your tacking cross.
- Tack it down. Pin, then tack round the edge and along the centre cross with big stitches. Firm, but not so tight that the net is caught in many places.
- Hoop both layers together. Keep them flat and tight, with no ripples between them.
- Stitch. Start from the centre, without a knot (Module 4). Bring the needle up and down through the middle of each hole, never through a net thread. Keep the tension even and a little firm.
- Remove the tacking, except a few stitches at the corners.
- Dampen. Spray the net or press a damp cloth on it until the canvas goes soft. Don’t soak the garment.
- Pull the threads. With tweezers, pull out the threads running one way first, one at a time, from the outer edge inward, pulling low and along the line of the thread. Then pull the threads running the other way.
- Finish. Take out the last tacking. Lay the piece face down on a towel and press lightly from the back.
Directions, corners and route
Gavanti, Murgi, Neyge and Menthe are worked exactly as on Aida. Plan your Gavanti route before you start (Module 3), so that the back of the garment stays clean too. Corners need extra care: the net can shift slightly at the edges, so check that the corner is still square against your tacking line before you turn.
Tension
Stitch a little firmer than on Aida. When the net comes out, there is a tiny bit of space where its threads were, and loose stitches will sag. But don’t pull so hard that the garment cloth puckers. On thin or stretchy cloth, add a light cotton backing (such as mulmul) behind the area to hold it steady.
Planning Kasuti on a garment
- Stitch before you sew. Where you can, embroider the cut piece (a blouse back, a kurta yoke, a sleeve) before the garment is stitched together. It is flatter and easier to hoop.
- Allow for seams. Keep the design clear of seam allowances, darts and hems – at least 2 cm in from any seam line.
- Think about the back. On a lined blouse, the back of your work will be covered. On an unlined dupatta, it will show, so plan your Gavanti and Murgi routes with care.
- Classic places: blouse back and sleeves, kurta yoke and neckline, dupatta edges and corners, saree border and pallu.
- Try it on paper. Draw the motif to size, cut it out and pin it to the garment. Look in a mirror before you commit.
Tips, tricks and hacks
- Test on a scrap first. Stitch a small motif on a spare piece of the same cloth with the same net, and remove the net. You’ll see the true size and how easily the net comes out.
- Use square mesh only. Hexagonal tulle or knitted mosquito net can’t be counted in straight lines and won’t unravel thread by thread.
- Cotton over nylon. Synthetic net can melt under an iron and is slippery to count. Choose cotton net or proper waste canvas.
- Bigger is better. A coarser net (fewer holes per inch) is easier to remove than a fine one.
- Pull short threads first. On a small motif, the short threads come out most easily; once they are gone, the rest loosen.
- Cut the net between motifs. For a row of separate butis, snip the net threads between them, so you pull shorter lengths.
- Tweezers with a fine, flat tip grip a single thread without catching your stitches.
- Use a water spray, not a soak. Soaking a whole garment risks colour bleed and shrinkage.
- Light behind the work. Hold the hoop up to a window to check you are going through hole centres.
- Chalk the dark cloth. On a black garment, mark the centre cross with white chalk pencil as well as tacking.
- One piece of net per motif on a large garment, rather than one huge sheet. It is easier to line up and to remove.
- Sharp needle, careful hand. Because the needle is sharp, check the back now and then that you haven’t caught a net thread by mistake.
Problems and how to fix them
The net threads won’t come out.
- Dampen the area again and wait a minute for the canvas to soften fully.
- Cut the stuck thread at both ends of the motif and pull out the short pieces from the edge inward.
- Prevention: stitch through hole centres, tack the net loosely, and never use Aida as a removable guide.
A stitch has caught a net thread.
- Snip the net thread on each side of the stitch and pull the tiny pieces out with tweezers.
- If the stitch is distorted, unpick just that stitch and redo it.
- Prevention: aim for the middle of the hole every time, and use good light.
The stitches went loose after the net came out.
- From the back, ease the slack along the line with the tip of a needle and tuck it into the end of the thread.
- If a whole line is slack, unpick and re-stitch it on bare cloth, following the holes left by the first stitches.
- Prevention: stitch a little firmer with the net in place, and test on a scrap first.
The garment cloth puckered.
- Dampen and press from the back on a towel, easing the cloth flat.
- If it is bad, ease each tight stitch with the needle from the back.
- Prevention: hoop both layers flat together, and add a light backing on thin cloth.
The motif is crooked on the garment.
- If it is small, unpick and re-stitch with the net lined up afresh.
- If it is slight, a matching border or a second motif can balance it by eye.
- Prevention: line the net with the grain and a tacked centre cross before you start.
The motif came out the wrong size.
- Measure the net: count holes per inch and recheck your sum.
- Choose a net with a different count, or scale the chart (Module 5, Reading, scaling and mirroring a chart).
- Prevention: always work out the finished size on paper and stitch a test scrap first.
The colours ran when the net was dampened.
- Rinse at once in plenty of cold water until it runs clear; don’t leave it damp and folded.
- Dry flat, quickly, away from the sun.
- Prevention: pre-wash the garment, use colourfast thread, and use a light spray, not a soak.
The net shifted while stitching.
- Stop, re-pin, and add more tacking across the area.
- Check the stitches already made against the tacked centre line; unpick any that drifted.
- Prevention: tack round the edge and through the centre cross, and hoop both layers together.
Beginner mistakes and myths
- Mistake: using a blunt tapestry needle. It won’t go through the garment cloth cleanly. Use a sharp one.
- Mistake: skipping the test scrap. The finished size and the removal are the two surprises a test prevents.
- Mistake: pulling net threads straight up. Pull low and along the line, or you may drag your stitches.
- Myth: “The net method isn’t real Kasuti.” The stitches, counting and no-knot finish are exactly the same. The net only replaces the even weave.
- Myth: “Any net will do.” Only a square, woven mesh can be counted and unravelled.
Practice drills
- Size test: on scrap cloth with your net, stitch a 10 × 10 Gavanti square. Remove the net and measure it. Check it against your sum.
- Removal drill: stitch three small diamonds in a row. Practise pulling the net out, one direction then the other.
- On a hankie: stitch a small corner motif on a cotton handkerchief with net, and finish it neatly.
- On a garment: a single buti on a kurta yoke or the corner of a dupatta.
As a hobby, for earning, for teaching
As a hobby: this is how you put Kasuti on clothes you already own. A single motif on a plain kurta or a dupatta corner makes it your own.
For earning: blouse backs, kurta yokes and dupatta borders are the most-asked-for Kasuti on garments. The net method lets you work on the customer’s own cloth. Always test the cloth for colour bleed first, agree the size on paper, and photograph the back for your records.
For teaching: teach the net method after learners have finished at least Project 1 on Aida. Give each a pre-tacked handkerchief so the first class is about stitching and removal, not setup.
Care and finishing
- After the net is out, press from the back on a towel, with a pressing cloth on silk.
- Check the back: trim any stray ends close, but leave the woven-in tails.
- For the first few washes, hand-wash the garment in cool water, on its own.
- Dry flat, away from direct sun. See Module 7, Caring for Kasuti.
Check yourself
- Did you work out the finished size before you started?
- Was the net lined up with the grain of the garment?
- Did every stitch go through the middle of a hole?
- Did the net come out cleanly, one direction at a time?
- Are the stitches still firm, with no puckering, after removal?
If all five are yes, you can put Kasuti on almost any garment.
Key terms
- Waste canvas – a stiffened, removable canvas used as a temporary counting grid.
- Net method – stitching through a tacked-on net, then pulling the net away.
- Tacking – large temporary stitches to hold layers in place.
- Grain – the direction of the threads in woven cloth.
- Backing – a light cloth behind thin fabric to steady it.
- Crewel / chenille needle – sharp needles that pierce cloth.