Kasuti uses no knots. Every thread is started, ended and joined by hiding its tail under stitches on the back, so both sides of the cloth stay clean. It is the first skill to learn, before any stitch, and the one that makes a reversible back possible.

What you’ll learn
- How to start a thread with no knot, by trapping its tail.
- How to end a thread by weaving it back under stitches.
- How and where to join a new thread so the join can’t be seen.
- Why you never carry thread across bare cloth on the back.
Why no knots
- A knot shows. On a reversible stitch like Gavanti, the back is a second finished side. A knot is a lump on it.
- A knot can pull through loose cloth, or work loose in the wash, and the stitching unravels.
- A knot makes a bump that shows through on the front when the piece is pressed or worn.
- It is the tradition. A clean, knot-free back is one of the ways people recognise skilled Kasuti.
What you need
- Your usual Kasuti kit: Aida or cloth in a hoop, stranded cotton, a tapestry needle, and small sharp scissors that cut close.
- Thread cut to about an arm’s length (40–50 cm). Shorter threads mean more starts and ends, but they twist and wear less.
Starting a thread
- Don’t knot the end of the thread.
- Bring the needle up from the back at the start of the line you are about to stitch. Leave a tail of 1–1.5 cm on the back.
- Hold the tail flat on the back with a finger, laid along the line, pointing the way you are going to stitch.
- Work your first few stitches forward along the line. On the back, they lie over the tail and hold it.
- After 4–5 stitches, turn the work over and check that the tail is caught. Trim any end that sticks out.
Ending a thread
- Stop when 8–10 cm of thread is left. Don’t stitch until it runs out.
- Take the needle to the back and turn the work over.
- Weave the needle under the last stitches on the back, following their path, for 2.5–5 cm. Don’t pierce the cloth.
- Pull gently, so the woven thread lies flat and doesn’t pucker the line.
- Trim the tail close to the stitches.
Joining a new thread
- End the old thread as above, inside a line or fill of the same colour.
- Start the new thread by weaving its tail under a few stitches on the back of the same line, then come up in the exact hole where the next stitch begins.
- Carry on stitching. The join sits inside the line, where later stitches cover it.
- Never carry thread across bare background. It shows through on the front, and it spoils the back. End and start again instead.
Practise it on its own a few times before your first project, so it becomes a habit.
Starting and ending in each stitch
Gavanti and Murgi
- Start: lay the tail along the line. Pass 1 and pass 2 both cover it on the back, so it is held twice.
- End: weave back along the back of the same line. For extra grip, take the needle through two or three of the back stitches (splitting the strands) instead of under them.
- Keep it short: 2.5 cm of weaving is usually enough on a reversible line. More makes the back of the line look thicker.
Neyge and Menthe
- Start: come up inside the area you will fill, so the first rows cover the tail.
- End: weave under the back of the fill, across two or three rows, then trim. Fills hide tails easily.
Starting next to stitches you have already made
This is the neatest start of all. Turn the work over, weave the new thread under 2.5 cm of finished stitches of the same colour, then come up where you need to begin. No tail to hold, and nothing to trap.
Two learner’s aids
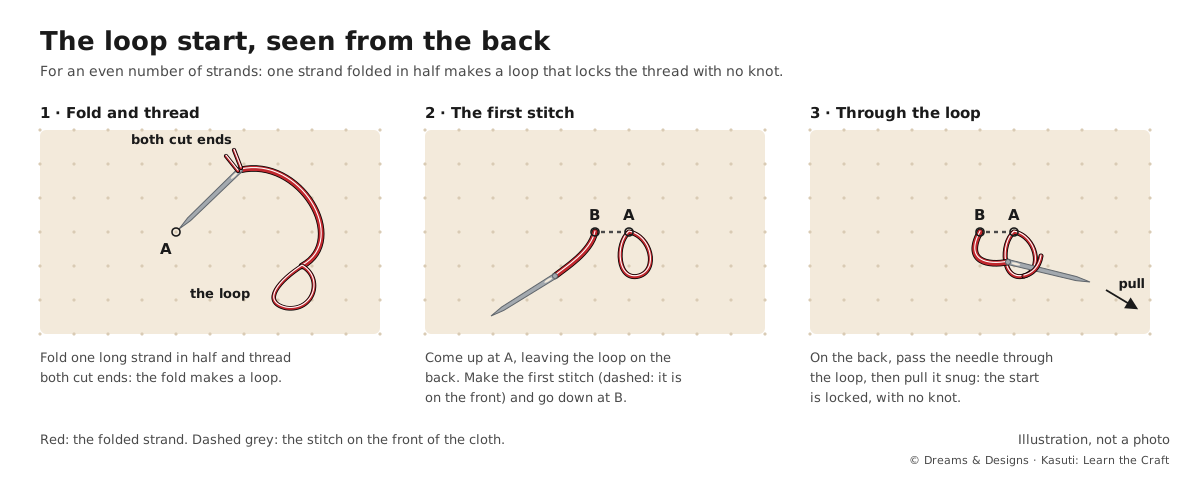
- The loop start (for an even number of strands only). Take one long strand, fold it in half and thread both cut ends through the needle. Come up, make your first stitch, and on the back pass the needle through the loop before pulling it snug. Neat and quick on Aida; for show-quality Gavanti, the woven start above is tidier.
- The away knot. Some teachers allow a knot on the front, 8–10 cm away from the start, as a temporary anchor. When you have stitched past it, cut the knot off, take the tail to the back and weave it in. No knot remains. It is not the traditional method, so move on from it as soon as you can.
Tips, tricks and hacks
- Learn this first, on its own, before any stitch. It is easier without a motif to think about.
- End at the end of a line where you can. A line that ends with a full thread is one fewer join.
- Thread a new needle before you end the old thread, so you don’t lose your place.
- Use a contrasting colour to practise. You will see exactly where the tail went.
- Change direction when ending slippery silk or rayon thread: weave back, then turn and weave a little the other way.
- Metallic threads need longer tails and short lengths. Weave them in a little further than cotton.
- Trim with the scissor points lying flat on the back, so you cut the tail, not the stitches.
- Keep a thread pot or a small box beside you for trimmed tails, so they don’t get caught in the work.
- Estimate before you cut. Stitch one motif, see how much thread it took, and cut to fit. Fewer joins, fewer chances for error.
- Never reuse unpicked thread. It is worn and kinked, and won’t lie flat or weave in well.
- Hold the work up to the light after ending. A tail that wandered onto bare cloth shows as a shadow.
Problems and how to fix them
The tail pulls out after a few stitches.
- The tail wasn’t lying along the line, so the stitches missed it. Pull it out, and start again with the tail held flat along the line.
- Use a slightly longer tail, up to 1.5 cm.
- Prevention: check the back after the first 4–5 stitches every time.
The tail sticks out on the back, or pokes through to the front.
- Trim the loose end close with sharp scissors.
- If it shows on the front, ease it back through with the needle tip from the back.
- Prevention: trim tails flat and close, and hold the tail flat while you stitch over it.
The ending unravels after washing.
- Re-thread the loose end on a needle and weave it in further, 5 cm this time.
- Split through two or three back stitches for grip, or change direction once.
- Prevention: weave at least 2.5 cm, and more on slippery threads.
The line looks thick or lumpy where you ended.
- You wove in too far, or doubled back too often. Unpick the ending and weave in a shorter distance.
- Split the back stitches rather than wrapping round them.
- Prevention: on reversible lines, 2.5 cm is usually enough.
A shadow of thread shows through the front.
- A tail or a carried thread crossed bare cloth. Unpick it, and end and restart instead.
- On light cloth, weave tails only under stitches of the same or darker colour.
- Prevention: never carry thread across background, and check against the light.
The join is visible: a gap or a double stitch.
- The new thread came up in the wrong hole. Unpick back to the join and re-start in the exact hole.
- If there is a double stitch, unpick one of the two.
- Prevention: before you end the old thread, mark the next hole with the needle tip or a pin.
The thread ran out completely, with no tail left to weave.
- Unpick one or two stitches to free enough thread, about 8 cm, then end properly.
- Re-work the unpicked stitches with the new thread.
- Prevention: stop with 8–10 cm left, every time.
Left-handed?
- If you stitch right to left, lay the tail pointing left along the line, so your first stitches still travel over it.
- Weaving in at the end is the same for everyone: follow the path of the stitches, whichever way that is.
Beginner mistakes and myths
Mistakes
- Knotting “just this once”. The habit is hard to break later.
- Stitching until the thread runs out, leaving nothing to weave in.
- Weaving in under a different colour, which can show through.
- Carrying thread to the next motif to save a restart.
- Trimming tails before checking that they are caught.
Myths
- “A tiny knot won’t show.” On a reversible piece, it shows on the back, and it can pull through.
- “No knots means the work will fall apart.” Woven-in ends hold firmly, especially once the piece has been washed and the fibres settle.
- “Joins are always visible.” A join made inside a line of the same colour can’t be found, even by the embroiderer.
Practice drills
- Five starts: start five short Gavanti lines with a trapped tail. Check each back.
- Five ends: end each of those lines by weaving back 2.5 cm. Tug each gently: none should move.
- The join: stitch one long Gavanti line using deliberately short threads, so you must join three times. Mark where the joins are on a note, then see if a friend can find them.
- The wash test: wash your practice piece by hand and check that every end held.
As a hobby, for earning, for teaching
As a hobby: a knot-free back is something you can be quietly proud of. It also makes any embroidery look better, not just Kasuti.
For earning: buyers of hand-work often turn a piece over. A clean back with no knots and no travelling threads is the quickest way to show that the work is real and careful. Photograph it for every listing (Volume 2).
For teaching: teach this before any stitch. Drills 1 and 2 make the first half of a first class. Check every learner’s back before they move on.
Care and finishing
- Before finishing a piece, turn it over and check every start and end. Trim any tail that sticks out.
- After the first wash, check again. Fibres settle and hold tails better, but a weak end shows itself now.
- Don’t press tails with a hot iron before they are trimmed; they can set in a lump.
- For washing and storing, see Module 7, Caring for Kasuti.
Check yourself
- Is there no knot anywhere on your piece?
- Is every tail caught under stitches of the same colour?
- Have you woven in at least 2.5 cm at every end?
- Are there no threads carried across bare cloth?
- Can someone else find your joins? (The right answer is no.)
If you can answer all five correctly, you are ready for any Kasuti project.
Key terms
- Tail: the short loose end of thread left on the back at the start.
- Trapped tail start: starting by stitching over the tail on the back.
- Weaving in: passing the needle under stitches on the back to secure a thread end.
- Join: where an old thread ends and a new one begins.
- Carried or travelling thread: thread taken across the back between two separate areas. Avoided in Kasuti.
- Loop start: a start for an even number of strands, using a folded strand.
- Away knot: a temporary knot on the front, cut off later.
Sources and uncertain points
- Main source: D&D’s own ebook, chapters 11, 13 and 14. The tail (1–1.5 cm), the stopping point (8–10 cm) and the weaving distance (2.5–5 cm) come from there.
- The loop start, the away knot, and splitting back stitches for grip are general embroidery methods, not recorded Kasuti tradition. The away knot in particular is not traditional.
- Whether old Kasuti embroiderers used any start other than the trapped or woven tail is not recorded in our sources.