The back of a trouser does the hard work: it covers the seat, stretches when you sit and carries most of the crotch length. This lesson drafts the back of the women’s block on the same framework as the front, checks the two pieces against each other and against the body, and tests them in a toile.

What you’ll learn
- How to draft the back block: centre-back slant, back rise, crotch extension and seat room.
- How to place the back crease, waist, dart, knee and hem.
- The six checks every block must pass on paper.
- How to cut, sew and fit a toile.
The back
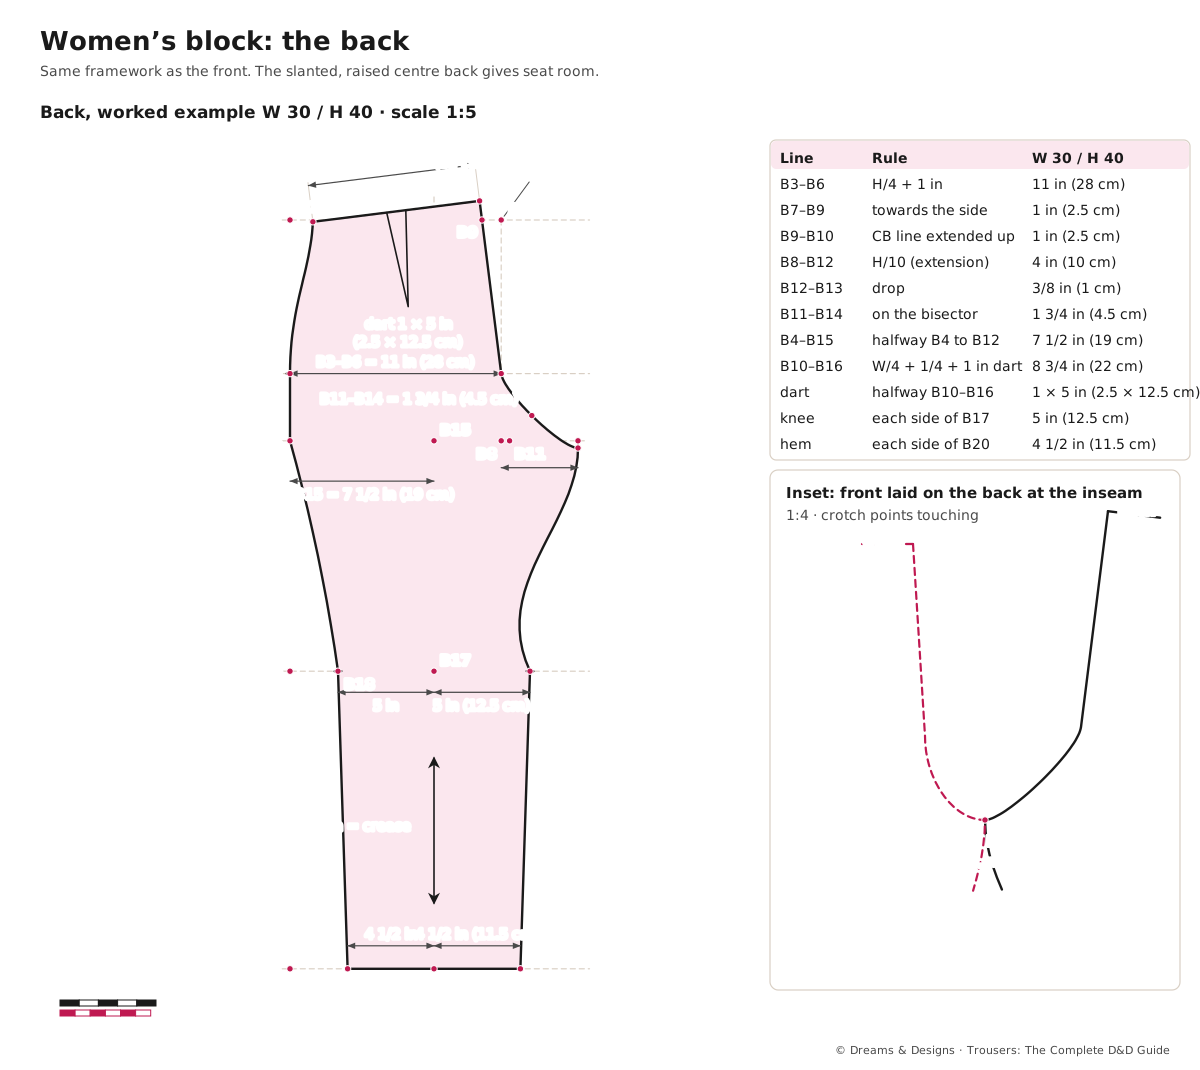
Draw the same framework as the front (points B1 to B5 at the same distances: hip line 8 in, crotch line 11 1/2 in, knee 23 1/2 in, hem 39 in), or trace it from the front.
- B3 to B6 = H/4 + 1 in = 11 in (28 cm). Square up from B6 to the waistline (B7) and down to the crotch line (B8).
- B7 to B9 = 1 in (2.5 cm) towards the side, on the waistline.
- Draw a straight line through B6 and B9. Extend it 1 in (2.5 cm) above the waistline: B10, the centre-back waist. Extend it down to the crotch line: B11. This slanted line is the centre back; its rise gives the seat room to sit.
- B8 to B12 = H/10 = 4 in (10 cm) along the crotch line. Drop 3/8 in (1 cm) below B12: B13, the back crotch point.
- From B11, draw a line into the corner, halving the angle, and mark B14 at 1 3/4 in (4.5 cm). Draw the back crotch curve from B6, through B14, to B13.
- B15 is halfway between B4 and B12: 7 1/2 in (19 cm) from B4. Square up and down through B15: the back crease and grain line.
- From B10, square a line off the CB towards the side. Along it, measure W/4 + 1/4 in ease + 1 in dart = 8 3/4 in (22 cm): B16. It lands about 1 1/4 in (3 cm) in from the side line, close to the waistline.
- Side seam: B16 to B3 with the hip curve, then straight to B4.
- Dart: halfway along B10–B16, at right angles to the waistline, 1 in (2.5 cm) wide and 5 in (12.5 cm) long.
- Knee: B17 on the crease; 5 in (12.5 cm) each side: B18 (side), B19 (inside). Back knee = 10 in (25.5 cm).
- Hem: B20 on the crease; 4 1/2 in (11.5 cm) each side: B21, B22. Back hem = 9 in (23 cm).
- Inseam: B13 to B19, curving in about 1/2 in (1.3 cm), then straight to B22. Side seam: B4 to B18 gently, then straight to B21.
The six paper checks
- Waist: (front + back, without darts) × 2 = 31 in (79 cm): 1 in ease over 30. ✔
- Hip: (10 + 11) × 2 = 42 in (106.5 cm): 2 in ease over 40. ✔
- Crotch seam: front about 12 3/4 in (32.5 cm) + back about 15 in (38 cm) = about 27 3/4 in (70.5 cm), 1 1/4 in over the body’s 26 1/2 in. ✔
- Inseams: the back may be up to 1/4 in (6 mm) shorter than the front; ease it in between crotch and knee. More than that, raise B13 slightly.
- Side seams: front and back the same length from waist to hip line. True them by moving B16 up or down.
- Joins: lay front and back together at the inseam; the crotch curves must flow into one smooth curve, and the waistline must meet the CB and CF at right angles.
Knee: 9 + 10 = 19 in (48 cm); hem: 8 + 9 = 17 in (43 cm), wider than the 12 1/2 in heel-to-instep. ✔
A standard method: a D&D teacher checks the figures before you rely on them.
The toile, step by step
- Trace front and back, add 1 in (2.5 cm) seam allowance at side seams, inseams and centre back (for fitting), 3/8 in (1 cm) at the crotch curves, and 1 1/2 in (4 cm) at the hem. Leave the waist with 3/8 in.
- Cut in calico or a cotton of similar weight to the final fabric, on the straight grain.
- Draw on the cloth with a felt pen: hip, crotch and knee lines, and both crease lines.
- Sew darts, side seams and inseams with a long stitch; then the crotch seam. Staystitch the waist and pin on a 1 in (2.5 cm) petersham or tape band. Use a short zip or pins at the CF or side.
- Fit, standing, in the shoes to be worn. Check that the hip and knee lines are level and the creases hang straight down from front and back.
- Then sit, squat, climb a step and walk. Mark pulls and folds with chalk; pin out extra cloth.
- Photograph front, side and back.
- Transfer every change to the paper block, one change at a time, and sew a second toile if the change was more than 1/2 in (1.3 cm).
Fit problems and their pattern fixes are in The crotch curve: shaping and testing and Fit changes on paper; the master list of symptoms is in Module 3.
Why the back is drafted this way
- The CB slant: the seat sticks out behind the body; tilting the CB and lifting it 1 in gives more length over the seat, so the trouser does not pull down when sitting.
- The wider back (H/4 + 1 in): room for the seat and for sitting.
- The longer extension (H/10): the back extension wraps under the seat; it is always longer than the front.
- The 3/8 in drop at B13: it balances the inseam lengths and lets the back crotch sit closer under the body.
- The bigger dart: the back has more waist-to-hip shaping than the front, because of the seat.
Variations
- Two back darts: for a waist-to-hip difference over 12 in (30 cm), use two darts of 3/4 in (2 cm), 1 1/2 in (4 cm) apart.
- Full or flat seat: adjust after the toile, using Fit changes on paper.
- Back yoke: for jeans, move the dart into a yoke (see Darts, pleats and yokes on paper).
- Stretch woven: reduce hip ease to 1 in (2.5 cm), shared between front and back.
- Lined block: draft the lining from the block, with 1/4 in (6 mm) extra at the side seams.
Tips, tricks and hacks
- Draw the back on the front framework in a second colour; it guarantees matching lines.
- Measure the curves, not the straight lines, when checking crotch length: tape on its edge, following every curve.
- Hold front and back together at the inseam against a window to check the joined crotch curve.
- Walk the side seams together with a pin as a pivot; mark the notch at the hip line on both.
- Use a felt pen grid on the toile; pull lines show at once against straight lines.
- Use a long stitch on toiles so they unpick quickly for changes.
- Professionals fit with wide seam allowances at the CB and inseam, so they can let out as well as take in.
- Fit the back in a mirror and a photo; nobody can see their own back crotch.
- Keep the first toile labelled with the date and the changes, even after the second.
- Change one thing per toile where time allows; you will know what worked.
- Sit on a hard chair for the sitting test; a sofa hides problems.
Problems and how to fix them
Back waist dips when sitting
Cause: not enough back rise or seat room.
- Raise B10 by 1/2 in (1.3 cm) and redraw the waist.
- Lengthen the back crotch extension by 1/4–1/2 in (6–13 mm).
- Prevention: sit-test every toile on a hard chair.
Folds under the seat
Cause: too much back length or crotch depth for a flatter seat.
- Pin out a horizontal fold below the seat and transfer it to the pattern.
- Shorten the back extension by 1/4 in (6 mm).
- Prevention: use the flat-seat change in Fit changes on paper.
Inseams will not match
Cause: back crotch point dropped too far, or inseam curve too deep.
- Raise B13 by 1/8 in (3 mm) at a time.
- Reduce the inseam hollow.
- Prevention: check inseam lengths before cutting the toile.
Side seams swing forward or back
Cause: front and back widths not balanced for this body, or creases off the grain.
- Move 1/4 in (6 mm) of width from front to back (or back to front) at the side seam.
- Check the creases are on the straight grain.
- Prevention: draw the side seam on the toile and check it is vertical.
Back dart pokes out
Cause: dart too short or too wide.
- Lengthen the dart towards the fullest point of the seat.
- Split it into two smaller darts.
- Prevention: no single dart over 1 1/4 in (3 cm).
The waist gapes at the CB
Cause: swayback, or the CB slant too steep for this body.
- Pin out a wedge at CB below the waist and transfer it.
- Take the extra into the CB seam.
- Prevention: check the side view at measuring.
Toile fits, final trouser does not
Cause: toile cloth very different from the final fabric.
- Make the toile in a cloth of similar weight and stretch.
- Re-fit in the final fabric, basted, before topstitching.
- Prevention: choose the toile cloth to match the fabric.
Beginner mistakes and myths
- Skipping the toile because the maths looks right. Fabric does not follow paper exactly.
- Fitting only standing. Most trouser problems show when sitting.
- Myth: “The back is just the front made bigger.” Its shape, slant and extension all differ.
- Changing several things at once between toiles.
Practice drills
- Easy: draft the back at quarter scale over your quarter-scale front.
- Medium: run the six paper checks on your full-size block and write the results on it.
- Medium: sew a toile and fit it with a partner; photograph and mark it.
- Hard: make two toiles with one change between them; describe the difference in writing.
For hobby, earning and teaching
As a hobby: the toile is where your trouser becomes yours. Keep it; it is a record of your body.
For earning: some studios include a toile fitting in made-to-measure orders and build it into the time estimate (see Module 12 on costing as a method).
For teaching: pair learners to fit each other’s toiles with checklists. Teach them to describe what they see before suggesting a fix.
Care and finishing
- After the last toile, true every seam on the paper and copy the block onto card.
- Store the final toile folded with the block, labelled.
- Write the tested date on the block; re-check it if the body changes.
Sources and uncertain points
- A standard, widely taught method, written for this book; D&D has no drafting method of its own. Schools vary the CB slant (3/4–1 1/4 in), the back extension (H/10 to H/8) and the drop at the crotch point (1/4–1/2 in).
- The crotch seam lengths quoted are measured on our draft and rounded; yours will vary a little with how the curves are drawn.
- All figures are for a D&D teacher to check on a toile.
Check yourself
- Can you draft the CB slant and back rise?
- Do you know why the back extension is longer than the front?
- Can you run the six paper checks?
- Do you sit, squat and walk in every toile?
- Do you transfer toile changes to the paper one at a time?
Key terms
- Back rise: the extra height at the CB waist above the waistline.
- CB slant: the angle of the centre-back seam, giving seat room.
- Toile (muslin): a test trouser in cheap cloth.
- Pull lines: creases that show where cloth is short.
- Easing: sewing a slightly longer edge to a shorter one without pleats.