Not every trouser needs a front fly. Cigarette pants, many women’s evening and festive trousers, and some Indian straight pants close with a zip in the left side seam (or sometimes the centre back), leaving a smooth front. This lesson covers the two ways to put in that zip: the lapped zip, a classic with a small fold of cloth over the teeth, and the invisible zip, which disappears into the seam.
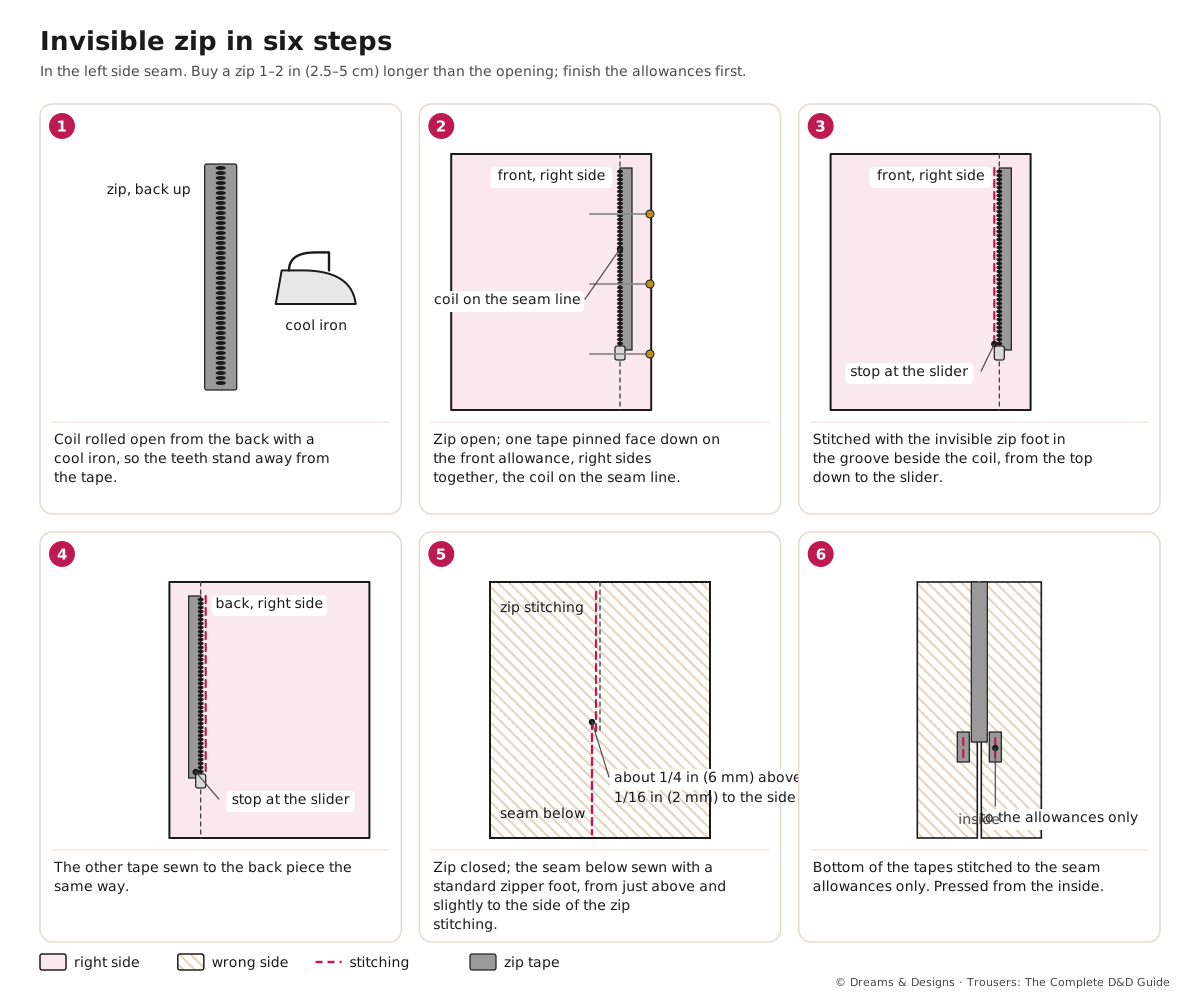
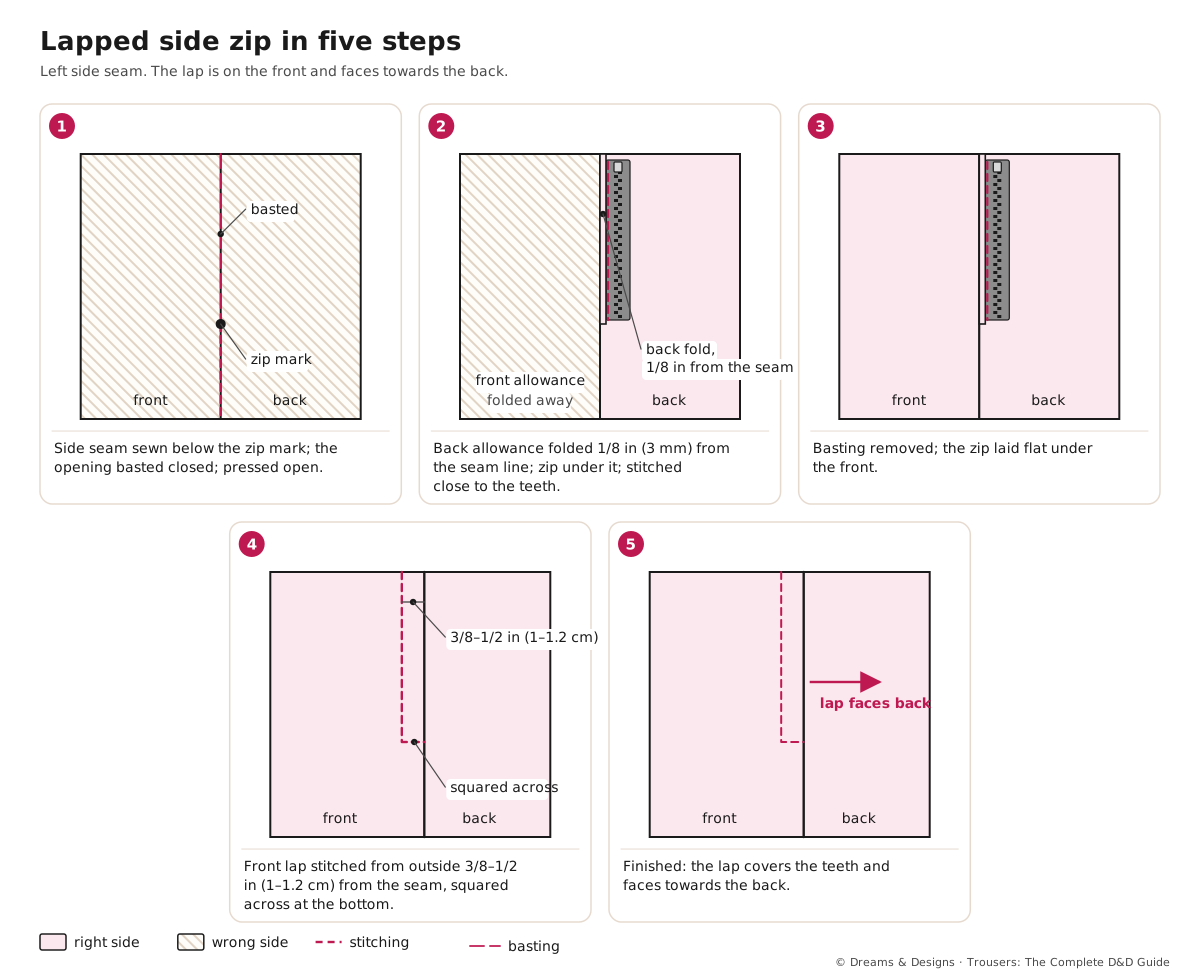
Photo: Lapped side zip in five steps.
What you’ll learn
- When to use a side, back, lapped or invisible zip.
- How to sew an invisible zip with the invisible zip foot.
- How to sew a lapped side zip.
- How to finish the top at a waistband or facing.
Choosing
| Zip | Best for | Notes |
|---|---|---|
| Invisible, left side seam | Cigarette pants, faced (bandless) waists, evening and festive trousers | Smooth line; needs a straight-ish seam |
| Lapped, left side seam | Classic women’s trousers with a waistband, older-style tailoring | Strong; hides the zip with a fold |
| Centre back, invisible | Jumpsuits, high-waisted trousers with a back seam | Hard to reach alone; add a pull loop |
| Exposed (decorative) | Fashion details, ankle zips, sportswear | A deliberate visible design |
The left side is the usual choice for side zips, as most people are right-handed and reach across. A left-handed wearer may want the right side.
The invisible zip, main steps
- Buy a zip 1–2 in (2.5–5 cm) longer than the opening. Finish the side seam allowances. Do not sew the seam yet.
- Press the coil open from the back with a cool iron so the teeth stand away from the tape.
- Open the zip. Pin one tape face down on the right side of the front allowance, the coil exactly on the seam line, the top stop just below the waist seam line.
- Using an invisible zip foot, stitch in the groove beside the coil, from the top down to the slider.
- Close the zip to check the position; open it and sew the other tape to the back piece the same way.
- Close the zip. Sew the side seam below it with a standard zipper foot, starting just above and slightly to the side of the end of the zip stitching.
- Stitch the bottom of the zip tapes to the seam allowances only. Press from the inside.
Teacher to check: a standard, widely taught method, in inches with cm.
Before you start
- Prerequisites: Seams: plain, French and flat-felled.
- Time: 30–45 minutes.
- Difficulty: intermediate.
- Tools: invisible zip foot (plastic ones fit many machines), standard zipper foot, interfacing strips 3/4 in (2 cm) wide for the zip edges.
- Order: darts, pockets, then the zip in the left side seam before the waistband or facing. The right side seam may be sewn first.
Step by step: the lapped side zip
- Sew the side seam up to the zip mark; machine-baste the opening closed; press open.
- Open the trouser flat, wrong side up. Fold the back allowance so it extends 1/8 in (3 mm) beyond the seam line; press.
- Lay the zip under that fold, teeth close to it; stitch close to the fold with a zipper foot.
- Lay the zip flat over the front allowance. From the outside, stitch across the bottom and up the front, 3/8–1/2 in (1–1.2 cm) from the seam, through the trouser, allowance and tape.
- Remove the basting. The front laps over the zip, facing towards the back.
Finishing the top
- With a waistband: the zip top sits just below the waist seam line. The waistband extension laps over it, closed with a hook and bar.
- With a facing: sew the facing to the waist, fold the facing ends back round the zip tapes, and slip-stitch them by hand, or machine the ends before turning (the “burrito” method; teacher to show). Add a hook and eye above the zip.
- Shortening: cut excess off the top only after the band or facing is sewn, and stitch across the coil to make a new stop.
Variations, and left-handed notes
- Without an invisible zip foot: use a standard zipper foot and roll the coil open with your fingers as you sew; slower, works.
- Curved side seams at the hip: stay the seam with tape first so it does not stretch and ripple.
- Exposed zip: cut a narrow window, face it, and topstitch the zip behind; used on joggers and sportswear ankles.
- Ankle zips on narrow trousers: invisible zips in the side seam at the hem, 5–7 in (12–18 cm) long, so the foot goes through.
- Indian straight pants and cigarette pants with kurtas: often an invisible left side zip with a faced or elastic-backed waist.
- Children: side zips are rare; elastic is easier.
- Left-handed: put the zip in the right side seam if the wearer prefers. Sewing is the same; mirror every step.
Planning and control
- Stabilise: fuse a strip of interfacing along the zip allowances on soft and stretch cloth.
- Match crossing seams: mark the waist seam and any yoke or pocket line on both zip tapes before sewing the second side, so they line up.
- Speed: slow and steady; stop needle down near the slider.
Side and back zips for women, men and children
- Women: the main users of side zips, on cigarette pants, high-waisted and evening trousers, and Indian straight pants worn under kurtas. The opening must pass the widest part of the hip.
- Men: side zips are rare, but appear on some formal trousers with side adjusters and on adaptive trousers.
- Children: seldom needed; elastic is easier, and children cannot reach a side zip easily.
- Jumpsuits: a long centre back invisible zip, often 20–22 in (50–56 cm), or a centre front exposed zip; plan the length from the neckline to below the hip. Teacher to check.
- Adaptive: long side zips on both legs, with large pulls, help wearers who dress seated.
Step by step: replacing an invisible zip
- Unpick the waistband or facing ends a little above the zip, and the seam 1 in (2.5 cm) below it.
- Unpick both zip tapes; note where the waist seams crossed.
- Press the seam allowances flat; fuse fresh interfacing strips if the edges have stretched.
- Sew in the new zip as in the main steps, matching the crossing marks.
- Resew the seam below and the band or facing ends; press from inside.
Tips, tricks and hacks
- Press the coil open first; it lets the needle get closer.
- Interface the zip edges on rayon, crepe and stretch cloth.
- Buy longer invisible zips; the slider gets in the way at the bottom.
- Mark matching points on the tape with a fabric pen.
- Sew both sides in the same direction, top to bottom, to avoid twist.
- Close the zip before sewing the seam below, then pull the zip tail out of the way.
- Add a hook and eye above every side zip; it takes the strain.
- A pull loop of ribbon helps on back zips.
- Press from the inside with a cool iron; invisible coils melt.
- Use a zip a shade darker than the cloth if the exact colour is not available; it disappears better than a lighter one.
- What professionals do differently: they stay the zip edges and match crossing seams on the tape, so the waist seam lines up perfectly across the zip.
Problems and how to fix them
The invisible zip shows its teeth
- Restitch closer to the coil.
- Press the coil open before sewing.
- Prevention: use the invisible zip foot.
A pucker or bubble at the bottom of the zip
- Unpick the seam just below and restitch, starting slightly above and to the side of the zip stitching.
- Press over a ham.
- Prevention: close the zip and pull the tail aside before sewing the seam below.
The waist seams do not line up across the zip
- Unpick one side and restitch, matching the mark.
- Mark both tapes before sewing next time.
- Prevention: mark crossing seams.
The zip seam ripples
- Unpick and stabilise with interfacing; resew.
- Steam-press gently to shrink on natural fibres.
- Prevention: stabilise first, especially on bias and stretch.
The zip breaks when stepping in
- Replace with a longer zip.
- Check the hip measurement; the opening may be too short for the hip.
- Prevention: the opening must reach well past the widest part of the hip.
The lap does not cover the zip
- Unpick the front stitching and resew further from the seam.
- Check the back fold extends 1/8 in beyond the seam line.
- Prevention: baste the seam closed while sewing a lapped zip.
The coil melted under the iron
- Replace the zip.
- Press zips only from the inside, with a press cloth.
- Prevention: cool iron on all nylon and polyester zips.
Beginner mistakes and myths
- Myth: invisible zips are fragile. They are fine for most trousers; strain comes from tight fit.
- Mistake: sewing the side seam before an invisible zip.
- Mistake: an opening too short to step through.
Practice drills
- Beginner: sew an invisible zip between two cotton rectangles.
- Improver: sew a lapped zip in the same way.
- Confident: sew an invisible side zip in a cigarette pant with a faced waist, matching the waist seams.
As a hobby, for earning, for teaching
As a hobby: an invisible zip makes simple trousers look polished.
For earning: converting a front-zip trouser to a side zip, or replacing broken invisible zips, are common requests.
For teaching: invisible zips are a good second zip after a lapped one; learners see the difference immediately.
Care and finishing
- Close zips before washing.
- Do not iron directly on an invisible zip.
Check yourself
- Can you sew an invisible zip that does not show?
- Do you know which side most side zips go on, and why?
- Can you sew a lapped zip?
- Do you stabilise zip edges on soft cloth?
Quiz
- When is the side seam sewn with an invisible zip? Answer: after the zip.
- Which way does the lap of a lapped side zip face? Answer: towards the back.
- Why press the coil open first? Answer: so the needle can stitch close to the teeth.
- What goes above a side zip at the waist? Answer: a hook and eye (or hook and bar).
Key terms
- Invisible zip: a coil zip hidden in the seam.
- Lapped zip: a zip covered by a fold of cloth on one side.
- Invisible zip foot: a foot with grooves that roll the coil open.
- Exposed zip: a zip shown as a feature.
Sources and uncertain points
- Main source: D&D’s own trousers ebook, chapter 43 (side and back zips, invisible zips), with general, widely taught practice.
- The left-side convention for side zips is common, not universal.
- Teacher to check: the facing finish round the zip top.