A men’s trouser pattern needs a few extra pieces and allowances that the block does not show: the fly extension and fly shield, a waistband split at the back so it can be let out, generous “let-out” seam allowances, pocket positions and, if wanted, turn-ups. This lesson adds them to the men’s block on paper. Sewing them is in Module 6.
What you’ll learn
- How to add a cut-on fly extension and draft a fly shield.
- How to draft a split back waistband with let-out allowance.
- Where to place pockets on the men’s pattern.
- How to add turn-ups (cuffs) by folding the paper.
The fly
Men’s trousers usually close left over right: the left front carries the visible, topstitched fly; the right front has the fly shield behind the zip. (Women’s trousers are often the other way; see Module 6, The fly-front zip.)
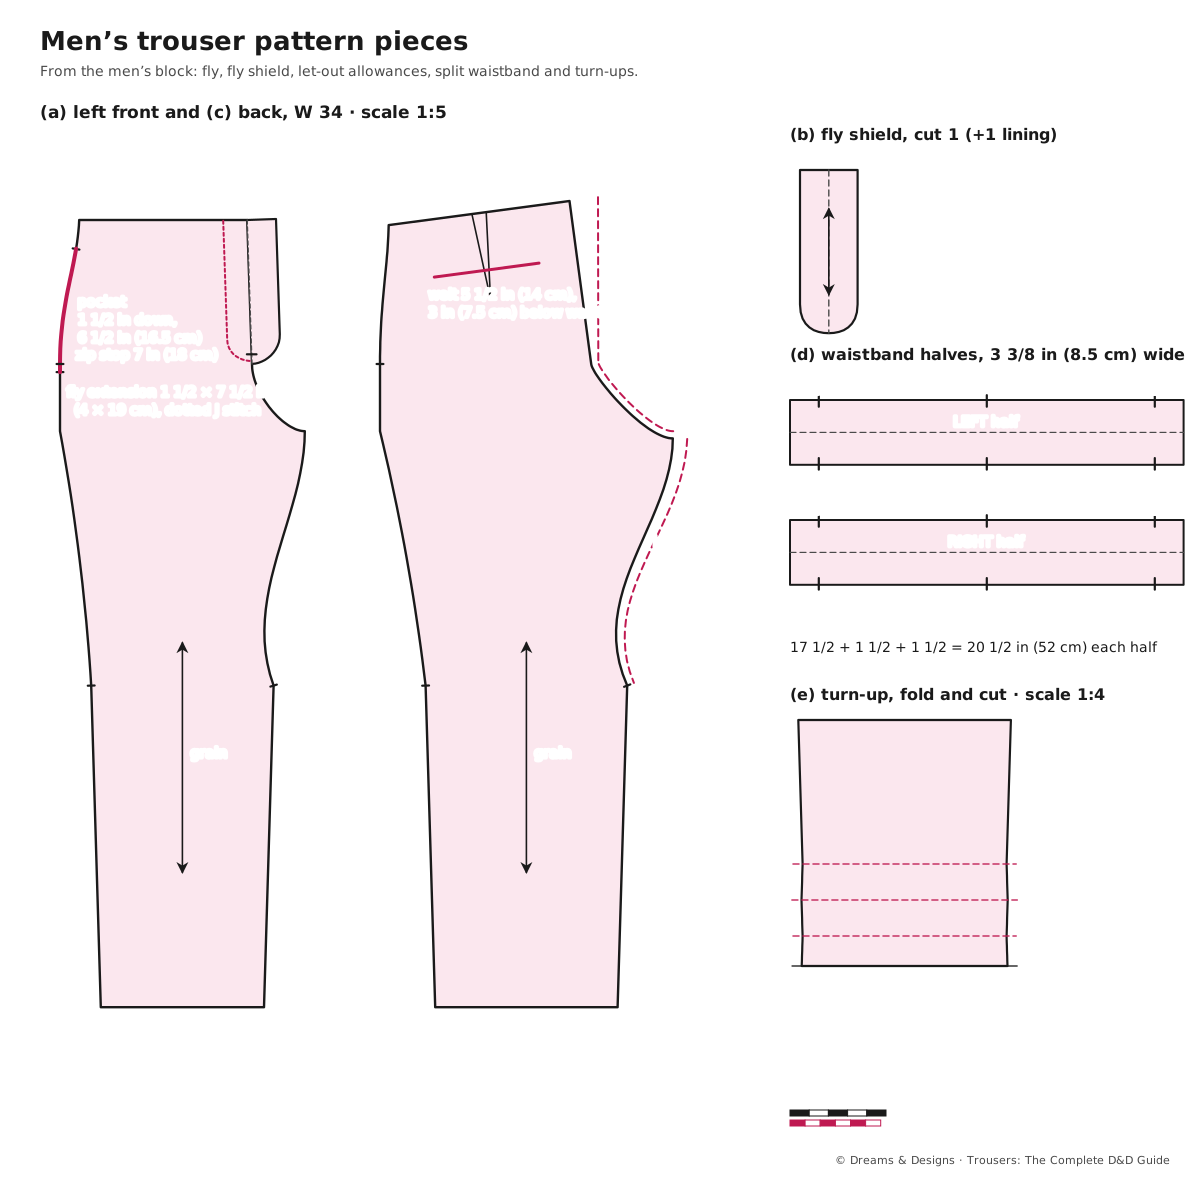
- Zip length: 7 in (18 cm) for our man. The zip stop sits about 1 1/2 in (4 cm) above where the front crotch curve starts.
- Left front: add a cut-on fly extension 1 1/2 in (4 cm) wide beyond the CF, from the waist down to 7 1/2 in (19 cm). Curve its lower end back into the CF.
- Right front: add 1/2 in (1.3 cm) beyond the CF from waist to zip stop, as a fold-back for the zip.
- Fly shield: a separate piece 3 in × 8 1/2 in (7.5 × 21.5 cm), folded lengthwise to 1 1/2 in (4 cm), lower end curved. Cut one in fabric (and one in lining for formal trousers).
- Mark the fly topstitching line on the left front: 1 1/4 in (3 cm) from the CF, curving to the CF just below the zip stop.
The split back waistband
- Measure the finished pattern waist on one side: front 8 3/4 in + back 8 3/4 in (without the dart) = 17 1/2 in (44.5 cm).
- Left half: 17 1/2 in + 1 1/2 in (4 cm) at the CB for letting out + 1 1/2 in (4 cm) tab that crosses the fly to fasten.
- Right half: 17 1/2 in + 1 1/2 in at the CB + 1 1/2 in underlap over the fly shield.
- Width: finished 1 1/2 in (4 cm). Cut 3 3/8 in (8.5 cm): twice the width plus 3/8 in (1 cm) seam allowances.
- Notch CB, side seams and CF on both halves.
- On the back trouser pieces, add the matching let-out allowance at the CB: 1 1/2 in (4 cm) at the waist, tapering to 3/8 in (1 cm) at the seat line, then 3/8 in round the crotch curve.
The two band halves are sewn to each back, then the CB seam is sewn straight through band and trouser. To let out or take in later, the tailor opens one seam and moves it, up to about 1 1/2 in (4 cm) in total.
A standard method: a D&D teacher checks the figures before you rely on them.
Pocket positions on the pattern
| Opening | Position | Notes | |
|---|---|---|---|
| Side-seam | 6 1/2 in (16.5 cm) | From 1 1/2 in (4 cm) below the waist | Hand slips in flat |
| Slant (on-seam) | About 7 in (18 cm) | 1 1/2 in (4 cm) in at the waist to 7 in down the side | Stays closed better on a full hip |
| Back welt (hip) | 5 1/2 in (14 cm) | 3 in (7.5 cm) below the waist, centred on the dart | Parallel to the waist |
| Watch / coin | 2 1/2 in (6.5 cm) | Right front, under the band | Optional |
Pocket bags: from 1 in (2.5 cm) above the opening to about 4 in (10 cm) below it, and wide enough for a hand: 6–7 in (15–18 cm). Adjust for phones, which are now longer than many pocket bags. Construction is in Module 6, Pockets.
Turn-ups by folding the paper
- Decide the finished turn-up depth: 1 1/2 in (4 cm) is common for men; 1 1/4–1 3/4 in (3–4.5 cm) is the usual range.
- Below the finished hem line, add: turn-up depth 1 1/2 in, inner fold 1 1/2 in, and a 1 1/4 in (3 cm) hem. Total added: 4 1/4 in (11 cm).
- Fold the paper up along each fold line in turn, as it will be pressed, and cut along the leg seams while folded. The seams then match the leg when turned up, even on a tapered leg.
- Unfold. The side seam and inseam below the hem now step in and out: that is correct.
Turn-ups suit straight and gently tapered legs in medium to heavy cloth. On a strongly tapered leg they pull; on a flared leg they splay.
Variations
- Side adjusters instead of belt loops: extend the band 2 in (5 cm) past the side seam on each side for the adjuster tabs.
- Extended waistband tab: lengthen the left tab to 3 in (7.5 cm) and pointed, with a button.
- Curtained waistband: line the inside of the band with a separate strip that hangs below it; cut it 2 in (5 cm) deeper than the band.
- Separate fly facing: instead of a cut-on extension, cut a J-shaped facing 2 in (5 cm) wide and 8 in (20.5 cm) long. Better for thick or patterned cloth.
- Button fly: make the extension 1 3/4 in (4.5 cm) wide and space 4 or 5 buttons about 1 1/2 in (4 cm) apart.
- Kurta pyjama and casual trousers: no fly at all; use a nada or elastic waist (see Indian drafts: churidar on the bias and kurta pyjama).
Tips, tricks and hacks
- Cut the fly extension on the pattern, not freehand on the cloth; fly widths must match exactly.
- Mark the zip stop with a notch on both fronts.
- Split back bands save alterations for years; tell customers why their waistband has a seam at the back.
- Taper let-out allowances smoothly; a sudden step shows through the cloth after pressing.
- Use the fold method for every turn-up and deep hem.
- Professionals add a little seat let-out on the inseam too: 3/4 in (2 cm) at the crotch tapering to 3/8 in at the knee.
- Check the band length against the trouser waist, not the body: the band includes the ease.
- Interface the waistband on paper: note the interfacing piece and its width.
- Place back pockets after the toile; a pocket in the wrong place cannot be moved later.
- Allow for phones: agree pocket bag depth with the customer.
Problems and how to fix them
Fly gapes open
Cause: zip too long for the rise, or tight across the front hip.
- Shorten the zip so the stop sits above the crotch curve.
- Add front hip room at the side seams.
- Prevention: check zip length against the CF on the pattern.
Fly shield shows
Cause: shield too wide, or the left fly extension too narrow.
- Trim the shield to 1 1/4 in (3 cm) finished.
- Widen the left extension to 1 1/2 in.
- Prevention: draft both from the same CF line.
Waistband too tight after sewing
Cause: band drafted to the body, not the trouser waist.
- Let out at the CB seam using the allowance.
- Re-cut the band with the trouser waist measurement.
- Prevention: measure the pattern waist without darts.
CB seam shows a bump where the allowance tapers
Cause: the allowance changes width suddenly.
- Trim the allowance to a smooth taper.
- Press it open over a ham.
- Prevention: draw the taper with a ruler on the paper.
Turn-ups twist
Cause: cut without folding the paper on a tapered leg.
- Recut the hem area with the fold method.
- Tack the turn-up at side seam and inseam.
- Prevention: always fold-and-cut turn-ups.
Back pocket points down at the side
Cause: placed level with the ground instead of parallel to the waist.
- For new pieces, align the pocket parallel to the waistline.
- On a made trouser, leave it; it cannot be moved cleanly.
- Prevention: mark pockets from the waistline, not the hip line.
Side pocket bags show through
Cause: heavy pocketing in light cloth, or a bag too wide.
- Use lighter pocketing.
- Anchor the bag into the fly or CF seam (a “stay”).
- Prevention: draft a front stay pocket for light cloths.
Beginner mistakes and myths
- Forgetting the right front’s small fold-back for the zip.
- Using a one-piece waistband on formal trousers; it cannot be let out.
- Myth: “The fly direction is a rule.” It is a convention; follow the customer’s wish.
- Myth: “Turn-ups are just a deep hem.” They need the fold-and-cut method.
Practice drills
- Easy: add a fly extension and draft a fly shield at quarter scale.
- Medium: draft both waistband halves full size for the worked example; check their lengths.
- Medium: fold-and-cut a turn-up on paper for a tapered leg.
- Hard: produce a full set of men’s trouser pattern pieces with all allowances, notches and labels.
For hobby, earning and teaching
As a hobby: a fly and split band are the step from “pyjama” to “trouser”. Make them once on a toile.
For earning: let-out allowances are what make men’s trousers alterable, and alterations are a steady part of tailoring work.
For teaching: show a ready-made formal trouser opened at the CB to reveal the allowance; then draft it.
Care and finishing
- Label every piece: name, “cut 1” or “cut 2”, grain line, notches and seam allowances written.
- Keep the small pieces (shield, band halves) in an envelope with the block.
Sources and uncertain points
- Fly widths, zip lengths, band widths and pocket sizes are common tailoring figures; makers vary them.
- Lap direction (left over right for men) is a widely followed convention, not a standard.
- All figures for a D&D teacher to check.
Check yourself
- Can you add a cut-on fly extension?
- Can you draft both halves of a split waistband?
- Do you know how wide the CB let-out allowance is, and where it tapers?
- Can you fold-and-cut a turn-up?
Key terms
- Fly extension: extra width at the CF that forms the fly.
- Fly shield: the folded strip behind the zip.
- Split waistband: a waistband in two halves, joined at the CB seam.
- Let-out allowance (inlay): extra seam allowance for later alteration.
- Turn-up (cuff): a folded band at the hem.