The last hour of a trouser decides how it is judged. Bar tacks, buttonholes, trimmed threads, a final press and a careful inspection turn a finished trouser into a well-made one. This lesson covers the finishing touches and gives a final quality checklist you can use on your own work, a student’s work or a customer order, for women’s, men’s and children’s trousers.

What you’ll learn
- Where every trouser needs bar tacks.
- How to sew buttonholes and buttons that last.
- How to do a final press and a thread clean-up.
- A final quality checklist for any trouser.
The finishing steps
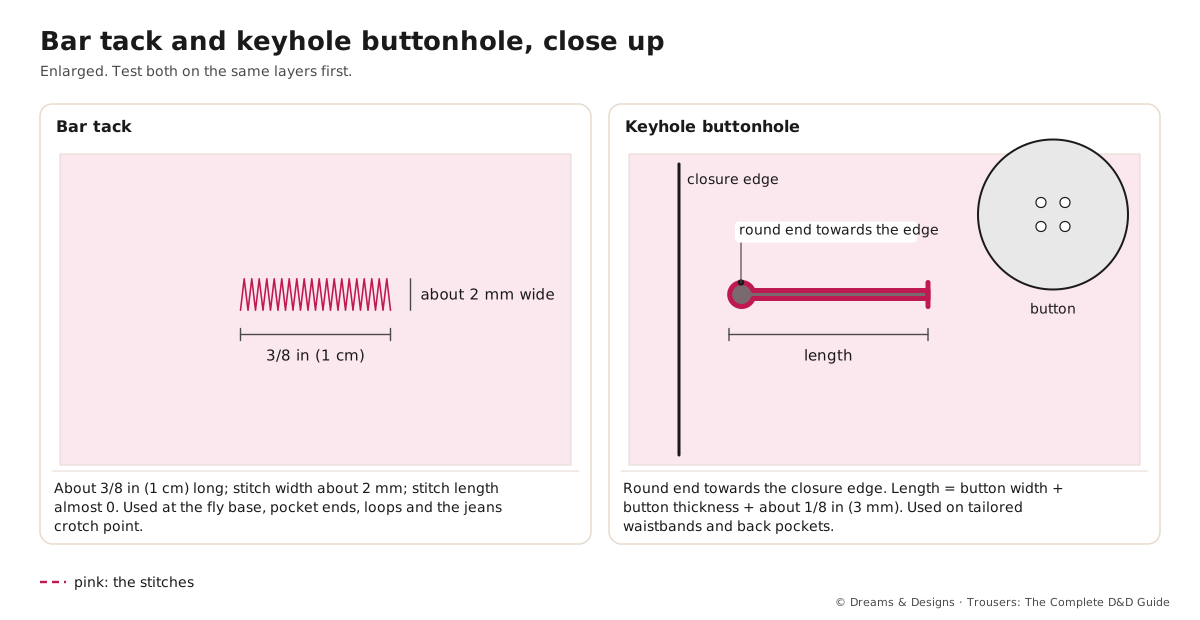
- Bar tacks: at the fly base, the ends of pocket openings, the tops of back pocket corners, belt loops, and the crotch point on jeans and work trousers.
- Buttonholes: keyhole on tailored waistbands and back pockets; straight on casual and children’s. Test on the same layers first; length = button width + thickness + about 1/8 in (3 mm).
- Buttons: sew with a thread shank (wind the thread round under the button) so the buttonhole lies flat; jeans tack buttons hammered on.
- Hooks and bars: sewn through the interfacing.
- Labels: care label and size, and the maker’s label (Module 1, Care and fibre labels).
- Threads: clip every loose end inside and out; pull topstitching ends through and tie.
- Marks: remove chalk, pen and tacks (test pen removal first).
- Final press: waistband, pockets, fly, creases or no creases (Pressing as you sew, and setting creases).
- Inspect with the checklist below, in daylight.
Final quality checklist
- Waistband flat, not twisted or rolling; closures align.
- Fly lies flat, hides the zip, opens and closes smoothly.
- Pockets lie flat; no lining showing; both at the same height.
- Darts and pleats match on both sides.
- Side seams hang straight; the legs do not twist.
- Crotch smooth; seam double-stitched; no pulls when seated.
- Hem even all round and at the chosen break; both legs equal.
- Seams finished inside; no raw edges, loose threads or skipped stitches.
- Topstitching even; no backstitch knots showing.
- No shine, pressing marks, chalk or tacks.
- Bar tacks at every stress point; buttons and snaps pass a firm pull.
- Labels in place; for children, no loose small parts and cord rules checked.
Teacher to check: a standard, widely taught finishing order and checklist (based on the D&D ebook’s final inspection list, ch. 46).
Before you start
- Prerequisites: the trouser fully sewn and hemmed.
- Time: 30–60 minutes; never rush it.
- Tools: buttonhole foot, button thread, thread snips, lint roller, good daylight or a daylight lamp, a hanger with clips.
Step by step: a hand-sewn button with a shank
- Thread a needle with doubled button thread; knot.
- Take a small stitch at the mark on the right side.
- Place a pin or matchstick on top of the button between the holes.
- Sew through the holes over the pin, 6–8 times.
- Remove the pin; lift the button; wind the thread round the stitches under it 5–6 times to make the shank.
- Take the needle to the back; finish with several small stitches and a knot.
Checking fit at handover
- The wearer stands, sits, walks, bends and climbs a step.
- Check the waist when seated, the seat and crotch when bending, and the hem with their shoes.
- For children: sitting on the floor and running about.
- For adaptive wear: dressing with the closures as the wearer or carer will.
- Note any change on the order card; small changes are quicker now than after washing.
Variations, and left-handed notes
- Tailored trousers: hand-worked keyhole buttonholes are a mark of bespoke work; machine keyholes are standard.
- Festive trousers: check embellishment for loose beads or sharp zari; line or bind scratchy areas.
- Children’s trousers: pull-test every button, snap and appliqué.
- School and work uniforms: check against the client’s specification sheet.
- Left-handed: hand-sew buttons and buttonholes working left to right; nothing else changes.
Planning and control
- Do the checklist in the same order every time, top to bottom, outside then inside.
- Bar tack control: stitch length near 0, width about 2 mm, slow over thick layers.
- Buttonhole control: one smooth run; do not stop mid-side.
Extra checks for women’s, men’s, children’s and festive trousers
- Women’s: the side zip opening passes the hip; lining does not show at the hems; the pocket stay lies smooth.
- Men’s: split back band and inlay left for alteration; heel guard on tailored hems; curtain neatly finished.
- Children’s: growth hem and adjustable waist work; cords within the current standard; every small part pull-tested; nothing scratchy inside.
- Festive: embellishment secure; zari bound away from the skin; nada and latkans firmly attached.
- Adaptive: closures work for the wearer or carer, seated if needed.
Writing a fault report
- Note each fault, where it is, and how serious: must fix, should fix, acceptable.
- Fix every “must fix” before handover.
- Record the cause, so the next trouser avoids it.
- Keep the reports; patterns in them show what to practise next.
Handover: what the customer receives
- The trouser pressed and hung, closures done up, any pins and tacks removed.
- Care instructions, matching the care label.
- Spare buttons, and a small piece of the cloth for future repairs if there is enough.
- For children’s orders: how to let down the growth hem and adjust the waist.
- A note of any alteration allowances left in (men’s centre back, side seams).
Step by step: a machine buttonhole
- Mark the buttonhole on the interfaced layer with a ruler: start point and length.
- Put the button in the buttonhole foot’s holder, if your machine has one, so the length is set automatically.
- Test on a scrap with the same layers and interfacing; adjust density.
- Sew the buttonhole in one run.
- Put a pin across each end; cut open from the middle towards each pin with a seam ripper or chisel.
- Trim any whiskers; a drop of fray stopper on loose cloth.
Tips, tricks and hacks
- Daylight inspection shows shine and colour differences that lamps hide.
- A lint roller removes threads from dark wool quickly.
- Pin across the end of a buttonhole before cutting it open.
- A drop of fray stopper inside a cut buttonhole on loose cloth.
- Sew spare buttons inside the waistband or onto the care label.
- Tie and bury thread ends instead of cutting at the surface.
- Check from 2 metres away, then up close.
- Photograph each finished order front, back and inside, for your records and portfolio (with consent if worn).
- Hang trousers by the hem or folded on the crease for handover.
- Keep a written checklist and tick it; memory skips steps when busy.
- What professionals do differently: they inspect every trouser against a written list before it leaves, and fix small faults at once rather than hoping nobody sees.
Problems and how to fix them
Loose threads keep appearing
- Trim again in daylight, inside and out.
- Check overlocker chains are secured.
- Prevention: trim as you go, after every seam.
The buttonhole is cut through its end
- Hand-stitch a bar across the end.
- Back with interfacing and re-stitch the buttonhole over it.
- Prevention: a pin across the end before cutting.
The bar tack looks messy
- Unpick and resew with a shorter stitch length.
- Use matching thread.
- Prevention: test on the same layers.
Chalk or pen marks will not go
- Follow the marker’s removal method; cold water for most.
- Try a mild detergent on a hidden area.
- Prevention: test markers; remove marks before pressing.
The legs are different lengths
- Re-mark and re-hem the longer leg.
- Check the wearer’s legs; one may truly be longer.
- Prevention: measure both legs on the body.
Shine from pressing
- Steam and brush.
- Dab with diluted white vinegar on wool (test).
- Prevention: always use a press cloth.
A button pulls off at the fitting
- Resew with a shank and backing button.
- Reinforce the band behind it.
- Prevention: pull-test every button before handover.
Beginner mistakes and myths
- Myth: nobody looks inside. Tailors, customers and examiners always do.
- Mistake: skipping the pull-test on children’s fastenings.
- Mistake: pressing over chalk, setting it.
Practice drills
- Beginner: sew five buttons with shanks on a scrap.
- Improver: make three keyhole buttonholes and bar tacks on a waistband sample.
- Confident: inspect a finished trouser (yours or ready-made) with the checklist and write a fault report.
As a hobby, for earning, for teaching
As a hobby: the checklist is the quickest way to see your own progress from one trouser to the next.
For earning: a written quality check before every handover cuts returns and builds reputation; see Module 11, Quality checks, for ready-made trousers.
For teaching: let learners swap trousers and check each other’s work against the list.
Care and finishing
- Give every customer the care instructions (label or card).
- Store finished orders hung, covered with breathable cloth, not plastic, in humid months.
Check yourself
- Do you know every place a trouser needs a bar tack?
- Can you sew a button with a shank?
- Do you use a written checklist?
- Do you pull-test children’s fastenings?
- Do you check fit seated as well as standing?
Quiz
- Name three bar tack points. Answer: for example the fly base, pocket opening ends and belt loops.
- How long is a buttonhole? Answer: button width + thickness + about 1/8 in (3 mm).
- Why give a button a shank? Answer: so the buttonhole lies flat under it.
- When is the best light for inspection? Answer: daylight.
Key terms
- Bar tack: a short, dense reinforcement stitch.
- Keyhole buttonhole: a buttonhole with a round end.
- Shank: the stem of thread under a button.
- Kaaj: a common Hindi/Urdu tailors’ word for a buttonhole (studio to confirm local use).
- Quality checklist: a written list used before handover.
Sources and uncertain points
- Main source: D&D’s own trousers ebook, chapters 46 and 47 (finishing details and final inspection checklist), widened with general practice.
- Buttonhole and bar-tack sizes are starting points. Teacher to check.