A pleat is a fold of cloth, stitched or pressed in place at one end and free at the other. On trousers, pleats give room at the hip and thigh for sitting and walking, and they shape the look, from a men’s double-pleated suit trouser to a box-pleated wide culotte. This lesson covers the three basic pleats: knife, box and inverted.
Teacher to check: pleat depths and positions are standard starting points, not yet checked by a D&D teacher.

What you’ll learn
- How knife, box and inverted pleats are folded, and how each is marked on a pattern.
- How to add front pleats to a trouser block.
- Forward and reverse pleats, and why tailors disagree on the names.
- How to stitch, press and finish pleats so they stay neat.
The three basic pleats
- Knife pleat: one fold, turned to one side. A series all face the same way. Trouser front pleats are knife pleats.
- Box pleat: two knife pleats turned away from each other, so the folds meet behind. Used on wide trousers, culottes and the Japanese hakama.
- Inverted pleat: the reverse of a box pleat: two folds turned towards each other, meeting in front. Used at the centre back of some wide trousers, and as a front “kick” on culottes.
Reading a pleat on a pattern
A pleat is shown by two lines: the fold line and the placement line. You fold on the first and bring it to the second. An arrow shows the direction. The space between them is the depth; each pleat uses twice its depth of cloth, called the intake. So a 1 inch (2.5 cm) pleat takes 2 inches (5 cm) of cloth.
Adding front pleats to the block
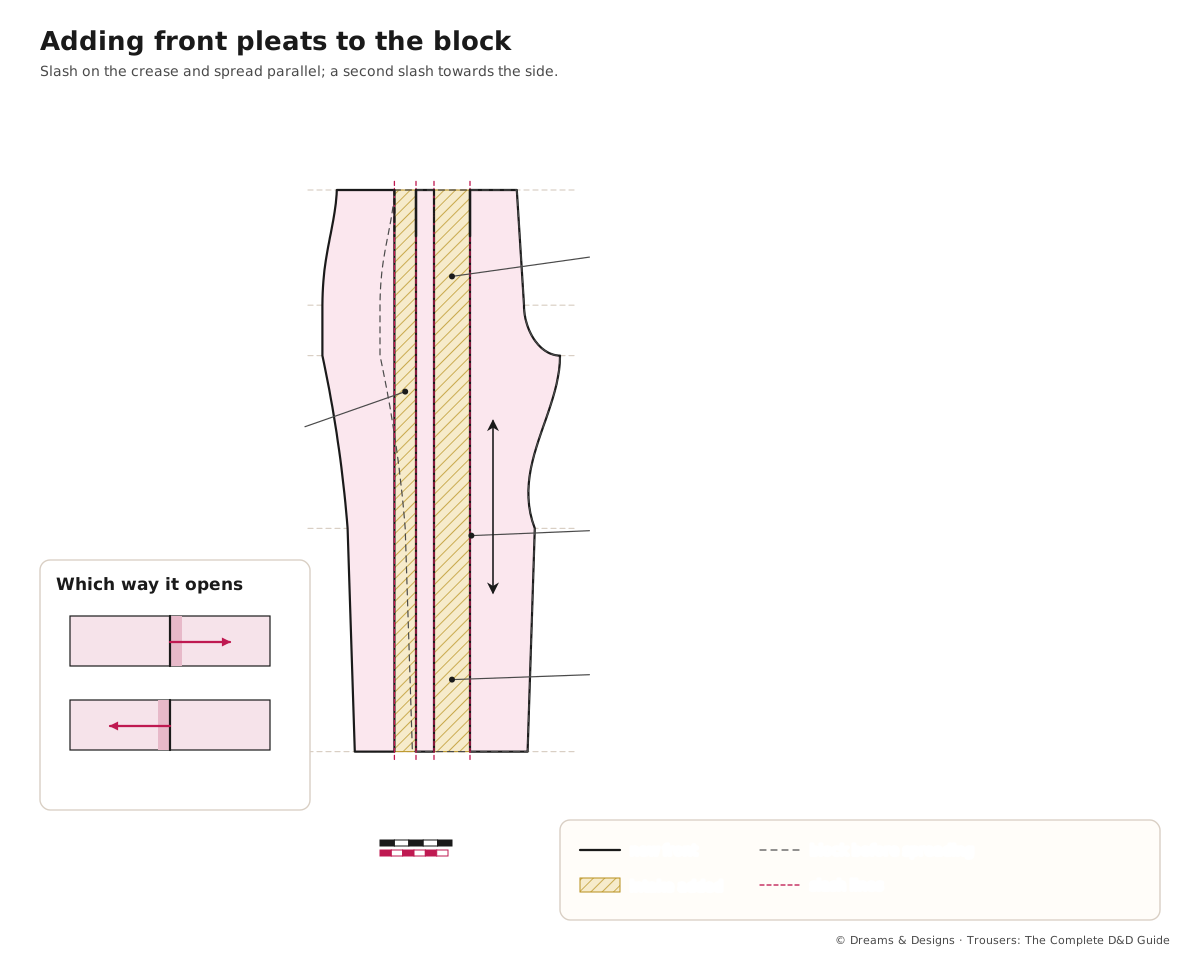
- Trace the front block. Extend the crease line up to the waist.
- Cut along the crease line from waist to hem.
- Spread the two halves apart, parallel, by the intake of the first pleat: for example 2½ inches (6 cm) for a 1¼ inch (3 cm) pleat.
- For a second pleat, cut a line about 1¼ inches (3 cm) towards the side and spread by its intake, often smaller, tapering to nothing at the hip if you only want waist room.
- Redraw the waist, then mark the fold and placement lines and the direction.
- Fold the pleats closed and true the waist and side seam across them.
Forward or reverse?
A pleat whose fold opens towards the fly and one that opens towards the pocket look quite different. Many British tailors call the first a forward pleat and the second a reverse pleat; some use the names the other way round, so sources differ. Agree the direction with the client by pointing, not by name.
Where pleats show up
- Men: single and double pleated suit trousers, the Gurkha trouser’s deep front pleats, and the Oxford bags of the 1920s.
- Women: pleated wide trousers and power-suit trousers, paperbag waists (pleats below a gathered frill), pleated culottes.
- Children: school uniform trousers with a single pleat; box-pleated girls’ culottes.
- India: pleated formal trousers in office wear, the salwar’s folded waist, the Patiala’s many pleats (see Pleats: accordion, sunray and Patiala), and the pleated front of the stitched dhoti pant.
- Worldwide: the hakama of Japan with its seven pleats (five front, two back, traditionally said to stand for virtues; sources differ).
Sewing pleats: step by step
- Mark fold and placement lines with tailor’s tacks or small snips at the waist edge, and chalk lines on the wrong side.
- Fold each pleat, pin, and tack across the waist within the seam allowance.
- For a stitched-down pleat, sew along the fold from the waist for 1–3 inches (2.5–7.5 cm), backstitching at the end.
- For a soft pleat, tack only across the waist.
- Press lightly from the wrong side with a press cloth, only as far as the pleat should be pressed. Front trouser pleats usually run into the crease.
- Attach the waistband, catching the pleats so they cannot move.
Variations
- Box-pleated wide trouser: add the intake across the whole leg width and fold box pleats from waist to hip, released below.
- Inverted pleat at the hem: a “kick” for movement in a narrow trouser.
- Pleat with a hidden pocket behind the fold.
- Released pleats stitched down partway and left free below (see also Tucks and pintucks, released tucks).
- Left-handed: no change in method; mark the fold direction clearly.
Planning and control
- Plan the intake from the hip and thigh room you need, not the waist.
- Line the first pleat up with the crease so the crease runs straight from pleat to hem.
- Fold all pleats the same depth on both legs; measure, do not judge by eye.
- Press with the iron lifting and lowering, never sliding.
Before you start, and what you need
- Prerequisites: a fitted block (Part IV), straight seams, and pressing with a press cloth.
- Time: about an hour to sample the three pleats; half a day to add pleats to a block and toile them.
- Difficulty: beginner for the pleats themselves; intermediate for placing them on a trouser.
- Tools: tailor’s chalk or a fine marker, contrast thread for tailor’s tacks, snips, a card pleat template, strips of brown paper, a press cloth, a tailor’s clapper (a smooth wooden block that holds steam in a crease while it cools).
- Budget: a strip of cereal-box card for the template; a smooth wooden chopping board as a clapper.
- Safety: steam burns; lift the iron away from your fingers when you hold a fold.
Women, men and children
- Women: pleats sit over the hip bone and must lie closed when standing; on a curvy figure, a single deep pleat often lies flatter than two shallow ones. On a full tummy, released tucks may be softer than pressed pleats.
- Men: the classic suit trouser has one or two pleats per side, the first on the crease. Pleats give seat and thigh room and suit higher rises; flat fronts suit lower rises.
- Children: one shallow pleat in uniform trousers gives room to sit cross-legged on the floor; box pleats on girls’ culottes keep them neat. Avoid deep pleats in heavy cloth, which add weight and bulk at the waist.
- Seated wearers: soft, unpressed pleats give room across the lap without strain.
Tips, tricks and hacks
- Snip the fold and placement at the waist edge; snips are quicker than chalk and never wash off.
- Use a card template the width of the pleat depth for fast, even folding.
- Press pleats over a strip of brown paper placed under the fold, so it leaves no ridge on the outside.
- Stitch the pleat underlay to the pocket bag to keep it flat; tailors call this a stay.
- Pleats should lie closed when the wearer stands. If they gape, the trouser is tight at the hip.
- Use fewer, deeper pleats in soft cloth and more, shallower ones in crisp cloth.
- Edge-stitch the fold on the inside of box pleats in wide trousers to keep them crisp.
- Professionals press the crease and pleat as one, from the waist to the hem in one line.
- Tack pleats closed for storage and cleaning; remove the tacks before wearing.
- Test on a scrap: fold, press and wash a sample to see how the pleat holds in that cloth.
Problems and how to fix them
1 · Pleats splay open
- Let out the side seams at the hip.
- Stitch the pleats down a little further.
- Prevention: fit the hip before adding pleats.
2 · The crease does not meet the pleat
- Re-press the crease from the pleat down.
- Move the pleat to the crease line.
- Prevention: place the first pleat on the crease in the pattern.
3 · Pleats are uneven between legs
- Unpick and re-fold to the marks.
- Re-mark from the pattern, not by eye.
- Prevention: snip both legs from the same pattern stack.
4 · Pleat ridges show on the right side
- Re-press with paper under each fold.
- Steam from the right side with a press cloth to relax them.
- Prevention: never press pleats without paper.
5 · Too much bulk at the waist
- Trim the underlay of each pleat inside the waistband.
- Reduce the number of pleats.
- Prevention: lighter cloth or fewer pleats.
6 · Box pleats will not stay flat
- Edge-stitch the inside folds.
- Stitch them down to the hip.
- Prevention: use cloth that holds a press.
7 · Pleats fall out after washing
- Re-press with steam and a damp press cloth.
- Edge-stitch the folds.
- Prevention: choose cloth with some synthetic or wool content for pressed pleats (see Pleats: accordion, sunray and Patiala on permanent pleats).
8 · Pleats pull the crease off its line
- Re-fold the first pleat exactly on the crease line and re-press.
- Check that both pleats are the same depth on each leg.
- Prevention: mark the crease line on the pattern from waist to hem and keep the first pleat on it.
Beginner mistakes and myths
- Mistake: folding pleats the wrong direction on one leg.
- Mistake: using pleats to hide a tight hip. They will splay.
- Myth: “Pleats make you look bigger.” Pleats add room; well-fitted pleats lie flat.
- Myth: “Pleats are only for men.” Women’s pleated trousers are a long tradition.
Practice drills
- Beginner: fold and press a knife, box and inverted pleat on a 12 inch (30 cm) sample each.
- Intermediate: add single and double pleats to your block and make a toile.
- Advanced: make a box-pleated wide trouser with edge-stitched folds.
As a hobby, for earning, for teaching
As a hobby: pleats are a small step from a plain trouser to a tailored one.
For earning: re-pleating or removing pleats is a regular alteration request.
For teaching: paper folding first: students fold each pleat in paper, then cloth.
Care and finishing
- Hang trousers by the hem or with the pleats aligned on a clip hanger.
- Re-press pleats with a damp press cloth; never press over a crease that is not in the right place.
Sources and uncertain points
- D&D ebook ch. 7, 11 and 19 for front pleats and their purpose.
- The names forward and reverse pleat: sources differ.
- The meaning of the hakama’s pleats: traditionally said; sources differ.
Check yourself
- Can you fold a knife, box and inverted pleat?
- Do you know the intake of a 1 inch (2.5 cm) pleat?
- Can you add two front pleats to the block?
- Do you know why pleats splay open?
- Can you press a pleat without a ridge?
Key terms
- Fold line, placement line: where a pleat folds, and where it lands.
- Depth, intake: how deep a pleat is, and the cloth it uses (twice the depth).
- Underlay: the hidden layers of a pleat.
- Forward, reverse pleat: pleats opening towards the fly or the pocket (names vary).