Every good alteration starts before the seam ripper comes out. This lesson teaches you to read a trouser from the inside: how much cloth is hidden in its seams, how it was built, and which changes it will accept. It ends with the hardest skill of all: knowing when to say “this one should not be altered”.
What you’ll learn
- How to check the seam allowance before promising a let-out.
- How a trouser’s construction (overlocked, pressed open, felled, fused) limits what can change.
- The order to alter in, and why it is the same as the order of fitting.
- How to pin, mark and unpick without damage.
- The signs that a trouser should not be altered at all.
First, diagnose
Use the fitter’s method from Part III, Fitting issues: how to diagnose, and the waist: is the problem circumference (too tight or loose around), length (too long or short at one point) or shape (the curve is wrong)? The alteration depends on the answer. Taking in side seams will never cure a back-waist gap, which is a shape problem.
Then, read the inside
- Turn the trouser inside out and lay it flat.
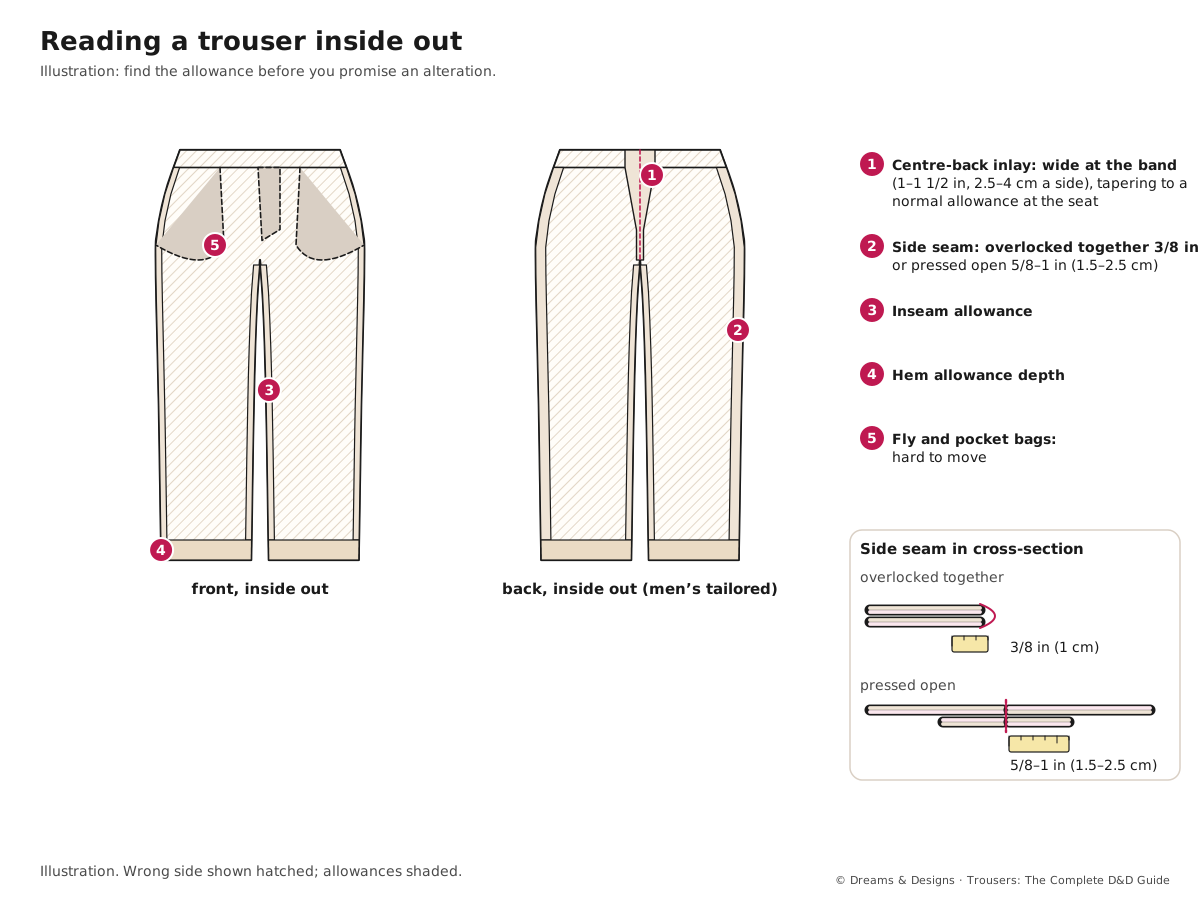
- Measure the seam allowance beyond each stitch line: centre back, side seams, inseam, hem. Write the numbers down.
- Note how each seam is finished. Two allowances overlocked together (common in ready-made) give little to let out. Allowances pressed open and finished separately give more. A flat-felled seam (jeans inseam) is hard to change.
- Look for the inlay. Men’s tailored trousers often have a wide allowance at the centre-back waist, sometimes 1–1 1/2 in (2.5–4 cm) on each side, tapering away at the seat. Women’s ready-made trousers rarely do.
- Check for old stitch lines and fold marks. If a seam is let out, its old needle holes and fade line may show. On dark, napped or shiny cloth they often stay.
- Note the parts that are hard to move: fly, pocket openings, belt loops, fused waistbands, decorative topstitching.
The order of work
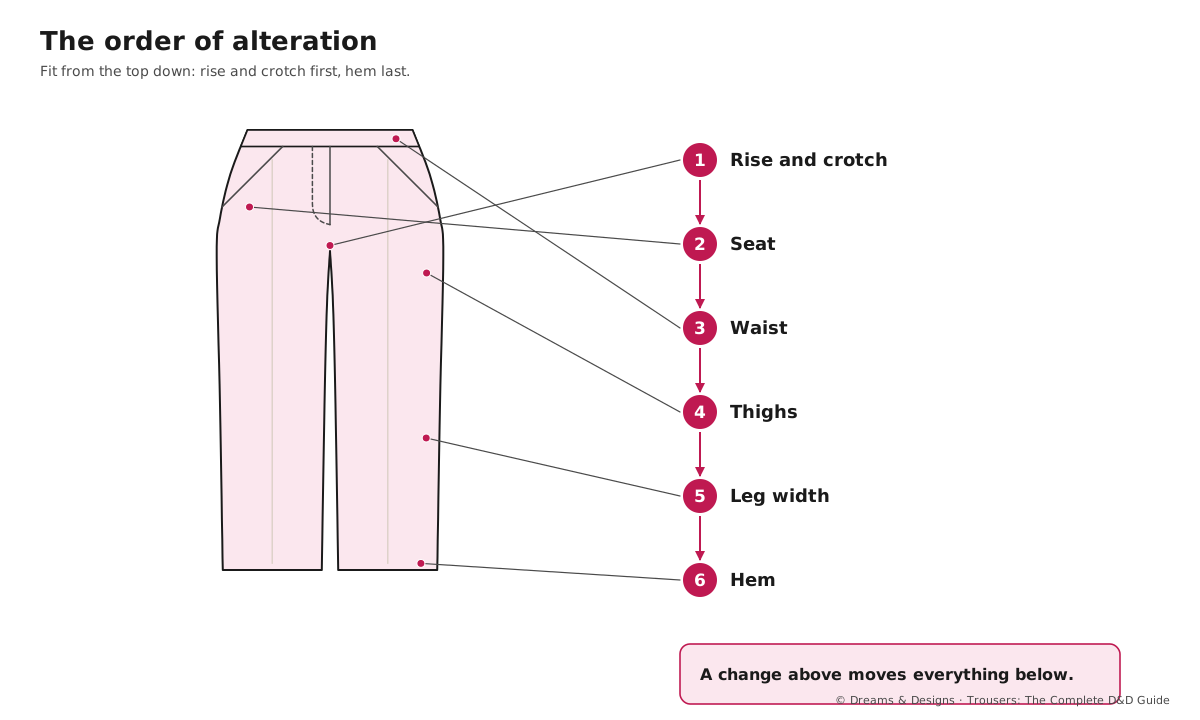
Alter from the top down, the same order as fitting: rise and crotch, seat, waist, thighs, leg width, then the hem last. A change at the rise moves the knee and hem; hemming first and then lowering the crotch leaves a short trouser.
Pin, try, then sew
- Pin the change on the wearer (right side out), with the shoes and undergarments they will wear.
- Ask them to sit, bend and stride. Pins that pull open mean too much was taken.
- Mark with chalk or thread tacks, then pin again on the inside along the new line.
- Tack (baste) and try again before any cutting. Cut only when the tacked fit is right.
Teacher to check: allowances quoted are typical of ready-made and tailored trousers; real garments vary widely. Always measure the trouser in front of you.
When not to alter
- There is not enough cloth. A let-out needs allowance beyond the stitch line, plus at least 3/8 in (1 cm) left to sew. If the allowance is 3/8 in overlocked, there is nothing to let out.
- The old line will show. Velvet, satin, coated denim, faded denim and some synthetics keep needle holes and a pale stripe. Show the customer before you start.
- The problem is shape, in a fused or structured part. Heavily fused waistbands and bonded seams rarely reshape well.
- Several large problems at once in a low-cost trouser: the work may be worth more than the trouser. Say so plainly.
- The body is still changing: pregnancy, the months after birth, a child’s growth, recovery after illness. Use adjustable fixes (elastic, side adjusters, temporary tacks) instead. See Part III, Pregnancy and postpartum.
- The change would destroy the design: narrowing a palazzo so far it is no longer a palazzo, or taking in a pleated trouser so the pleats close.
- Special pieces: heirloom, bridal and heavily embroidered trousers may need a specialist and written agreement before anything is cut.
Before you start: tools and time
- Tools: seam ripper, small sharp scissors, tape measure, hem gauge, tailor’s chalk or a wax marker (test it), pins, hand needles, tacking thread in a contrast colour, iron and press cloth, a ham, and a mirror or a helper.
- Budget alternatives: a sharp blade in a holder instead of a ripper (carefully), a sliver of dry soap instead of chalk, a rolled towel instead of a ham.
- Time: 10–15 minutes to read a trouser properly; most mistakes come from skipping this.
- Safety: rippers slip. Cut away from your hand, and never pull a ripper through a seam towards your body.
Step by step: unpicking cleanly
- Press the seam flat first; stitches show more clearly.
- From the wrong side, cut every third or fourth stitch with the ripper’s point.
- Turn to the other side and pull the bobbin thread: it lifts out in one length.
- Pick out the loose bits with tweezers or a lint roller.
- Unpick overlocking by cutting the two straight needle threads; the looper threads then pull away.
- Steam the old line, and brush gently on wool to close needle holes.
- Unpick a little beyond where the change ends, so the new line can blend in smoothly.
Planning: writing an alteration ticket
Before work begins, write a ticket (or a page in your notebook) for every trouser:
| Line | What to write |
|---|---|
| Problem | In fitting words: “gaps 1 in at centre-back waist”. |
| Change | Where and how much: “take in CB 1/2 in each side, taper to nothing at seat”. |
| Allowance found | The measured numbers, seam by seam. |
| Risks | Old line may show; pockets move; topstitching to redo. |
| Shoes, undergarments | What was worn at the fitting. |
A ticket protects you and the wearer: everyone knows what was agreed.
Women’s, men’s and children’s trousers
- Women’s ready-made: usually small allowances, overlocked; side zips and faced waists are common. Taking in is easier than letting out.
- Men’s tailored: the split waistband with a centre-back inlay is built for alteration; let-outs of 1–2 in (2.5–5 cm) in total at the waist are often possible. Teacher to check against the trouser.
- Jeans: felled inseams, a yoke and heavy topstitching make every change slower. See Altering stretch, knit and denim trousers in this Part.
- Indian trousers: salwars and churidars often have generous seams; see Altering salwars, churidars and pyjamas.
- Children’s: plan for growth, not a perfect fit today. See Children’s trousers: letting down, letting out and handing on.
Tips, tricks and hacks
- Buy for the largest part, alter down. Hip and thigh are harder to let out than the waist is to take in (from the D&D ebook).
- Photograph front, side and back before you start; you will want the “before” picture later.
- Use safety pins on the wearer, not straight pins, for sitting tests.
- Mark both sides, then measure both; bodies are rarely symmetrical.
- Tack with long stitches in a bright thread: they are quick to pull out.
- Keep a sticky note on each hanger with the problem written on it when trying several trousers (from the D&D ebook).
- Look at the hem allowance first on any trouser you might lengthen: it is the most common disappointment.
- Test your marker on the inside of the hem; some chalk and pens stain.
- Change one thing, then try again. Several changes at once hide which one worked.
- Keep the cut-off pieces until the job is collected; they are your patch cloth.
- What professionals do differently: they read the inside before quoting, write the change down, and say “no” to jobs that will disappoint.
Problems and how to fix them
You promised a let-out, then found no allowance
- Offer an insert: a gusset or side panel in matching or contrast cloth.
- Offer elastic or an adjuster at the waist instead.
- Prevention: measure the allowance before saying yes.
The pinned fit was right, the sewn fit is tight
- Release the seam by half the difference and resew.
- Check you sewed on the pin line, not inside it.
- Prevention: tack and try before sewing; allow for the thickness of the seam.
The ripper cut the cloth
- Darn the nick from the wrong side with fine thread, or fuse a tiny patch of interfacing behind it.
- If it is in the seam allowance, simply sew a fraction deeper.
- Prevention: cut stitches from the wrong side, point up, and never slide the ripper along the seam.
Old needle holes show after letting out
- Steam and brush the line; on wool, rub the holes gently with a fingernail along the grain.
- On cotton, wash once; holes often close.
- Prevention: warn the wearer; on velvet, satin and coated cloth, avoid let-outs.
The trouser was altered in the wrong order
- Re-pin from the top and recheck the hem.
- Let down the hem if there is allowance; face it if not.
- Prevention: rise and crotch first, hem last.
Two sides came out different
- Measure from the centre line to each side seam and even them.
- If the body is asymmetrical, keep the difference on purpose and note it.
- Prevention: mark both sides on the wearer and compare flat.
The wearer is unhappy with a change they agreed
- Show the ticket and the before photos calmly.
- Offer what can be undone, if allowance remains.
- Prevention: pin, show in the mirror, and write the change down before work.
Beginner mistakes and myths
- Myth: a good tailor can let out anything. No one can add cloth that is not there.
- Myth: alterations always save money. Sometimes a different trouser is the better choice.
- Mistake: pinning a trouser while the wearer stands stiffly, then sewing it.
- Mistake: cutting off allowance before the fit is proven.
- Mistake: hemming before the rise is right.
Practice drills
- Beginner: read five trousers from your own cupboard. Write every seam allowance down.
- Improver: unpick and resew 12 in (30 cm) of a side seam on an old trouser, leaving no marks.
- Confident: write tickets for three real alterations, including one “do not alter” with your reasons.
As a hobby, for earning, for teaching
As a hobby: reading the inside of trousers teaches you how they are made, faster than any book.
For earning: a clear ticket and an honest “no” build more trust than any single alteration.
For teaching: hand out old trousers and ask learners to “quote” them: what can change, what cannot, and why.
Check yourself
- Do you measure seam allowances before promising a let-out?
- Can you name the order of alteration?
- Do you tack and try before cutting?
- Can you list four reasons not to alter?
- Can you unpick a seam without marking the cloth?
Quiz
- What is an inlay? Answer: extra seam allowance left on purpose for future alteration, usually at the centre-back waist of men’s trousers.
- Why is the hem altered last? Answer: changes higher up move the hem.
- Why buy for the hip and take in the waist? Answer: taking in is almost always possible; letting out is limited by allowance.
- Name one fabric where old stitch lines often show. Answer: velvet, satin, coated or faded denim.
Key terms
- Seam allowance: the cloth between the stitch line and the raw edge.
- Inlay (outlet): extra allowance left for letting out.
- Tacking (basting): long temporary stitches for a trial fit.
- Thread tacks: loose stitches used as marks.
- Alteration ticket: the written record of the agreed change.
Sources and uncertain points
- Main source: D&D’s own trousers ebook, chapters 48–52 (isolate before you alter; buy for the larger measurement; when not to alter; the sticky-note trick), widened to men, children and Indian trousers.
- Inlay sizes and let-out amounts are typical, not a standard. Teacher to check against D&D’s studio practice.