A drape is only useful once it becomes a pattern you can cut again. This lesson covers the last half of every drape: marking the cloth while it is still on the form, taking it off, “truing” the wobbly pencil lines into clean ones, and checking that the pieces still fit together before you add seam allowances.
Teacher to check: the marking symbols and truing order are a standard method, not yet checked by a D&D teacher.

What you’ll learn
- How to mark seams, darts, balance points and grain on the draped cloth.
- How to take the drape off without losing your marks.
- How to true the lines onto paper and walk the seams.
- How to add seam allowances and test the result as a toile.
Marking while it is on the form
Mark with a soft pencil, lightly, as dots or short dashes along the style tape you can feel under the cloth. Mark everything you will need on the table, because once the pins come out the cloth forgets its shape.
- Seam lines: waist, centre front, centre back, side seam, inseam, crotch curve. Dots every 1 inch (2.5 cm), closer on curves.
- Darts and pleats: mark both legs of each dart and the point; mark each pleat fold and where it lies.
- Crossmarks (balance marks): short lines across each seam at the hip line, crotch line and knee, on both pieces that meet. These are your notches.
- Grain lines: check they are still straight; if the drape needed them to move, that is a sign of a problem.
- Labels: write “front, right, waist up” on each piece.
Taking it off
Remove the pins from one seam at a time, leaving a few at the waist, then lift the piece away. Lay it flat on the table and press lightly with a dry iron if needed: steam can shrink or stretch the drape.
Truing: from dots to lines
- Lay the cloth on pattern paper, grain line on a straight line on the paper, and pin it flat.
- Join straight seams (side seam, inseam) with a long ruler.
- Join curves with a hip curve (waist, side hip) or French curve (crotch). Average out wobbles: the true line passes through most dots, not all.
- Trace or prick through to the paper with a tracing wheel.
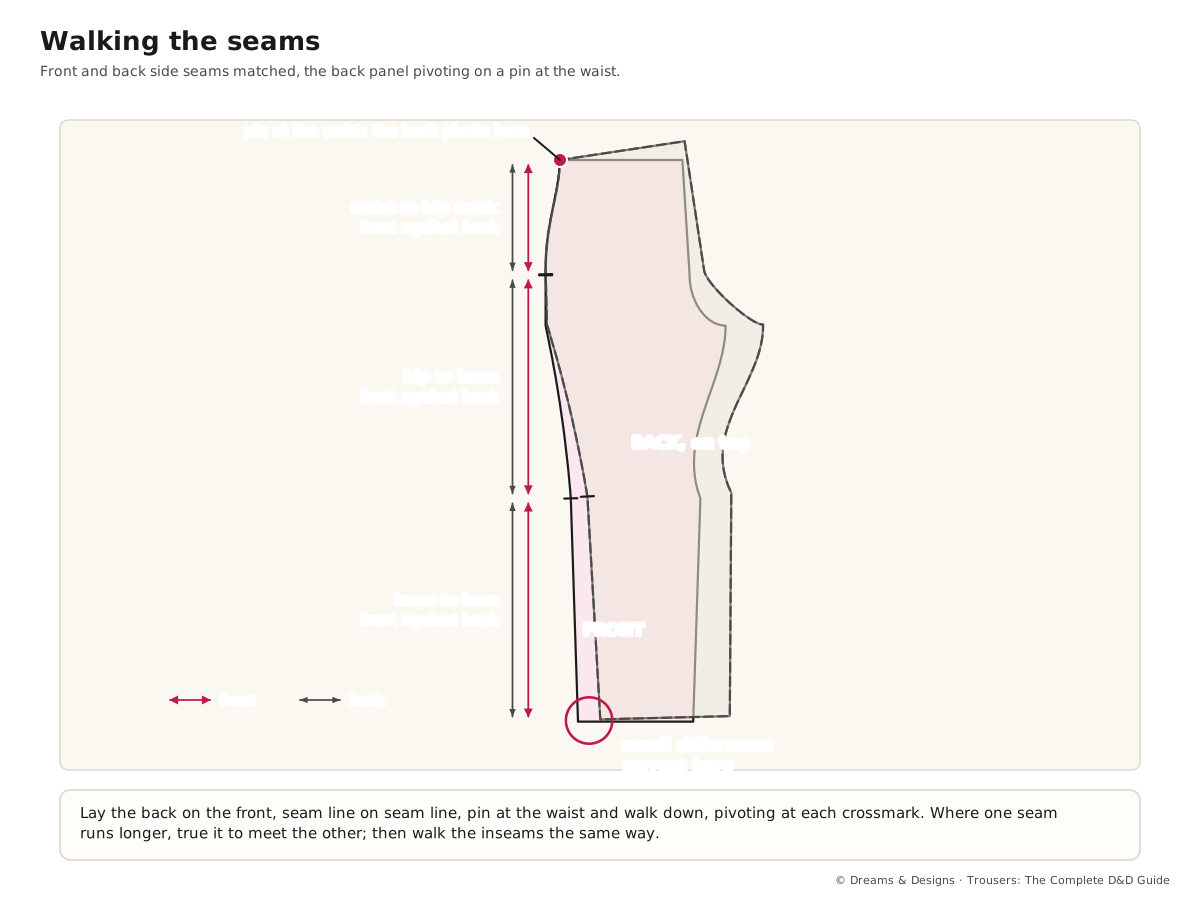
- Walk the seams: lay matching seams together and check their lengths between crossmarks. Side seam front against back, inseam front against back.
- Check corners: fold out darts and pleats, then check the waist and crotch lines run smoothly across the fold.
- Add seam allowances: usually 5/8 inch (1.5 cm) on seams, 1 inch (2.5 cm) at centre back for letting out, and the hem depth at the hem.
The toile test
Cut the trued pattern in fresh markin, machine-tack it with a long stitch, and try it on the form, then on the person. Sit, squat and walk. Mark changes on the toile in a different colour, and transfer them back to the paper. Only then cut the real cloth.
Marking symbols
| Mark | Means | Where |
|---|---|---|
| Dots or dashes | Seam line | Every seam, closer on curves |
| Short line across a seam | Crossmark (notch) | Hip, crotch, knee |
| “V” with a point | Dart | Waist front and back |
| Arrow along a fold | Pleat direction | Front waist |
| Long line with arrows | Grain | Each piece, along the crease |
| Circle | Point to match or stop | Crotch point, zip end |
Variations
- Digital truing: photograph the drape flat on a cutting mat with a ruler in shot, then trace in pattern software. Check the scale with a printed test square.
- Taping instead of pencil: some drapers mark seams on the cloth with narrow tape while on the form; it is easier to see and to correct.
- Draping on a person: for a one-off, pin a fitted toile on the person and mark with chalk. Work fast, keep pins well away from skin, and never cut on the body.
- Left-handed: mark from the left side; when truing, mirror the piece and label it clearly.
- Children: mark extra growth room as a separate line (a growth tuck or deeper hem) rather than changing the drape.
Women, men and children
- Women: mark the dart points at the fullest part of the tummy and seat; they move with the body, so mark them on the padded form, not from a chart.
- Men: mark the fly extension and a wider centre-back allowance for later letting out; many tailors leave 1–1½ inches (2.5–4 cm) there.
- Children: mark an elastic casing line instead of darts, and a growth line in the hem; label the age and height on the pattern.
Planning: the order of work
- Mark everything on the form before any pin comes out.
- Remove one piece at a time; true it before taking off the next.
- True straight lines first, then curves, then walk the seams.
- Fold darts and pleats closed to true the waist.
- Add allowances last, after all corrections.
- Toile, correct, and only then make the final pattern in card.
Tips, tricks and hacks
- Mark with two colours: grey for the first drape, red for corrections.
- Crossmark generously: two marks at the back crotch, one at the front, as on most patterns, so the pieces cannot be confused.
- Use a tracing wheel and carbon only on paper, never on the final cloth.
- Measure the crotch curve standing on edge: hold the tape measure on its edge to follow the curve.
- True the crotch as one line: lay front and back crotch curves together at the inseam and check the curve runs smoothly through the join.
- Square the corners: the waist meets the centre front and the side seam at right angles for about 1/2 inch (1.3 cm), so the waistband sits flat.
- Keep the original drape pinned to the paper pattern; it is a record if the pattern is questioned.
- Professionals check ease against the body measurements at waist, hip and thigh after truing.
- Write the date, the form and the person on every pattern piece.
- Photograph the toile from the front, side and back, standing and sitting, before you change anything.
Problems and how to fix them
1 · Marks rub off or blur
- Use a harder pencil and mark lighter, more often.
- Use narrow tape on the form instead of pencil.
- Prevention: mark in good light, with the cloth taut.
2 · Seams do not match in length
- Split the difference between both pieces.
- Check the crossmarks; one may be misplaced.
- Prevention: crossmark both pieces at the same moment on the form.
3 · The crotch curve looks lumpy
- True with a French curve in two or three overlapping placings.
- Lay front and back together and smooth the join.
- Prevention: mark the crotch with closer dots.
4 · The drape stretched when removed
- Re-pin it flat to the grain line and redraw.
- Stay-stitch the bias edges next time before removal.
- Prevention: drape firm markin and handle by the straight edges.
5 · The waist is a zig-zag after folding darts
- Fold the darts closed and redraw the waist across them.
- Cut along the new waist with the darts still folded.
- Prevention: always true the waist with darts closed.
6 · The toile fits the form but not the person
- Re-pad the form to the person and re-drape the problem area.
- Fit directly on the person and transfer changes.
- Prevention: pad carefully (see Draping basics: the form, padding and grain).
7 · The pattern grows when seam allowances are added
- Check you added allowances outside, not inside, the seam line.
- Measure the seam line itself, not the cutting line.
- Prevention: draw seam lines solid and cutting lines dashed, and label them.
8 · Grain line has drifted
- Re-drape with the grain held straight at the crease.
- Accept small drift on purpose only for bias styles.
- Prevention: pin the grain line first and check it throughout.
Beginner mistakes and myths
- Mistake: cutting the real cloth from the drape without a toile.
- Mistake: forgetting crossmarks; the pieces then go together twisted.
- Myth: “Truing changes the drape.” It only cleans it; the shape stays.
- Myth: “A computer does it better.” Software traces; your eye still decides the line.
Practice drills
- Beginner: drape a simple straight skirt panel, mark it, true it and walk the side seam.
- Intermediate: drape one trouser front and back, true both, and walk the inseam and side seam.
- Advanced: true a drape with two darts and a pleat, fold them closed, and make a toile that fits within 1/4 inch (6 mm).
As a hobby, for earning, for teaching
As a hobby: truing is quiet, satisfying table work; your patterns become a library you can reuse.
For earning: a trued, labelled pattern card per client is a studio asset; repeat orders start from it.
For teaching: give students a ready-marked drape to true before they drape their own; it teaches what to mark.
Care and finishing
- Copy final patterns onto card; hang them by a hole at the waist.
- Store toiles folded with their pattern so fit changes are traceable.
Sources and uncertain points
- General draping and pattern practice; D&D ebook ch. 40 for the drape-then-flat principle.
- Seam allowance widths vary by studio and fabric: teacher to check.
Check yourself
- Do you mark everything before removing any pins?
- Can you place crossmarks so pieces cannot be confused?
- Do you know which tool trues which line?
- Can you walk a seam and fix a mismatch?
- Do you always make a toile before the real cloth?
Key terms
- Truing: turning marked dots into clean, accurate pattern lines.
- Crossmark (balance mark, notch): a mark across a seam to match pieces.
- Walking the seams: checking matching seams for equal length.
- Seam line, cutting line: where you sew, and where you cut.
- Stay-stitching: a line of stitching that stops an edge stretching.