Your first whole trouser: a wide, floor-length palazzo with an elastic waist and no zip, no fly and no darts. It is the most-worn trouser in Indian wardrobes after the salwar, it forgives small fitting errors, and it teaches the three things every later project needs: a draft taken from the block, a clean crotch seam, and a level hem. The D&D starter kit is matched to this project and the next.

What you’ll learn
- How to turn the women’s block into a palazzo pattern, with exact figures.
- How to lay out and cut a wide trouser on 44 in cloth.
- How to sew a pull-on trouser in the right order, with a strong crotch seam.
- How to make an elastic casing that does not twist, and a level floor-length hem.
At a glance
| Level | Skills practised | Time |
|---|---|---|
| Beginner | Slash-and-spread draft, layout, plain seams, seam finishes, crotch seam, elastic casing, hem | Draft 1–1 1/2 hours (from a tested block); cut 45 minutes; sew 3–5 hours |
Lessons this project uses: Module 4, The women’s block: the framework and the front, The women’s block: the back, the checks and the toile, From the block: taper, flare and wide legs and From the block: palazzo, harem, culotte and jogger; Module 6, Laying out and cutting: grain, nap and fabric layouts, Seams: plain, French and flat-felled, Seam finishes: overlocked, zigzag, pinked and bound, Waistbands: elastic, half-elastic, nada and adjustable, Hems: blind, topstitched and faced and Order of construction: basic and pull-on trousers.
Materials and quantities
For our worked-example woman: waist 30 in (76 cm), hip 40 in (101.5 cm), finished length 40 in (101.5 cm) to the floor in flat shoes.
| Item | Amount | Notes |
|---|---|---|
| Fabric, 44–45 in (112–115 cm) wide | 2.5 m | Rayon, cotton cambric, mulmul, crepe or soft linen; plain or a small all-over print |
| Or fabric, 58–60 in (147–152 cm) wide | About 2.25 m | Still two lengths: the spread legs are too wide to sit side by side |
| Elastic, 1 1/4 in (3 cm) wide | 1 m | Knitted or woven waistband elastic; you cut about 29 in (73.5 cm) |
| Thread | 1 spool, 100 m | Polyester all-purpose, matched; a second spool if you overlock |
| Pattern paper | 2 sheets, about 50 × 36 in (127 × 91 cm) | One for the front, one for the back |
| Also | – | Chalk, tape measure, pins, a bodkin or large safety pin, shears, iron |
To scale for another size: one length = finished length + 4 1/4 in (11 cm) for the casing, hem and the back’s raised centre back. Lay the spread front and back side by side on the folded cloth: if they do not fit, you need two lengths, as here. Add 5% for shrinkage, round up to the next quarter metre, and cut elastic to the wearer, not to a chart (Module 2, How much fabric to buy and Elastic, nada, latkans and drawstrings).
The D&D starter kit
The starter kit is matched to Projects 1 and 2 and sized for our worked examples (hip up to about 42 in, 106.5 cm; length up to about 40 in, 101.5 cm). Larger sizes or longer legs need more cloth: ask the studio. The price is on our QR menu.
| For | Contents | Quantity |
|---|---|---|
| Project 1, palazzo | Pre-washed rayon or cotton cambric, 44–45 in (112–115 cm) wide | 2.5 m |
| Project 1, palazzo | Waistband elastic, 1 1/4 in (3 cm) wide | 1 m |
| Project 1, palazzo | Polyester all-purpose thread, matched | 1 spool, 100 m |
| Project 2, cigarette pants | Medium-weight cotton twill or cotton-blend suiting, 58–60 in (147–152 cm) wide | 1.3 m |
| Project 2, cigarette pants | Invisible zip, 9 in (23 cm), matched | 1 |
| Project 2, cigarette pants | Lightweight woven fusible interfacing | 0.5 m |
| Project 2, cigarette pants | Fusible stay tape, 3/8 in (1 cm) | 1 m |
| Project 2, cigarette pants | Hook and eye, small | 1 set |
| Project 2, cigarette pants | Polyester all-purpose thread, matched | 1 spool, 100 m |
| Both | Pattern paper, about 50 × 36 in (127 × 91 cm) | 4 sheets |
| Both | Tailor’s chalk, white and blue | 2 pieces |
| Both | Tape measure, 60 in / 150 cm, inches and cm | 1 |
| Both | Bodkin for threading elastic | 1 |
Not in the kit: shears, pins, rulers and curves, an iron, a sewing machine, and an invisible-zip foot (feet differ from machine to machine). Module 2 lists the full tool kit.
The draft
Start from your tested women’s block, without seam allowances. Every figure below is for our worked example; for your own, use your own block and the same moves.
- Trace the block front and back with the hip line (8 in, 20.5 cm), crotch line (11 1/2 in, 29 cm), knee line and both crease lines.
- Wide leg (From the block: taper, flare and wide legs): drop the side seam straight down from the hip line, and the inseam straight down from the crotch point. Front hem 12 1/2 in (31.5 cm), back hem 15 in (38 cm). Extend the length to 40 in (101.5 cm).
- Elastic waist: take the side seam and centre front straight up from the hip line to the waistline. Ignore the darts. The back keeps its slanted centre back and its 1 in (2.5 cm) rise. The top now measures about 41–42 in (104–106.5 cm) round, enough to pass over the 40 in hip.
- Casing: add 1 3/4 in (4.5 cm) above the waistline: 1/4 in (6 mm) turn-under and a 1 1/2 in (4 cm) channel for 1 1/4 in elastic. Fold the paper at the casing fold line and cut the side and centre edges while folded, so the casing matches the trouser when it is turned in.
- Slash and spread (From the block: palazzo, harem, culotte and jogger): draw two lines on each piece, parallel to the crease and 2 1/2 in (6.5 cm) either side of it, from the hem up to the hip line. Cut up to the hip line, leave a hinge, and spread each slash 2 in (5 cm) at the hem. Front hem 16 1/2 in (42 cm), back hem 19 in (48.5 cm), 35 1/2 in (90 cm) per leg.
- Hem line: redraw it as a smooth curve; it drops about 1/4 in (6 mm) at each spread. Square it to the side seam and inseam for the last 1 in (2.5 cm).
- Seam allowances: 5/8 in (1.5 cm) at side seams and inseams, 3/8 in (1 cm) on the crotch curves, 1 1/2 in (4 cm) at the hem. The casing is already included. Mark notches: hip line on both side seams, one notch on the front crotch, two on the back crotch.
- Elastic: waist minus 2 in = 28 in (71 cm) finished. Cut 29 in (73.5 cm) to allow the 1 in (2.5 cm) overlap, and check it on the body before cutting.
A standard method: a D&D teacher checks the figures before you rely on them.
Cutting layout
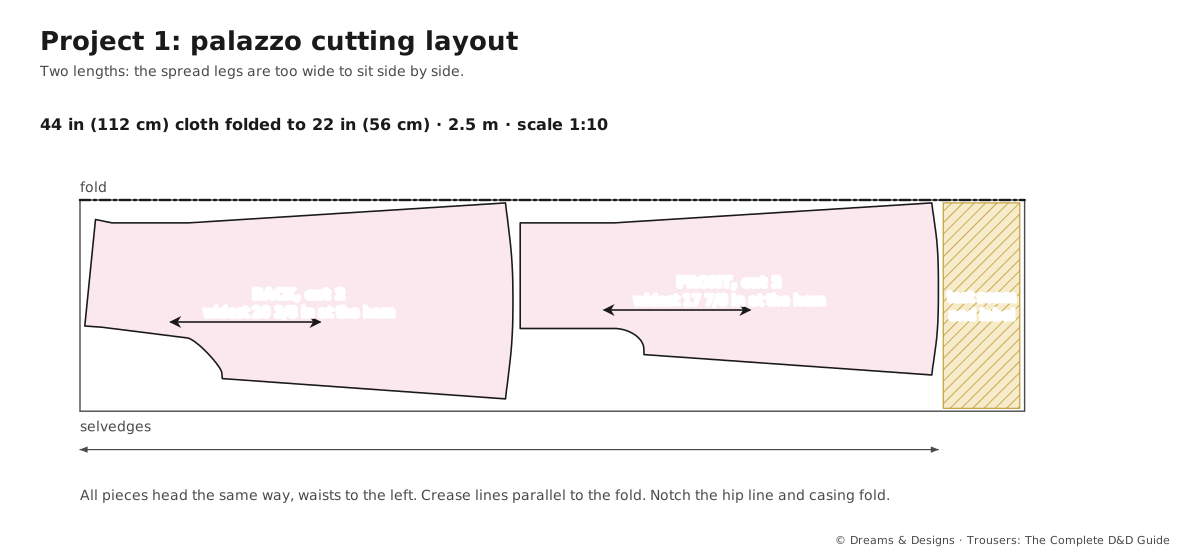
- Pre-wash and dry the cloth as you will wash the palazzo; press it. Rayon can shrink 5% or more (Module 2, Shrinkage, pre-washing and lining).
- Fold it selvedge to selvedge, right sides together. Straighten the cut ends.
- Lay the back in the first length, the front in the second, both heading the same way, crease lines parallel to the selvedge. Measure from the crease to the selvedge at both ends of each piece.
- Pin or weight, chalk round, and cut through both layers. You now have a left and right front and a left and right back.
- Snip the notches 1/4 in (6 mm) deep, and the casing fold line at each edge. Chalk a small “B” on the wrong side of each back.
Step by step
- Test seam. Sew two scraps with your chosen stitch (2.5 mm) and finish. Check: no puckering, no skipped stitches. Rayon likes a new 70/10 or 80/12 needle.
- Side seams. Front to back, right sides together, notches matched, from the top of the casing to the hem. Finish the allowances together (overlock or zigzag) and press them towards the back. Check: the hip notches meet.
- Inseams. Crotch point to hem on each leg; finish and press towards the back. Check: both inseams the same length; any small difference eased in above the knee.
- Crotch seam (method A, Order of construction: basic and pull-on trousers). Turn one leg right side out and slip it inside the other, right sides together. Match the inseams exactly at the crotch point, then the notches. Sew from the back waist round to the front waist at 3/8 in (1 cm). Sew a second row 1/8 in (3 mm) inside the first along the lower curve. Check: the inseams meet in a neat cross.
- Finish the crotch. Trim the lower curve to 1/4 in (6 mm) between the notches, and finish the allowances together. Do not clip a seam that will be overlocked.
- First try-on. Pin a length of elastic round the waist and try the palazzo on. Check: it passes over the hip, the crotch does not drag, the side seams hang straight down.
- Casing. Press the 1/4 in turn-under, then fold the casing inside along the snipped fold line and press. Stitch close to the lower fold all round, leaving a 2 in (5 cm) gap at the centre back.
- Elastic. Pin one end to the trouser beside the gap. Thread the other through with the bodkin. Overlap the ends 1 in (2.5 cm) and zigzag a box. Close the gap.
- Settle the gathers. Stretch the waist to spread the fullness evenly, then stitch in the ditch through the casing at each side seam to stop the elastic twisting. A small label or a bar of contrast stitching at the centre back shows the wearer which way round it goes.
- Hang it. Leave the palazzo on a hanger for a day: the spread areas sit partly off grain and may drop.
- Mark the hem in the shoes to be worn: just clearing the floor, all round. Trim to an even 1 1/2 in (4 cm) below the mark.
- Hem. Press 1/4 in (6 mm) under, then 1 1/4 in (3 cm). Machine-stitch close to the fold, or blind-hem by hand for a finer finish (Hems: blind, topstitched and faced). Press the whole trouser.
Fitting points
- Waist: two fingers slide flat under the elastic; it stays up when walking and sitting.
- Crotch: no drag between the legs when standing, no pull at the back when sitting on the floor.
- Balance: the side seams hang straight; if they swing forward, the back needs more length at the centre back (see Module 3, Fitting issues: rise, seat, crotch and thighs).
- Hem: level all round and clear of the floor, so it cannot catch on steps or under a heel.
Success check
- The crotch seam is double-stitched, and the inseams meet at the crotch point.
- The gathers are even, and the elastic lies flat and does not roll.
- Both legs are the same length and the hem is level all round.
- Inside, every edge is finished and there are no loose threads.
- It pulls on and off easily and stays up.
Finished preview
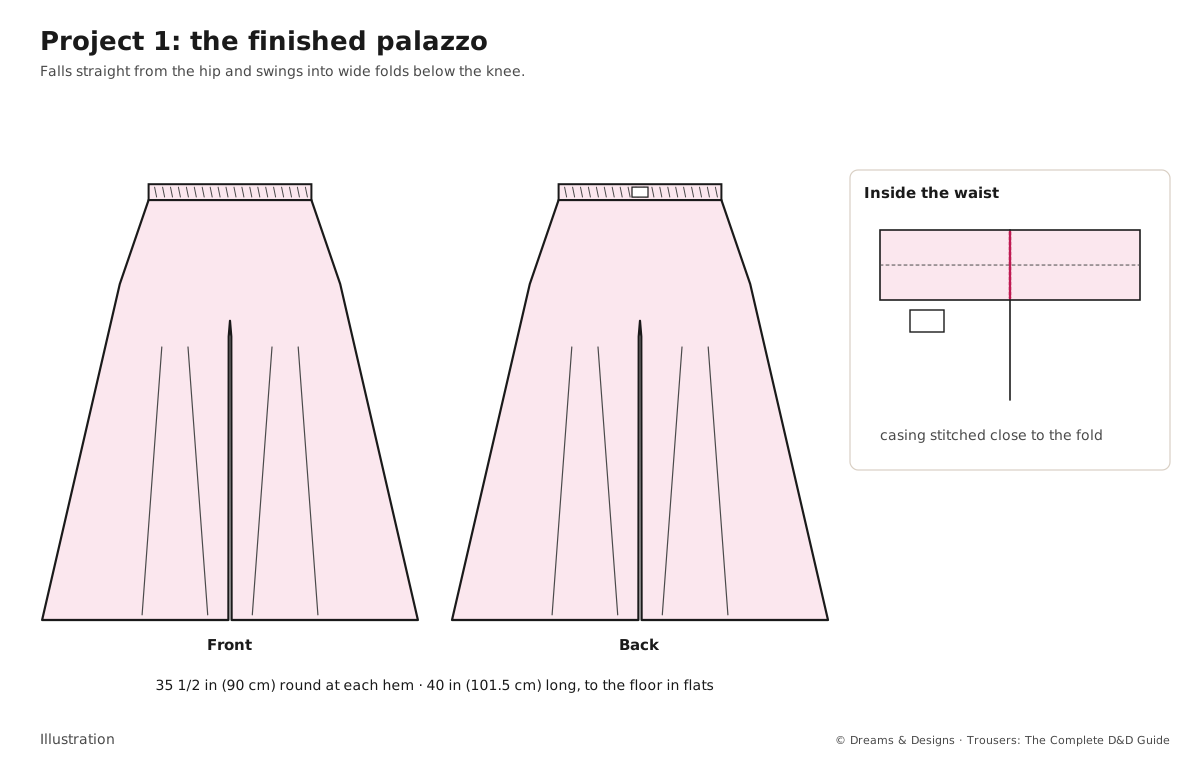
A soft, floor-length trouser that falls straight from the hip and swings into wide folds below the knee, each leg about 35 in (90 cm) round at the hem. From the front it reads almost like a skirt when standing still, and as two separate legs when walking. The waist is a neat gathered band about 1 1/2 in (4 cm) deep. Inside: finished seams, a double-stitched crotch, a flat casing stitched at each side seam.
Tips, tricks and hacks
- Draft the palazzo on a copy of the block, never on the block itself; you will want the block for Project 2.
- Use tissue or newspaper under rayon when cutting; pin through both and cut them together, and the cloth cannot slide.
- Cut with weights, not pins, on slippery cloth; tins of food work.
- Chalk a “B” on every back as soon as it is cut. Wide front and back legs look almost alike.
- Sew side seams from the hem up on soft cloth if they stretch; it keeps the hem edges level.
- Press each seam before crossing it with another; the crotch cross will then lie flat.
- Lay the elastic flat before joining it: a twist sewn into the join can never be got out.
- Mark the hem with a helper and a ruler standing on the floor, or with a long ruler and the palazzo on a padded form.
- Professionals let wide legs hang overnight before hemming; the spreads can drop 1/4–1/2 in (6–13 mm).
- A row of stitching 1/2 in (1.3 cm) below the casing top, through elastic and cloth, holds the elastic flat for good; stretch as you sew.
- Keep the offcuts for a matching scrunchie, potli or dupatta edging.
Problems and how to fix them
The elastic twists inside the casing
- Unpick the side-seam stitching, untwist, and stitch in the ditch again, stretching the waist.
- Add a row of stitching through the casing and elastic all round.
- Prevention: cut the casing 1/4 in wider than the elastic, and stitch at the side seams before wearing.
The elastic will not go through the casing
- Check that no seam allowance is folded up across the channel; tack it down flat.
- Use a bigger bodkin, or a safety pin turned closed.
- Prevention: press the side-seam allowances in opposite directions inside the casing.
The crotch seam splits when sitting
- Re-sew the lower curve with a second row and a slightly shorter stitch (2 mm).
- If the cloth itself tore, patch it from the inside with a small fused square and re-sew.
- Prevention: always double-stitch the lower curve, and check the crotch depth on the toile.
The hem dips at the spreads
- Hang the trouser for a day, re-mark from the floor, and re-hem.
- Trim the dips level before re-hemming.
- Prevention: redraw the hem as a smooth curve on paper, and hang before hemming.
The side seams swing forward
- Lift the front at the waist by pulling a little more elastic through the front half, and re-stitch.
- On the next pair, add 1/2 in (1.3 cm) at the back waist, tapering to nothing at the side.
- Prevention: check balance at the first try-on, before the casing is sewn.
The waist slides down
- Open the casing at the back, shorten the elastic by 1 in (2.5 cm), and re-join.
- Change to a firmer elastic of the same width.
- Prevention: fit the elastic on the body, snug but not tight, before cutting.
The rayon slides and the pieces come out uneven
- True the cut edges against the pattern on a flat table and trim.
- Stay-stitch the waist edge so it does not stretch further.
- Prevention: cut on tissue, single layer if needed, and keep the cloth fully on the table.
The seams pucker
- Loosen the top tension slightly and test on a scrap.
- Use a new, finer needle and hold the seam taut (not stretched) front and behind the foot.
- Prevention: always sew a test seam first.
Variations: sizes, fabrics, Indian and occasion versions
- Other sizes: draft your own block first (Module 4) and use the same moves. For a hip over 44 in (112 cm), increase each spread to 2 1/2 in (6.5 cm), and check the crotch room on a toile (Module 3, Petite, tall, plus-size, slim and athletic).
- Petite or tall: change the length below the knee only; the spreads stay the same.
- Pockets: add side-seam pockets (5 1/2–6 1/2 in, 14–16.5 cm, opening from 1 1/2 in, 4 cm, below the waistline) before the side seams (Side-seam and slant pockets).
- Smarter waist: a flat front with elastic only at the back (Waistbands: elastic, half-elastic, nada and adjustable), or a separate elastic band.
- Fabrics: rayon and crepe drape and swing; cambric and mulmul are cool for Bengaluru summers; linen creases but breathes; georgette needs a lining or a slip. Avoid stiff cloth: the spreads stick out.
- With a kurta: the palazzo is the everyday partner of a straight or A-line kurta (Module 8, Pairing kurtas with trousers).
- Festive: silk or art silk with a woven or embroidered border along the hem, cut on the cross-grain so the border runs round the leg; line it with cotton.
- Split palazzo: leave the side seams open 12 in (30.5 cm) above the hem and face the slits.
- Culotte length: stop at mid-calf, 29 in (73.5 cm), as in From the block: palazzo, harem, culotte and jogger.
- Children’s palazzo: from the child block, with elastic only and no ties (Module 3, Children’s trousers: safety).
- Anyone may wear it: men’s wide trousers use the same moves on the men’s block.
Beginner mistakes
- Spreading the slashes past the hip line, which adds width at the seat as well as the hem.
- Forgetting the casing allowance, so the trouser sits 1 3/4 in low.
- Cutting the elastic to the full waist measurement: it falls down.
- Hemming the same day, on cloth that then drops.
- Laying the front and back in opposite directions on a print with a direction.
As a hobby, for earning, for teaching
As a hobby: once the pattern is made, a palazzo takes an evening. Make three in different cloths and you have learnt how drape changes a design.
For earning: palazzos are a steady order with kurtas. Keep a tested pattern for each regular customer and cost your time with the method in Part XII; the book gives no prices.
For teaching: a good first-class project. Have learners draft one half-scale first, then full size; mark the hem in pairs, so each learner sees the other’s hem from the floor.
Care and finishing
- Wash rayon gently in cool water and dry it in the shade; do not wring.
- Press on the wrong side with a press cloth; rayon shines under a hot iron.
- Hang palazzos from the waist with clips, not folded over a bar, to keep the folds.
- If the elastic tires after many washes, open the casing at the back and replace it.
Sources and uncertain points
- The draft follows the book’s own Part IV figures, from a standard, widely taught flat-pattern method; it is not a D&D method of its own.
- Fabric quantities and kit amounts are for our worked example and are to be checked by a teacher against the real cloth widths stocked.
- Shrinkage of rayon varies widely between mills; always pre-wash.
Check yourself
- Can you explain why the slashes stop at the hip line?
- Do you know how much casing to add for 1 1/4 in elastic?
- Did you double-stitch the lower crotch curve?
- Can you cut elastic to the body, with the overlap?
- Did you hang the palazzo before hemming?
Share your work
We’d love to see it. Photograph the front, the back and the inside in daylight, then either:
- Send it to the studio on WhatsApp – the subject is filled in for you, and a teacher replies; or
- post it in #show-and-tell on the Bangalore Sewing Club Discord with the tag #trousers-p1.