Jeans pockets are among the most copied details in clothing: the curved front “scoop” pocket with its little coin pocket, and the two topstitched patch pockets on the seat. Placed well, back pockets balance the seat; placed badly, they make the whole trouser look wrong. This lesson covers both, for women’s, men’s and children’s jeans, and for any casual trouser in the jeans style.
What you’ll learn
- How to sew a jeans front pocket with a coin pocket and twin topstitching.
- How to make, press and topstitch a back patch pocket.
- How to place back pockets so they balance different seats.
- Rivets, bar tacks and other reinforcements.
The pieces
- Front leg with the scoop (curved opening) cut away.
- Pocket facing (sometimes called the pocket yoke): main denim, shaped to fill the scoop.
- Coin pocket (also called the watch or fifth pocket): a small denim square.
- Pocket bag: one or two pieces of strong cotton pocketing.
- Back pockets: two denim pockets, usually a pentagon shape.
Front pocket, main steps
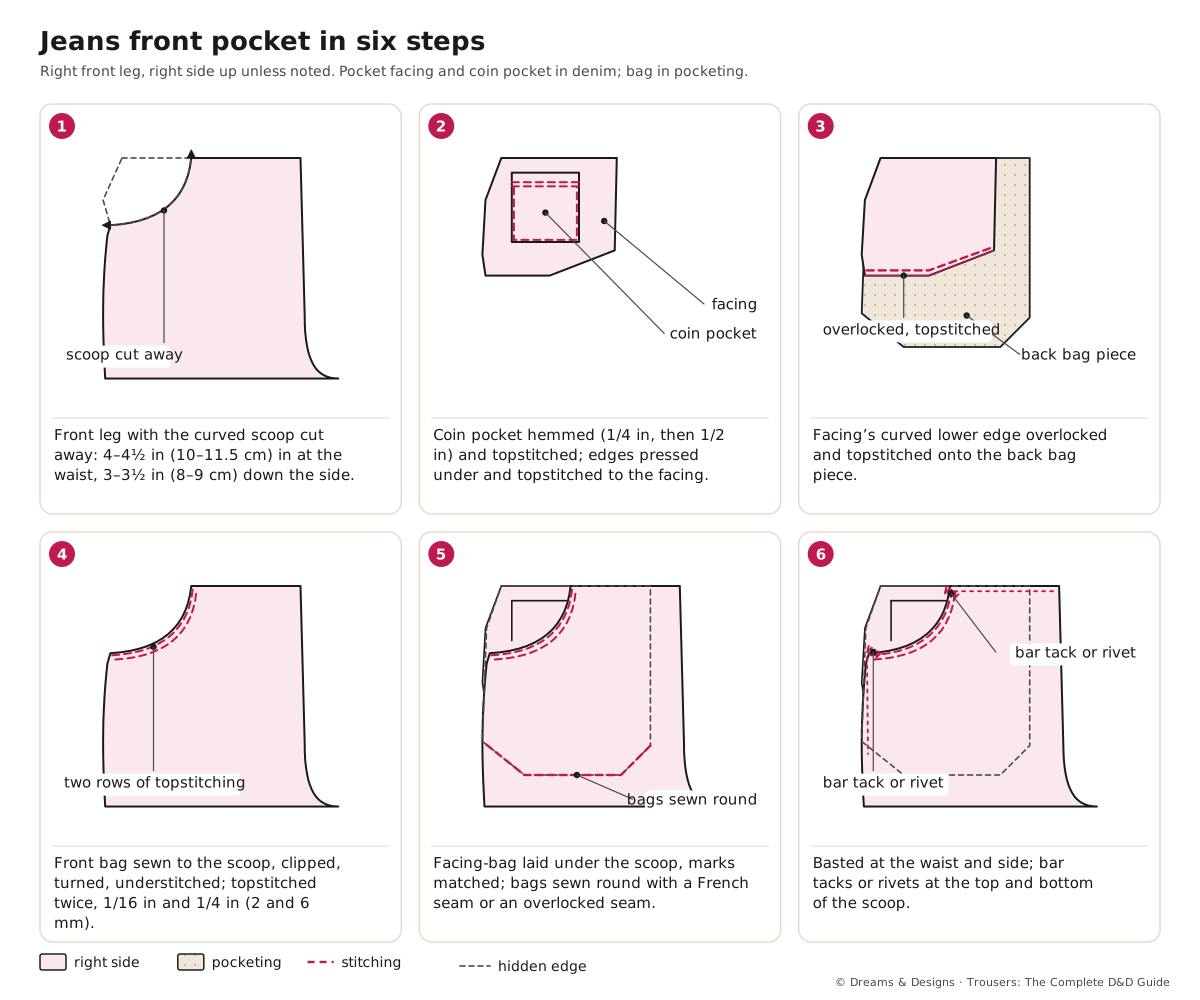
- Hem the top of the coin pocket (fold 1/4 in then 1/2 in, 6 mm and 1.2 cm) and topstitch; press the side edges under and topstitch it to the facing.
- Overlock the curved lower edge of the facing and topstitch it to the back bag piece.
- Sew the front bag piece to the scoop, right sides together. Clip the curve, turn, understitch, press.
- Topstitch the scoop twice from the right side, 1/16 in and 1/4 in (2 mm and 6 mm) from the edge.
- Lay the facing-bag under the scoop, matching the marks. Sew the bag pieces together round the bottom: a French seam, or a plain seam overlocked.
- Baste the pocket to the leg at the waist and side. Add bar tacks or rivets at both ends of the scoop.
Back pocket, main steps
- Hem the pocket top: fold and topstitch twice. Add any decorative stitching now, while it is flat.
- Press the other edges under on the seam line, using a card template cut to the finished shape.
- Pin or glue-baste the pocket in position on the back leg (after the yoke and centre back are sewn).
- Topstitch round the sides and bottom twice, pivoting at the corners. Reinforce the top corners with a small triangle or bar tack.
Teacher to check: a standard, widely taught method, in inches with cm.
Before you start
- Prerequisites: Seams: plain, French and flat-felled and Side-seam and slant pockets.
- Time: 1½–2½ hours for four pockets with twin topstitching.
- Difficulty: moderate; the topstitching is the skill.
- Tools: jeans needle (90–100), topstitching thread (heavier, often gold or tan), edge-stitch foot, card for templates, rivet setter or bar-tack setting.
- Safety: wear eye protection when hammering rivets; a hard, solid surface only.
Placing back pockets
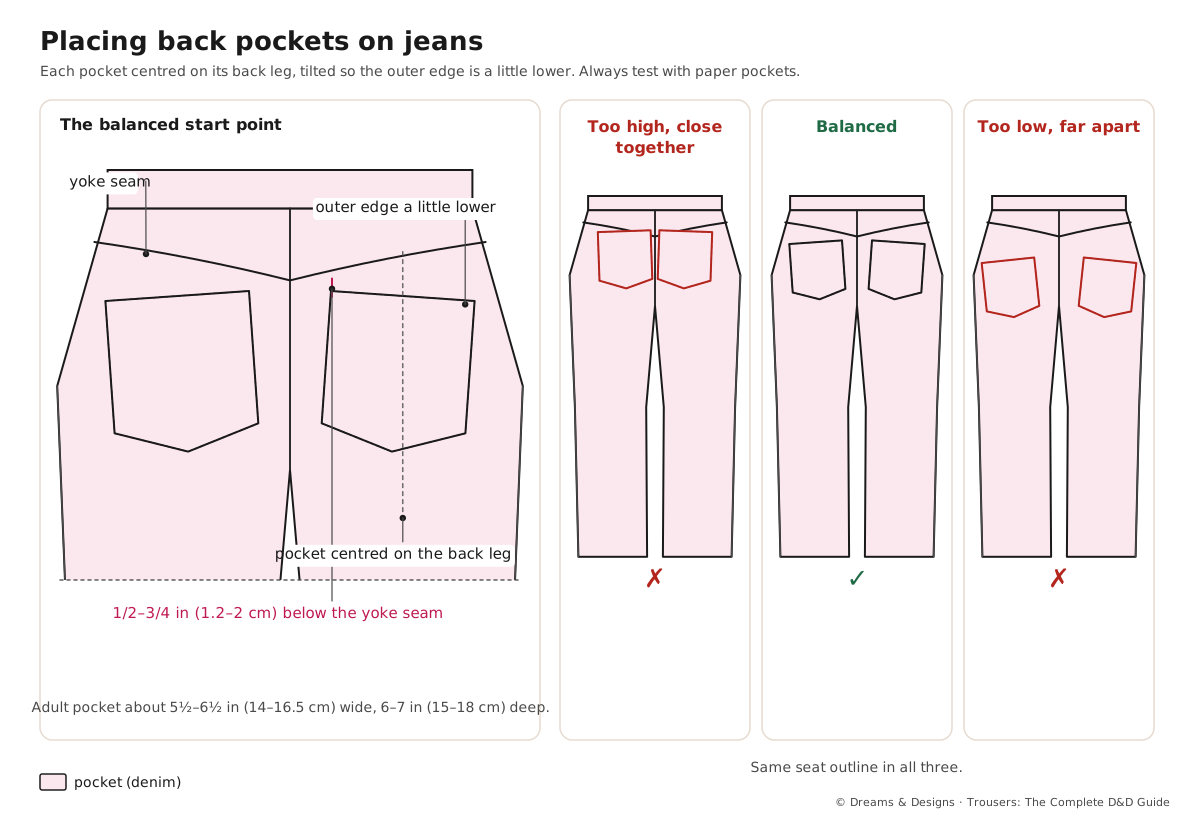
- Start point: centre each pocket on the back leg, with the top inner corner about 1/2–3/4 in (1.2–2 cm) below the yoke seam.
- Tilt: angle the pocket so the outer top corner is a little lower; this follows the seat.
- Women: pockets slightly closer together and a little lower than they first look on the table often balance a fuller seat. Try them on.
- Men: pockets usually a little larger and set more upright.
- Children: scale the pocket to the trouser; a child’s back pocket is often 4–4½ in (10–11.5 cm) wide for ages 4–8, as a starting point.
- Always test: pin paper pockets on the trouser and look in a mirror from behind before stitching. This matters more than any rule.
Typical adult back pocket: about 5½–6½ in (14–16.5 cm) wide and 6–7 in (15–18 cm) deep. Starting points only. Teacher to check.
Making the pocket pieces from your pattern
- Draw the scoop on the front leg pattern: from a point on the waist about 4–4½ in (10–11.5 cm) in from the side, curving down to the side seam about 3–3½ in (8–9 cm) below the waist. Adults; scale for children. Teacher to check.
- Trace the facing: the area the scoop removed, extended 2–2½ in (5–6 cm) below and inside the curve, with the grain the same as the leg.
- Trace the pocket bag: from the waist to about 3–4 in (8–10 cm) below the scoop’s lowest point, its inner edge reaching nearly to the fly. Cut one bag from the scoop line (front bag) and one from the full leg outline (back bag), or cut one piece folded.
- Coin pocket: a rectangle about 3–3½ in (8–9 cm) wide and 3½ in deep plus hem, placed on the facing so its top sits just below the waistband seam.
- Mark notches at both ends of the scoop on the leg, facing and bag, so they line up exactly.
Rivets, bar tacks and reinforcement
- Rivets are traditional at the top and bottom of the scoop and the coin pocket corners. Set them after topstitching, with the post pushed from the inside. Buy rivets sized for the denim thickness.
- Bar tacks (a short, close zigzag, about 3/8 in or 1 cm long, stitch length almost 0) do the same job and need no tools. Many modern jeans use only bar tacks.
- Back pocket corners: a small triangle of stitching, a short back-and-forth, or a bar tack.
- Do not rivet the back pockets of jeans that will be worn sitting on furniture or car seats; exposed rivets scratch. Bar tack instead.
- Women’s, men’s and children’s jeans are built the same way; only the scale, the topstitching weight and the reinforcement change.
Variations, and left-handed notes
- No coin pocket: many women’s and children’s jeans drop it; keep the facing.
- Flap back pockets: add a flap above the pocket, see Patch and cargo pockets.
- Decorative back stitching: design your own; avoid copying a brand’s trademarked stitch shape.
- Single-needle topstitching: for chinos and casual cotton trousers in jeans cut.
- Children’s jeans: bar tacks instead of rivets, which can be hard or cold; avoid any loose decoration for under-threes.
- Left-handed: no change to the sewing; when topstitching curves, some left-handed sewers find it easier to guide the cloth with the left hand behind the foot.
Planning and control
- Order on jeans: back yoke and centre back first, then back pockets, then front pockets, then the fly. Full order: Order of construction: jeans, salwar and churidar.
- Topstitching control: stitch length 3–3.5 mm; slow at curves; stop with the needle down to pivot. Never backstitch heavy thread; pull the ends through and knot.
- Tension: heavier thread usually needs slightly looser top tension; test on folded denim.
- Twin rows: sew the edge row first, then the second using the foot edge or a guide.
Tips, tricks and hacks
- Card templates make two identical back pockets; press the edges over the card.
- Glue-baste pockets with a washable glue stick; pins distort topstitching.
- Use ordinary thread in the bobbin and topstitching thread on top.
- Topstitch on a test piece of the same denim, folded to the same thickness.
- A twin needle gives even parallel rows on curves, on lighter denim.
- Bar tack instead of rivets if you have no setter; it is just as strong.
- Clip the scoop curve before turning, and press over a ham.
- Keep the coin pocket below the waistband line by at least 1/2 in, or it gets caught in the band seam.
- Sew decorative stitching first on flat pockets.
- Check the placement in the mirror with the wearer standing naturally.
- What professionals do differently: they use card templates and fixed placement marks on the pattern, so pockets are identical every time.
Problems and how to fix them
The back pockets look too high or too wide apart
- Unpick and move them lower and closer, checking in the mirror.
- Try a slightly larger pocket on a fuller seat.
- Prevention: test with paper pockets before stitching.
Topstitching rows wander
- Unpick the bad section and resew with an edge-stitch foot.
- Draw a guide line with a water-soluble pen.
- Prevention: practise on folded denim; sew slowly at curves.
The machine skips over thick corners
- Use a jeans needle and turn the hand wheel over the thickest point.
- Use a hump jumper (folded scrap) behind the foot.
- Prevention: hammer thick seams flatter before stitching.
The two back pockets are different sizes
- Re-press both over one card template.
- Recut the odd one if needed.
- Prevention: always use a card template.
The scoop stretches and ripples
- Unpick and re-stay with tape, easing the cloth.
- Steam-press to shrink a little on cotton.
- Prevention: stay-stitch and tape the scoop as soon as it is cut.
Pocket corners tear open
- Resew the corners with a small reinforcing triangle.
- Add bar tacks.
- Prevention: reinforce both top corners on every back pocket.
The rivet will not set
- Check the post is the right length for the thickness; use a shorter or longer one.
- Set on a hard surface with the proper tool.
- Prevention: test on the same number of layers first.
Beginner mistakes and myths
- Myth: back pockets should be placed the same on every body. They need adjusting to the seat.
- Mistake: backstitching heavy topstitching thread, making a knot on the surface.
- Mistake: sewing pockets after the side seams, when the leg is no longer flat.
- Mistake: copying a brand’s pocket stitching design.
Practice drills
- Beginner: twin-topstitch straight lines and a curve on folded denim.
- Improver: make and topstitch one back pocket from a card template.
- Confident: sew a full jeans front pocket with coin pocket, then place back pockets on a real trouser and check in the mirror.
As a hobby, for earning, for teaching
As a hobby: designing your own back-pocket stitching is a signature you can put on every pair.
For earning: reinforcing torn jeans pockets and moving back pockets are common, quick jobs.
For teaching: a back-pocket placement exercise with paper pockets and a mirror teaches proportion in minutes.
Care and finishing
- Wash jeans inside out to protect the topstitching and the colour.
- Check pocket bags at the bottom corners; they wear through first.
Check yourself
- Can you sew a scoop pocket with a coin pocket?
- Do you use card templates for back pockets?
- Can you place back pockets to suit a particular seat?
- Do you reinforce the corners?
Quiz
- What stitch length suits jeans topstitching? Answer: about 3–3.5 mm.
- Which is sewn first on jeans: back pockets or the side seams? Answer: back pockets.
- Why avoid rivets on young children’s jeans? Answer: they can be hard or cold; bar tacks work instead.
- How do you test pocket placement? Answer: pin paper pockets and look in a mirror.
Key terms
- Scoop pocket: curved front pocket of jeans.
- Coin (watch, fifth) pocket: the small pocket inside the front pocket.
- Back yoke: the shaped band across the top of the jeans back.
- Rivet: metal reinforcement set through the cloth.
- Topstitching thread: heavier thread for visible stitching.
Sources and uncertain points
- Main source: D&D’s own trousers ebook, chapter 44, with general, widely taught jeans-making practice.
- Back pocket sizes and placement vary by brand and body; the numbers are starting points. Teacher to check.
- Some brand pocket-stitching designs are protected as trademarks; design your own.