The hem is the last line of the trouser and the one everyone looks at. A hem that is uneven, puckered or the wrong length changes how the whole leg looks. This lesson covers marking the length correctly (with the right shoes), and the three main hems: the blind hem of tailored trousers, sewn by hand (turpai) or machine; the topstitched hem of jeans and casual trousers; and the faced hem for flares, curved hems and short-of-cloth legs.
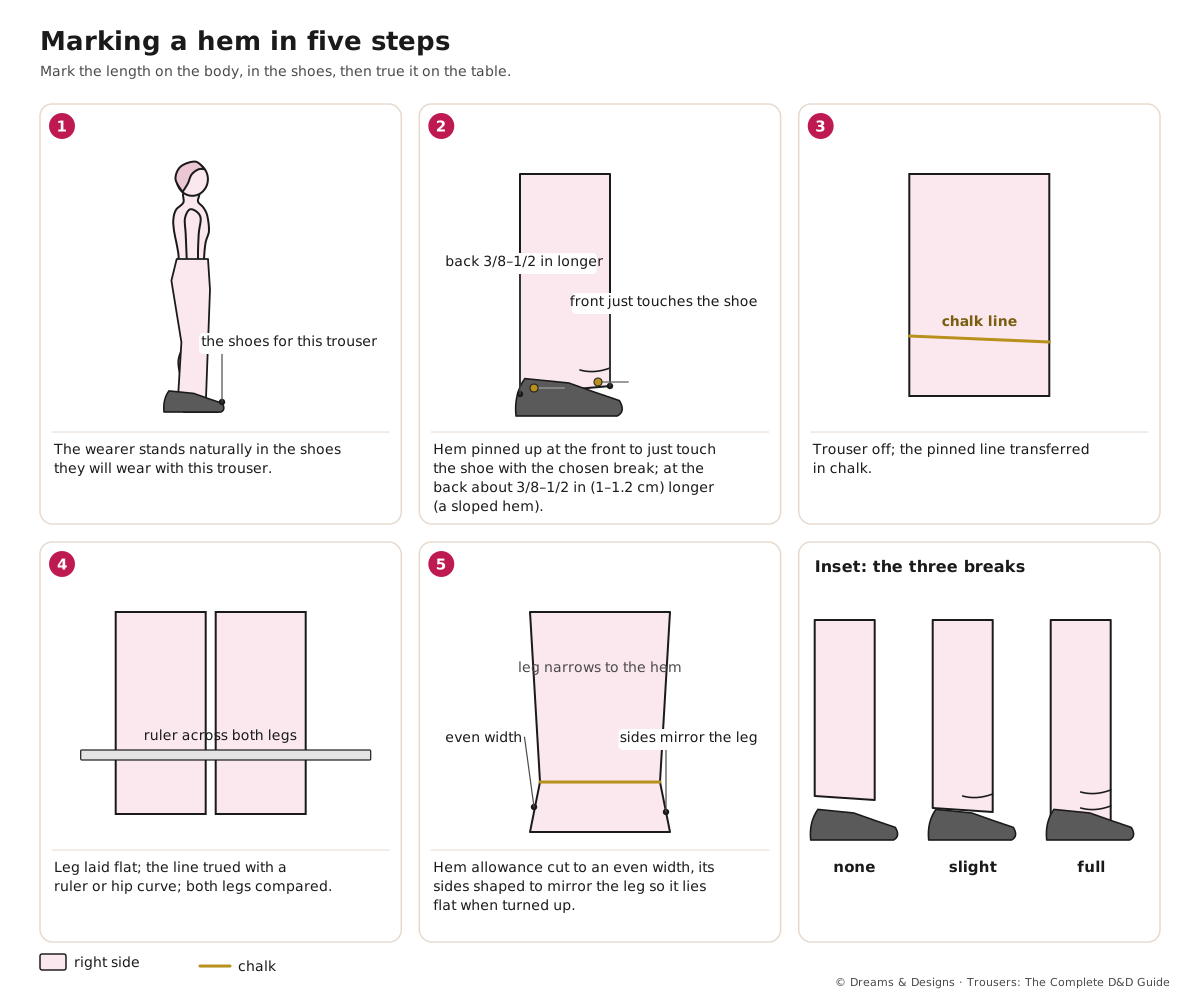
Photo: Blind hems by hand and machine, and the heel guard.
What you’ll learn
- How to mark a hem with the right shoes and the chosen “break”.
- Hem allowances for different trousers.
- How to sew a hand blind hem (turpai), a machine blind hem, a topstitched hem and a faced hem.
- Professional extras: the sloped hem and the heel guard.
Mark the length first
- The wearer stands naturally (not stiffly) in the shoes they will wear with this trouser. Heel height changes the length needed (from the D&D ebook’s hemming advice).
- Choose the break: no break (the hem just meets the shoe), slight break (one soft fold), or full break (more fold). Cropped and tailored trousers usually have no or a slight break; wide-leg trousers may skim the floor.
- Pin the hem up at the front. For tailored trousers, slope it: the back about 3/8–1/2 in (1–1.2 cm) longer than the front, so it covers more of the heel. Teacher to check.
- Check both legs; many people have one leg slightly longer.
- Take the trouser off, chalk the line, and true it with a ruler or hip curve on a flat table.
Hem allowances (starting points)
| Trouser | Allowance | Hem type |
|---|---|---|
| Tailored women’s and men’s | 1½–2 in (4–5 cm) | Blind hem, hand or machine |
| Jeans and casual | 1 in (2.5 cm), double-folded | Topstitched |
| Palazzo, wide leg, flared | 1/2–1 in (1.2–2.5 cm) or a facing | Narrow, topstitched, or faced |
| Pyjama, salwar, cotton straight pants | 1–1½ in (2.5–4 cm) | Turned and machine-stitched, or turpai |
| Children’s | 2–3 in (5–8 cm) growth hem | See Hems: turn-ups, churidar ankles, raw edges and growth hems |
The blind hem, main steps
- Cut the allowance to an even width. On tapered legs, shape the allowance’s sides outward (mirroring the leg) so it lies flat when turned up.
- Finish the raw edge: overlock, zigzag, or bind (Hong Kong on fine tailoring).
- Press the hem up on the line before any stitching (from the D&D ebook’s construction tricks).
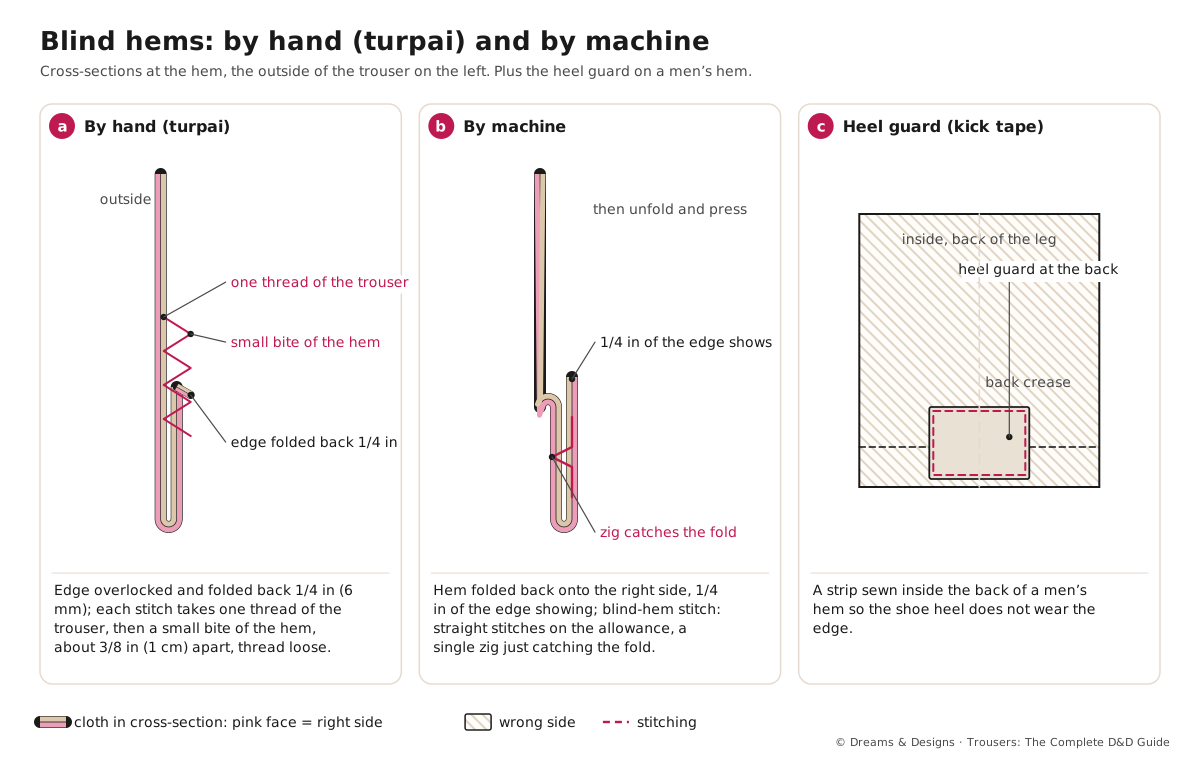
- By hand (turpai): fold the finished edge back 1/4 in (6 mm). Catch one thread of the trouser, then a small bite of the hem edge, about 3/8 in (1 cm) apart, keeping the thread loose. Press.
- By machine: fold the hem back onto the right side, leaving 1/4 in of the edge showing; use the blind-hem foot and stitch so the zig just catches the fold. Unfold and press.
Teacher to check: a standard, widely taught method, in inches with cm.
Before you start
- Prerequisites: trouser fully sewn and tried on with shoes.
- Time: 20 minutes (machine) to 1 hour (hand) for a pair.
- Difficulty: easy to moderate.
- Tools: hem gauge, chalk, blind-hem foot, hand needle (fine “sharps”), matching thread, ham and press cloth. A helper for pinning makes a big difference.
Step by step: the topstitched and faced hems
Topstitched (double-fold) hem:
- Press up the first fold, 1/2 in (1.2 cm), then the second, 1/2 in, enclosing the edge.
- Topstitch from the right side close to the inner fold; jeans often use heavy thread and a 3–3.5 mm stitch.
- At thick seams (jeans inseam), flatten with a hammer and walk the machine over by hand.
Faced hem:
- Cut a facing 2–2½ in (5–6 cm) deep following the hem shape (or use wide bias tape for gentle curves).
- Join the facing pieces into a loop matching the leg; finish its top edge.
- Sew the facing to the hem edge, right sides together. Trim, clip curves, understitch.
- Turn the facing up, press with the seam rolled slightly to the inside, and blind-hem or topstitch it.
A faced hem suits flares, curved or split hems, trousers that need lengthening with no hem allowance left, and very heavy cloth where a fold would be bulky.
Professional extras
- Heel guard (kick tape): a strip of strong tape sewn inside the back of the hem on men’s tailored trousers, with its edge just showing at the fold, so shoes rub the tape, not the cloth.
- Sloped hem: longer at the back than the front, so the trouser covers the heel without bunching on the shoe front.
- Interfaced hem: a bias strip of interfacing in the fold of a wool hem gives a soft, rounded edge.
- Weighted hem: on very fluid palazzos, a narrow band of weight tape can help the hem hang; rare, teacher to check.
Variations, and left-handed notes
- Rolled hem: for chiffon and georgette palazzos and sharara linings; use the rolled hem foot or overlocker rolled hem.
- Narrow machine hem: fold 1/4 in twice and stitch; for fine cotton pyjamas.
- Stretch hem: twin needle or coverstitch for joggers and leggings.
- Embroidered hems: salwar and pyjama hems often carry lace, embroidery or a Kasuti border; sew decoration before hemming, while the leg is flat.
- Left-handed hand hemming: work from left to right (the mirror of right-handed instructions), with the hem fold facing you. Catch stitches look the same.
Planning and control
- Order: hems come last, after the waistband, when the trouser can be tried on properly. Exception: decorated hems are decorated early.
- Thread tension in hand hems: loose; pulled stitches show as dimples on the right side.
- Machine blind hem: test the stitch width on a scrap until the bite is a single thread.
- Pressing: press the fold, not the stitched edge, so the edge of the allowance does not mark.
Tips, tricks and hacks
- Hem with the right shoes on, always.
- Press first, then stitch.
- Mirror the leg’s taper on the hem allowance so it lies flat.
- Use a strip of card cut to the hem depth as a quick gauge.
- Take a tiny bite of the trouser in hand hems: one thread is enough.
- Knot every 4–6 in (10–15 cm) in hand hems so a break does not unravel the whole hem.
- Put a strip of paper between hem and leg when pressing to stop the edge marking.
- Use silk or fine polyester thread for hand blind hems; it sinks into the cloth.
- Check both legs laid together before cutting the allowance.
- For floor-length palazzos, let the trouser hang for a day before hemming; the bias areas drop.
- What professionals do differently: they slope tailored hems, add heel guards, and hem each leg to its own length if the wearer’s legs differ.
Problems and how to fix them
Hand stitches show on the right side
- Unpick and resew with smaller bites and looser thread.
- Steam-press to relax the stitches.
- Prevention: one thread per bite; thread a shade darker than the cloth.
The hem puckers on a tapered leg
- Unpick and reshape the allowance sides to mirror the leg.
- Reduce the allowance depth.
- Prevention: shape the allowance at cutting.
The hem is uneven
- Re-mark on the wearer; true with a ruler.
- Check one leg is not longer from a crooked crotch seam.
- Prevention: true the line flat and compare both legs.
The hem is too short
- Let down the allowance and use a faced hem.
- Add a turn-up or a contrast band as a design feature.
- Prevention: mark with shoes on and check the break before cutting.
The machine blind hem misses the fold
- Adjust the stitch width or the guide on the foot.
- Hand-stitch the missed sections.
- Prevention: test on a scrap folded the same way.
The hem edge marks through on the right side
- Press again with paper between the layers.
- Change to a flatter finish (Hong Kong or a lighter overlock).
- Prevention: press the fold only.
The machine stalls at the jeans inseam
- Hammer the seam flatter and hand-turn the wheel.
- Use a hump jumper behind the foot.
- Prevention: jeans needle and slower speed at seams.
Beginner mistakes and myths
- Myth: hems should be the same length on every pair. Shoes and style change it.
- Mistake: hemming while the wearer stands stiffly or barefoot.
- Mistake: pulling hand stitches tight.
- Mistake: leaving a deep, straight allowance on a tapered leg.
Practice drills
- Beginner: sew 12 in (30 cm) of turpai on wool or cotton scrap; check from the right side.
- Improver: machine blind-hem a pair of pyjama legs.
- Confident: mark, slope and hem a tailored trouser with a heel guard; face a flared hem.
As a hobby, for earning, for teaching
As a hobby: hemming your own ready-made trousers saves time and fits your shoes.
For earning: hemming is the single most requested alteration; speed and an invisible finish keep customers coming back.
For teaching: pair learners to pin each other’s hems; they learn to see the break.
Care and finishing
- Check hand hems after washing; resew small breaks at once.
- Press hems from inside; avoid pressing a sharp line on wool hems if a soft edge is wanted.
Check yourself
- Do you mark hems with the wearer’s shoes on?
- Can you sew an invisible hand hem?
- Do you shape the allowance on tapered legs?
- Can you face a flared hem?
Quiz
- What is a “break”? Answer: how the hem meets the shoe: none, slight or full.
- Why slope a tailored hem? Answer: so the back covers more of the heel without bunching at the front.
- What is a heel guard? Answer: tape inside the back hem that takes the shoe’s rubbing.
- When is a faced hem useful? Answer: flares, curved hems, short of hem allowance, very heavy cloth.
Key terms
- Turpai: hand hemming, a common tailors’ word in India.
- Blind hem: a hem whose stitches barely show.
- Break: the fold of the hem at the shoe.
- Heel guard (kick tape): tape protecting the back hem.
- Faced hem: a hem finished with a separate facing.
- Pauncha: a common Hindi word for the trouser hem or leg end; studio to confirm local use.
Sources and uncertain points
- Main source: D&D’s own trousers ebook, chapters 45 and 47 (blind, topstitched hems; the break; press before stitching; hem with the shoes on), with general, widely taught tailoring practice.
- Allowances and the back slope are starting points. Teacher to check.
- Local terms (turpai, pauncha) vary by region; studio to confirm Kannada equivalents.