The waistband carries the whole trouser on the body. If it rolls, digs in or gapes at the back, the trouser will never feel right, however well the rest is sewn. This lesson covers the three fitted waist finishes: the straight band of classic trousers and jeans, the contoured (curved) band for high and low rises, and the faced waist with no band at all. Elastic, nada and adjustable waists are in the next lesson.

What you’ll learn
- How to cut, interface and attach a straight waistband with an extension.
- How to sew a contoured waistband that follows the body’s curve.
- How to sew a faced (bandless) waist that does not roll out.
- The men’s split back waistband, and where the hook and bar go.
Which waist?
| Finish | Best for | Notes |
|---|---|---|
| Straight band | Classic women’s and men’s trousers, jeans, mid rise at the natural waist | Usually 1¼–1½ in (3–4 cm) wide; can gape at the back on curvy figures |
| Contoured band | High rise, low rise, curvy waist-to-hip shapes, wide bands | Cut in curved pieces; sits smoothly |
| Faced waist | Cigarette pants, evening trousers, high-waisted styles | Clean line; less structure; pairs with a side or back zip |
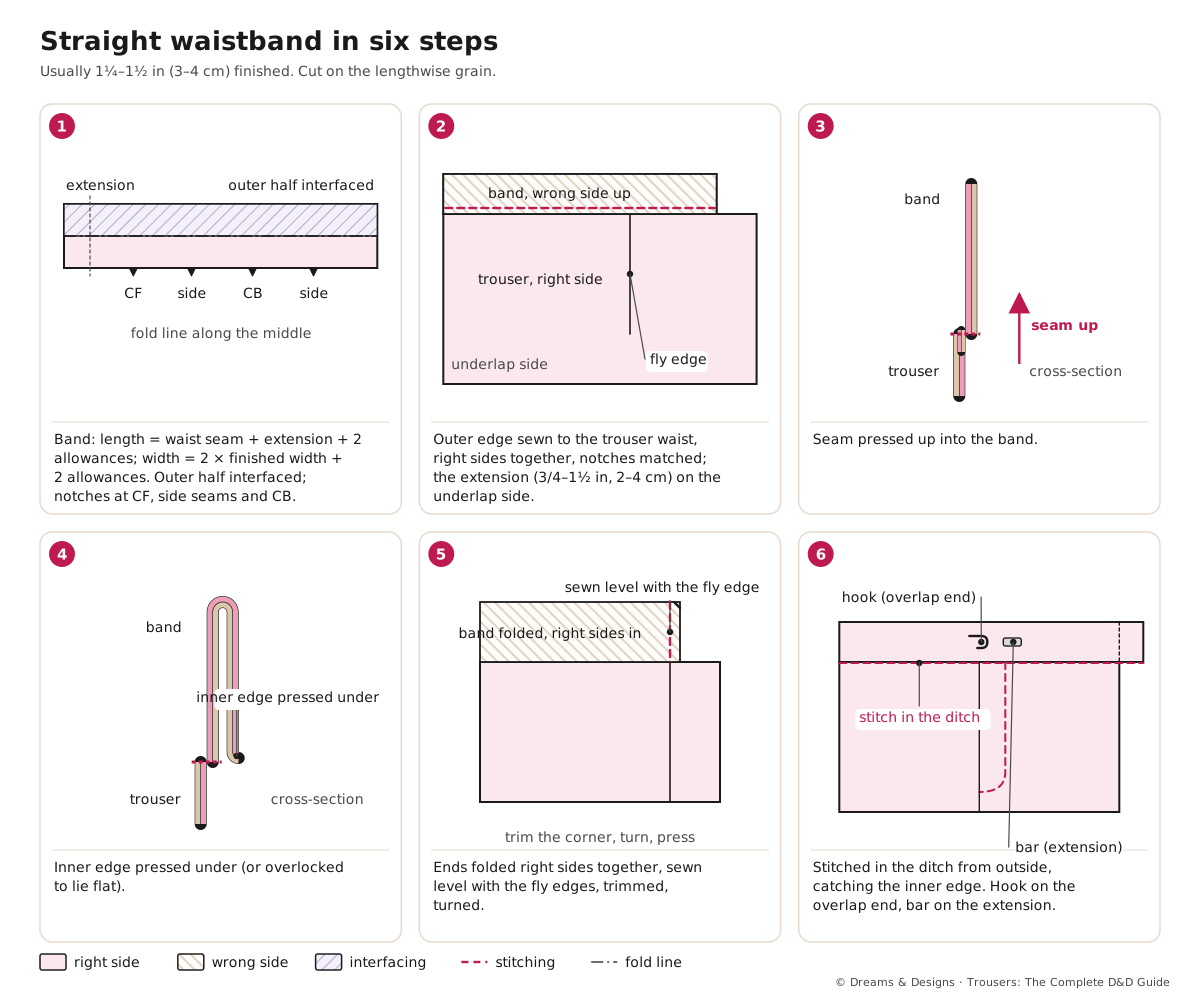
The straight waistband, main steps
- Cut on the lengthwise grain (most stable): length = waist seam measurement + extension + 2 allowances; width = twice the finished width + 2 allowances.
- Interface the outer half (or all) with waistband interfacing; mark notches for centre front, side seams and centre back.
- Stay the trouser waist with stay-stitching; check it has not stretched against the pattern.
- Sew the outer edge of the band to the trouser waist, right sides together, notches matched. The extension (3/4–1½ in, 2–4 cm) sits on the underlap side of the fly.
- Press the seam up into the band. Press the inner edge under, or overlock it to lie flat (less bulk).
- Close the ends: fold the band right sides together, sew each end level with the fly edges, trim, turn and press.
- Stitch in the ditch from the outside, or edge-stitch the whole band, catching the inner layer.
- Fasten: trouser hook on the overlap end, bar on the extension; or a buttonhole and button.
Teacher to check: a standard, widely taught method, in inches with cm.
Before you start
- Prerequisites: fly or side zip sewn; side seams sewn; belt loops basted on if used (Belt loops, tabs and adjusters).
- Time: 45–90 minutes.
- Difficulty: intermediate.
- Tools: waistband interfacing or firm fusible, trouser hook and bar, edge-stitch foot, ham, press cloth.
- Fit first: try the trouser on before the band; the waist seam should sit where intended, with about 1/2–1 in (1.2–2.5 cm) of ease in the band for comfort when seated. Teacher to check.
Step by step: the contoured waistband
- Cut the band in curved pieces from the pattern (often front and back pieces, or front, side and back), twice: outer band and facing.
- Interface the outer band fully; stay its top edge with tape so it cannot stretch.
- Sew the outer band pieces together at the side seams; do the same for the facing. Press open.
- Sew the outer band to the trouser waist, notches matched.
- Sew the facing to the outer band along the top edge, right sides together. Trim and grade.
- Understitch the facing as far as you can reach, so it rolls to the inside.
- Close the ends round the fly or zip, turn, press, and stitch in the ditch from the outside.
Step by step: the faced waist
- Cut the facing from the pattern, about 2–2½ in (5–6 cm) deep, following the waist shape. Interface it; stay the trouser waist with tape.
- Sew the facing pieces at the side seams (except the zip side); finish the lower edge.
- Sew the facing to the trouser waist, right sides together. Trim, grade and clip the curve.
- Understitch the facing a few millimetres from the seam, through the facing and allowances only. This is what stops it rolling out (from the D&D ebook’s construction tricks).
- Turn, press, and finish the facing ends round the zip.
- Tack the facing to the seam allowances at the side seams and darts by hand, so it stays inside.
- Add a hook and eye above the zip.
The men’s split back waistband, and the curtain
- Split waistband: men’s tailored trousers often have the band in two halves joined at the centre back seam, with a V-shaped inlay continuing the trouser’s centre back inlay up through the band. A tailor can then let the waist in or out by up to about 1–1½ in (2.5–4 cm) without a new band. Teacher to check the D&D amount.
- Curtain: a band of pocketing or lining sewn to the inside of the waistband, hanging loose below it, covering the seam and pocket tops. Common in men’s tailored trousers; sometimes with a non-slip strip (rubberised tape) to hold a tucked-in shirt.
- Brace buttons are sewn inside the band of some formal men’s trousers.
Variations, and left-handed notes
- Jeans band: a straight band, often cut on the cross grain or slightly curved, edge-stitched all round, tack button and buttonhole.
- Wide high-waisted band: 2–3 in (5–8 cm), always contoured; a straight wide band will not fit a curved body.
- Hollywood waist: no seam at the waist; the band is cut in one with the trouser and faced. A drafting change; teacher to show.
- Gurkha waist: a wide band with buckled straps crossing at the front; see Belt loops, tabs and adjusters.
- Women’s and men’s extensions: the extension follows the fly direction, so it is on the opposite side for a women’s-direction fly.
- Children: fitted bands are less useful because children grow; use buttonhole elastic inside a straight band (next lesson).
- Left-handed: the band is sewn the same; if the wearer chose the opposite fly lap, mirror the extension.
Planning and control
- Measure the trouser waist seam, not the body, to cut the band; then check it against the body plus ease.
- Ease: if the trouser waist is a little bigger than the band, ease it in evenly between notches; never stretch the band.
- Interfacing: firm for jeans and tailored, lighter for soft cloth. Too stiff digs in; too soft rolls.
- Pressing: press the band flat, then shape over a ham to match the body’s curve.
Tips, tricks and hacks
- Add a second, light strip of interfacing along the top fold of a band that rolls (from the D&D ebook’s construction tricks).
- Cut bands on the lengthwise grain for stability, unless a check or stripe needs otherwise.
- Use the selvedge as the inner edge on men’s bands: no finish needed, no bulk.
- Overlock the inner edge instead of folding it on thick cloth.
- Mark notches on the band for CF, side seams and CB; they keep the trouser balanced.
- Stay the waist with tape before attaching any band or facing.
- Understitch every facing.
- Try on with the band pinned before stitching the ends.
- Sew hooks through the interfacing, not just the outer cloth.
- Curve a straight band slightly at the back (shorten the top edge by stretching the lower edge with steam) on curvy waists; teacher to show.
- What professionals do differently: they choose the band type by the body’s waist-to-hip shape and the rise, not by habit, and they always leave the men’s back band split for alteration.
Problems and how to fix them
The waistband gapes at the back
- Take in the centre back seam and band (split band) or add small darts in the band.
- Replace a straight band with a contoured one.
- Prevention: fit the waist and choose a contoured band for curved waists (Module 3, Fitting issues: how to diagnose, and the waist).
The band rolls over
- Add firmer interfacing or a strip at the top fold.
- Stitch in the ditch at the side seams to hold the layers.
- Prevention: correct interfacing and a band shaped to the body.
The facing rolls out
- Understitch it.
- Hand-tack it to the seams.
- Prevention: understitch as standard.
The band is too short for the trouser
- Check the waist did not stretch; ease it in with a gathering row.
- Cut a new, longer band.
- Prevention: stay-stitch and stay-tape the waist; cut bands from the measured seam.
The ends do not line up with the fly
- Unpick the ends and resew level with the fly edges.
- Re-mark the extension length.
- Prevention: mark the ends on the band before sewing.
Stitch in the ditch misses the inner layer
- Hand-stitch the missed sections from inside.
- Pin the inner layer from the outside before stitching.
- Prevention: press the inner edge a hair below the seam line.
The band digs in when seated
- Let out the back band (split band).
- Use a softer interfacing in a new band.
- Prevention: leave sitting ease in the band, and check the rise.
Beginner mistakes and myths
- Myth: a tight waistband holds trousers up best. Good fit at the hip and seat does that; the band only finishes it.
- Mistake: cutting the band to the body measurement without checking the trouser waist.
- Mistake: no interfacing.
- Mistake: a straight wide band on a high-rise trouser.
Practice drills
- Beginner: attach a straight band to a half-scale trouser top.
- Improver: sew a faced waist with understitching and an invisible zip.
- Confident: sew a men’s split waistband with a curtain on a tailored trouser.
As a hobby, for earning, for teaching
As a hobby: a comfortable, non-rolling waistband is the best gift you can give your own trousers.
For earning: waist alterations are the most common trouser alteration; a split back band makes them fast.
For teaching: show learners a rolled band and a correct one side by side; then let them find the cause.
Care and finishing
- Press waistbands over a ham, not flat.
- Do not tumble-dry fused bands hot; the glue can bubble.
Check yourself
- Can you work out a straight band’s length and width?
- Do you know when to choose a contoured band?
- Do you understitch facings?
- Can you explain why men’s back bands are split?
Quiz
- On which side is the band extension? Answer: the underlap side of the fly.
- What stops a faced waist rolling out? Answer: understitching (and tacking at the seams).
- What is a curtain? Answer: a lining band hanging inside the waistband.
- Which grain is best for a straight band? Answer: lengthwise.
Key terms
- Extension: the band end that sits under the closure.
- Contoured band: a curved band in shaped pieces.
- Faced waist: a waist finished with an inner facing, no band.
- Split waistband: a band seamed at the centre back for alteration.
- Curtain: the inner lining band of tailored trousers.
- Stitch in the ditch: stitching in a seam’s groove from the outside.
Sources and uncertain points
- Main source: D&D’s own trousers ebook, chapters 42 and 47 (separate and faced bands, interfacing, understitching, extra top-fold interfacing), with general, widely taught tailoring practice.
- Band widths, ease and let-out amounts are starting points. Teacher to check.
- Many Indian tailors call the waistband the “belt”; studio to confirm local terms.