Cigarette pants are slim, straight-looking trousers that stop at the ankle, with a clean front and a zip hidden in the left side seam. They are the office and kurti trouser of modern India. This project is your first fitted trouser: you keep the block’s darts, taper the leg, put in an invisible zip and finish the waist with a facing instead of a band. The D&D starter kit covers it.
What you’ll learn
- How to taper the block to a cigarette leg, and check that the foot still passes.
- How to sew darts that end smoothly.
- How to put an invisible zip into a side seam.
- How to finish a waist with an interfaced, understitched facing.
At a glance
| Level | Skills practised | Time |
|---|---|---|
| Beginner+ | Taper draft, darts, interfacing, invisible zip, faced waist, blind hem | Draft 1 hour; cut and mark 1 hour; sew 6–10 hours |
Lessons this project uses: Module 4, The women’s block: the framework and the front, The women’s block: the back, the checks and the toile and From the block: taper, flare and wide legs; Module 6, Laying out and cutting: grain, nap and fabric layouts, Sewing darts and pleats, Side zips and invisible zips, Waistbands: straight, contoured and faced, Hems: blind, topstitched and faced, Pressing as you sew, and setting creases and Order of construction: basic and pull-on trousers.
Materials and quantities
For our worked-example woman: waist 30 in (76 cm), hip 40 in (101.5 cm), heel-to-instep 12 1/2 in (32 cm), finished length 37 in (94 cm), to just above the ankle bone.
| Item | Amount | Notes |
|---|---|---|
| Fabric, 58–60 in (147–152 cm) wide | 1.3 m | Medium-weight cotton twill, cotton-blend suiting, gabardine; no stretch, or up to 2% elastane |
| Or fabric, 44–45 in (112–115 cm) wide | 2.25 m | Two lengths: front and back one above the other |
| Invisible zip | 1, 9 in (23 cm) | For a 7 in (18 cm) opening; longer is fine, shorter is not |
| Lightweight woven fusible interfacing | 0.5 m | For the facings |
| Fusible stay tape, 3/8 in (1 cm) | 1 m | Zip allowances and waist seam |
| Hook and eye, small | 1 set | Above the zip |
| Thread | 1 spool, 100 m | Polyester all-purpose, matched |
| Pattern paper | 2 sheets, about 50 × 36 in | Front, back and the two facings |
| Also | – | Invisible-zip foot and a standard zipper foot, chalk, tape, press cloth, hand needle |
To scale for another size: one length = finished length + 3 in (7.5 cm) for the waist allowance and hem. On 58–60 in cloth the front and back usually fit across the fold when laid top-to-tail; on 44–45 in cloth they need two lengths. Add 5% for shrinkage and round up (Module 2, How much fabric to buy).
The D&D starter kit
The starter kit is matched to Projects 1 and 2 and sized for our worked examples (hip up to about 42 in, 106.5 cm; length up to about 40 in, 101.5 cm). Larger sizes or longer legs need more cloth: ask the studio. The price is on our QR menu.
| For | Contents | Quantity |
|---|---|---|
| Project 1, palazzo | Pre-washed rayon or cotton cambric, 44–45 in (112–115 cm) wide | 2.5 m |
| Project 1, palazzo | Waistband elastic, 1 1/4 in (3 cm) wide | 1 m |
| Project 1, palazzo | Polyester all-purpose thread, matched | 1 spool, 100 m |
| Project 2, cigarette pants | Medium-weight cotton twill or cotton-blend suiting, 58–60 in (147–152 cm) wide | 1.3 m |
| Project 2, cigarette pants | Invisible zip, 9 in (23 cm), matched | 1 |
| Project 2, cigarette pants | Lightweight woven fusible interfacing | 0.5 m |
| Project 2, cigarette pants | Fusible stay tape, 3/8 in (1 cm) | 1 m |
| Project 2, cigarette pants | Hook and eye, small | 1 set |
| Project 2, cigarette pants | Polyester all-purpose thread, matched | 1 spool, 100 m |
| Both | Pattern paper, about 50 × 36 in (127 × 91 cm) | 4 sheets |
| Both | Tailor’s chalk, white and blue | 2 pieces |
| Both | Tape measure, 60 in / 150 cm, inches and cm | 1 |
| Both | Bodkin for threading elastic | 1 |
Not in the kit: shears, pins, rulers and curves, an iron, a sewing machine, and an invisible-zip foot (feet differ from machine to machine). Module 2 lists the full tool kit.
The draft
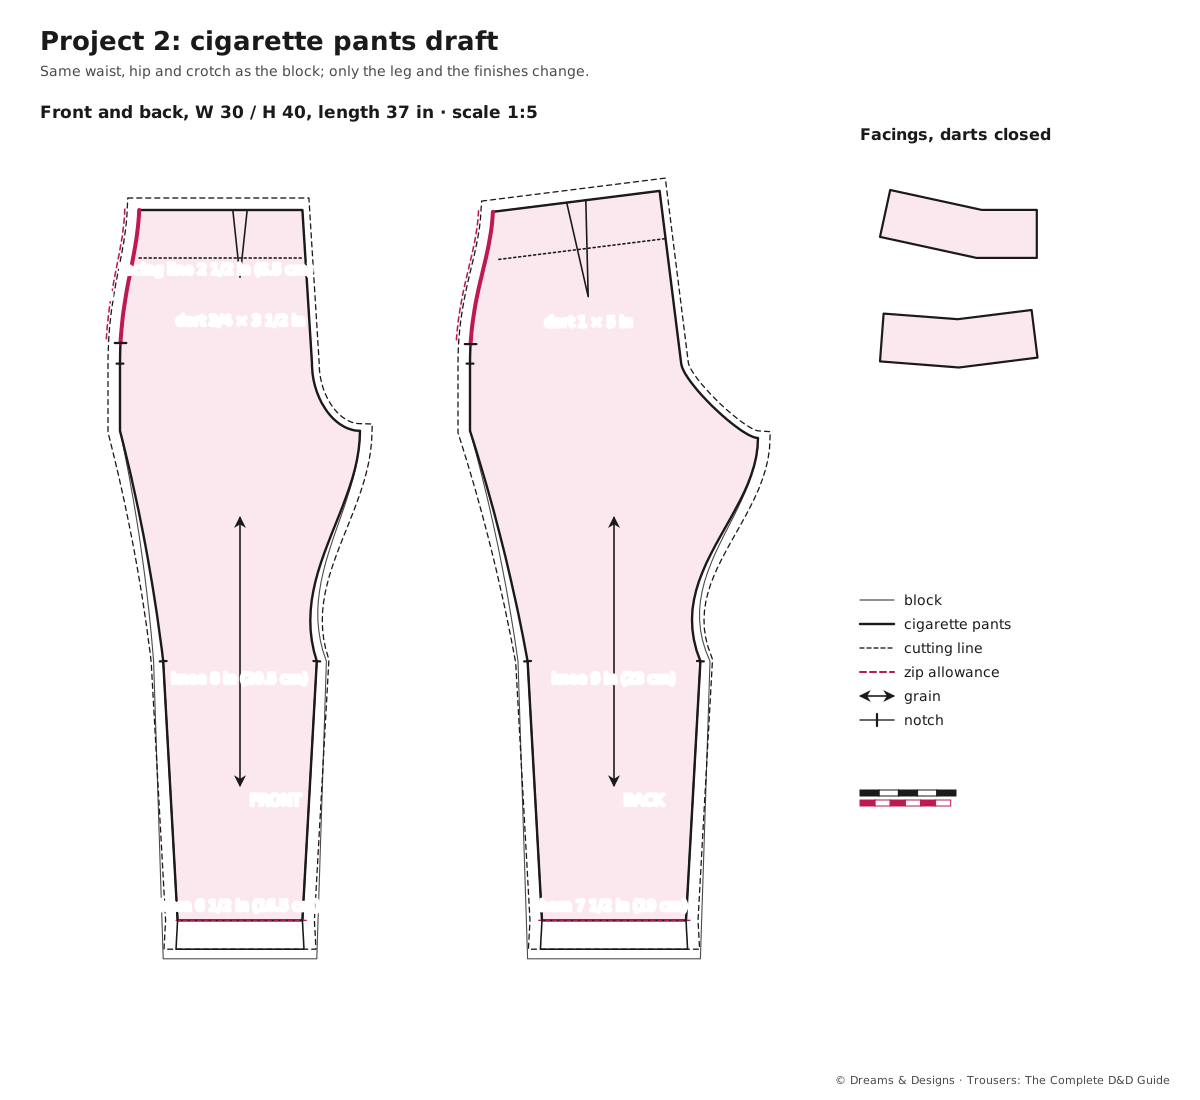
Start from your tested women’s block, without seam allowances. The waist, hip and crotch do not change: only the leg and the finishes.
- Knee: take 1/2 in (1.3 cm) off each side of the crease on the front (9 → 8 in) and on the back (10 → 9 in). Total knee 17 in (43 cm).
- Hem: take 3/4 in (2 cm) off each side of the crease on the front (8 → 6 1/2 in) and the back (9 → 7 1/2 in). Total hem 14 in (35.5 cm).
- Length: shorten by 2 in (5 cm) at the hem line, to 37 in (94 cm).
- Seams: join the new knee points to the crotch point and to the hip line with smooth curves, then straight to the new hem points (From the block: taper, flare and wide legs).
- Foot check: 14 in hem against a 12 1/2 in heel-to-instep: the foot passes with 1 1/2 in (4 cm) to spare. Less than 1 in spare needs an ankle slit.
- Darts: keep the block’s front dart (3/4 in, 2 cm, wide, 3 1/2 in, 9 cm, long, on the crease) and back dart (1 in, 2.5 cm, wide, 5 in, 12.5 cm, long).
- Zip: mark the opening on the left side seam of front and back, 7 in (18 cm) below the waist seam line.
- Facings: trace the top 2 1/2 in (6.5 cm) of the front and back, then fold the darts closed on the tracing so each facing is one smooth curved piece. Cut a front and back facing for each side.
- Seam allowances: 5/8 in (1.5 cm) at the waist, right side seam and inseams; 3/4 in (2 cm) on the left side seam for the zip; 3/8 in (1 cm) on the crotch curves; facings 5/8 in at the top and sides, lower edge finished. Hem 1 1/2 in (4 cm): fold the paper up at the hem line and cut the leg edges while folded, so the hem allowance mirrors the taper and lies flat when turned.
A standard method: a D&D teacher checks the figures before you rely on them.
Cutting layout
- Pre-wash and press the cloth.
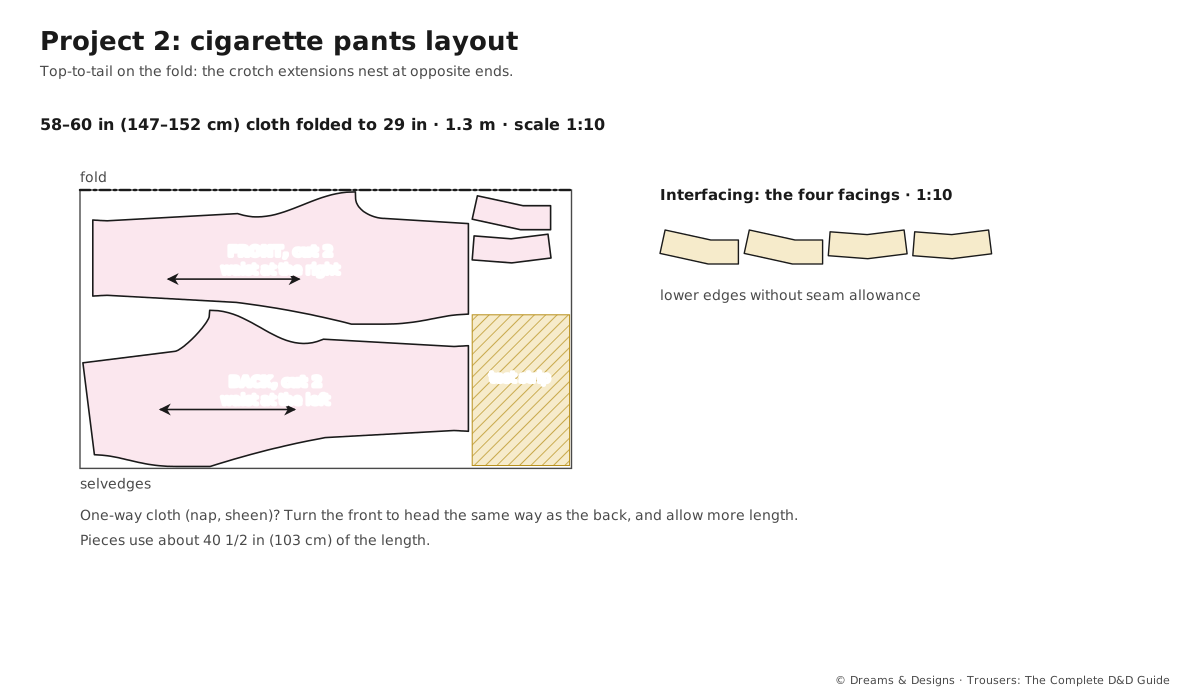
- Fold it selvedge to selvedge, right sides together. Lay the front and back top-to-tail so the crotch extensions nest at opposite ends; crease lines parallel to the fold. If the cloth has a nap or a sheen, lay both pieces the same way and use more length.
- Place the facings in the space left near the waist ends.
- Cut; snip the notches (hip, knee, crotch), the dart legs and the zip stop. Mark each dart point with chalk or a pin through both layers.
- Cut the facings again in interfacing, without the seam allowance on the lower edge.
Step by step
- Prepare. Fuse interfacing to the facings. Fuse stay tape along the left side seam allowances from the waist to 1 in (2.5 cm) below the zip stop, and stay-stitch the waist edge 1/2 in (1.3 cm) from the edge.
- Finish edges that will be pressed open: side seams, inseams, and the lower edge of the facings (Seam finishes: overlocked, zigzag, pinked and bound).
- Darts. Sew from the wide end to the point, with the last few stitches on the fold; tie off, do not backstitch. Press front darts towards the centre front, back darts towards the centre back, over a ham. Check: no dimple at the point; left and right the same length.
- Right side seam. Sew, press open. Check: hip and knee notches meet.
- Invisible zip, left side (Side zips and invisible zips). Press the coil flat. Sew one tape to the front, coil on the seam line, top stop 1/8 in (3 mm) below the waist seam line; sew the other tape to the back. Check: close it; the waist seam lines meet level across the zip.
- Below the zip. With a standard zipper foot, sew the rest of the left side seam, starting just above and slightly outside the end of the zip stitching. Press open. Stitch the zip tape ends to the allowances only.
- Inseams. Sew, press open.
- Crotch seam (method A). One leg inside the other, inseams matched; sew from the back waist to the front waist; double-stitch the lower curve and trim it to 1/4 in (6 mm).
- Try on. Close the zip; pin the waist allowance under. Check: waist level, seat smooth, side seams vertical, creases hanging straight, no pull at the calf, foot passes. Take in or let out the side seams below the zip if needed.
- Facing. Join the facings at the right side seam. Sew the facing to the waist, right sides together. Trim, grade and clip the curve. Understitch the facing a few millimetres from the seam. Turn it inside and press (Waistbands: straight, contoured and faced).
- Facing ends. Fold the facing ends under so they clear the zip coil by 1/8 in (3 mm); slip-stitch them to the zip tape. Hand-tack the facing to the seam allowances at the side seam and the darts.
- Hook and eye on the facing, just above the zip, so the zip top cannot pull open.
- Hem. Try on in the shoes; the hem sits just above the ankle bone. Press the 1 1/2 in (4 cm) allowance up, finish the edge, and blind-hem by hand or machine (Hems: blind, topstitched and faced).
- Final press with a press cloth, on the wrong side. A crease is optional: press it on the crease line you drafted (Pressing as you sew, and setting creases).
Fitting points
- Waist: sits at the natural waist with about 1 in (2.5 cm) ease; no gape at the back.
- Darts: point at the fullness and end before it, with no bubble.
- Seat and crotch: no smile or frown lines; no pull when sitting.
- Leg: creases hang straight; the calf has room; the hem does not catch on the heel.
Success check
- The zip is invisible from the outside and the waist seam meets level across it.
- The facing stays inside and does not roll to the outside.
- The darts end smoothly, and left and right match.
- Both hems are the same length and invisible from outside.
- The pants go on over the foot without forcing.
Finished preview
A clean, slim trouser that skims the hip and narrows gently to a 14 in (35.5 cm) hem just above the ankle bone. The front is smooth, with two short darts; the left side seam hides the zip so well that only the hook inside shows where it opens. Inside: a neat interfaced facing, tacked down, and pressed-open, finished seams.

Tips, tricks and hacks
- Make a test zip first in two scraps of the same cloth; it takes 15 minutes and saves the trouser.
- Baste the zip by hand before machining it, if your first try ripples.
- Thread-trace the dart points on suiting; chalk rubs off while you sew.
- Grade the facing seam: trim the facing allowance narrower than the trouser allowance, so no ridge shows.
- Understitch as far as you can round the curve, stopping about 1 in (2.5 cm) from the zip.
- Use a ham or a rolled towel to press darts; a flat board flattens the shape you just sewed.
- Hem with the trouser on a sleeve board or over a rolled towel; a narrow leg is hard to press flat on a board.
- Professionals sew the zip before the crotch, while the side is still flat and easy to reach, as here.
- A dab of fray stopper at the bottom of the zip tapes stops them unravelling.
- Keep the tracing of the facing with the pattern; you will reuse it on Project 7.
- Press with a cloth on suiting; a hot iron leaves a shine that never washes out.
Problems and how to fix them
The zip ripples or puckers
- Unpick, press the tape flat and re-sew without pulling the cloth.
- Fuse stay tape to the allowance if it was missed.
- Prevention: stay the zip allowances and baste first on soft cloth.
There is a bubble below the zip
- Unpick 2 in (5 cm) of side seam below the zip and re-sew, starting closer to the zip stitching.
- Press it from the inside over a ham.
- Prevention: start the seam just above and just outside the last zip stitch.
The waist seam does not meet across the zip
- Unpick one side of the zip and re-sew it to match the other.
- If the difference is tiny, hide it by adjusting the facing seam slightly.
- Prevention: mark the waist seam line on both zip tapes before sewing.
The facing rolls to the outside
- Understitch further, or understitch again closer to the seam.
- Hand-tack the facing at every seam and dart.
- Prevention: interface, grade, clip and understitch every time.
The foot will not pass the hem
- Open the side seams 3–4 in (7.5–10 cm) above the hem and face them as slits.
- Let out the side seam allowances at the hem if there is cloth.
- Prevention: compare the hem with the heel-to-instep on paper.
Diagonal wrinkles at the calf
- Let out the inseam or side seam over the calf by 1/4 in (6 mm) each.
- Check the crease is on grain; re-cut a twisted leg if needed.
- Prevention: check the calf on the toile; see Fit changes on paper: thighs, knees, petite and tall.
The back waist gapes
- Take in the back darts 1/8 in (3 mm) each, tapering to the point.
- Shape the centre back seam in 1/4 in at the waist.
- Prevention: fit the waist at the try-on, before the facing goes on.
The dart ends in a pucker
- Re-sew the last 1 in (2.5 cm), running off the fold more gradually.
- Press over a ham, then steam the point flat.
- Prevention: tie off at the point; never backstitch it.
Variations: sizes, fabrics, Indian and occasion versions
- Other sizes: draft your own block; take the same amounts off the leg. For a full calf, take less off at the knee and keep the hem.
- Stretch cotton (2% elastane): the block’s ease will feel looser; take in the side seams at the try-on, not on paper.
- Ankle slit: leave the side seams open 2 in (5 cm) above the hem and mitre the corners.
- Lapped zip instead of invisible, or an invisible zip at the centre back (Side zips and invisible zips).
- With a band: a 1 1/4 in (3 cm) contoured band instead of the facing (Waistbands: straight, contoured and faced).
- Mid-rise: lower the waist 1 in (2.5 cm) all round and redraw the facing.
- Office: in suiting with a pressed crease, worn with a shirt or blazer.
- With a kurti: the standard pairing for straight and side-slit kurtis (Module 8, Pairing kurtas with trousers); ikat, khadi and block prints all suit it.
- Festive: silk or brocade, with a narrow embroidered or gota band just above the hem.
- Teens: on the women’s or men’s block with the teen’s own measurements (Children’s blocks: baby, toddler and teen, and growth tucks).
- Men’s slim trouser: the same taper on the men’s block (18 in knee, 15 in hem total) with a fly: see Project 6.
Beginner mistakes
- Taking more off one side of the crease than the other: the leg twists.
- Forgetting to mirror the hem allowance, so the turned hem is too tight.
- Sewing the left side seam closed before the zip.
- Skipping the understitching on the facing.
- Pressing darts on a flat board with no press cloth.
As a hobby, for earning, for teaching
As a hobby: one good cigarette pattern gives you a dozen trousers in different cloths and lengths.
For earning: cigarette pants are a regular order with kurtis and for office wear. The fitted waist means a toile or a fitting for each new customer; plan that time into your costing (Part XII).
For teaching: teach the invisible zip on a sample in the class before, so the project day is about fit, not fear.
Care and finishing
- Close the zip before washing; turn the pants inside out.
- Press on the wrong side, or with a press cloth on the right side.
- Hang from the hem with clips, or fold along the creases over a padded hanger.
Sources and uncertain points
- The draft uses the book’s Part IV figures, from a standard, widely taught method; D&D has no method of its own here.
- The kit quantities assume the front and back fit top-to-tail across 58–60 in cloth for our worked example; a teacher checks this against the cloth actually stocked.
- Zip side (left) is a convention; a left-handed wearer may prefer the right.
Check yourself
- Can you taper a leg by equal amounts each side of the crease?
- Did you check the hem against the heel-to-instep?
- Can you put in an invisible zip with the waist seams level?
- Did you interface, grade, clip and understitch the facing?
- Do your darts end without a dimple?
Share your work
We’d love to see it. Photograph the front, the back and the inside in daylight, then either:
- Send it to the studio on WhatsApp – the subject is filled in for you, and a teacher replies; or
- post it in #show-and-tell on the Bangalore Sewing Club Discord with the tag #trousers-p2.