With a tested pattern from the last lesson, the jumpsuit is sewn in four stages: a lined bodice with clean neck and armholes, the trouser with its pockets, the waist seam that joins them, and the long centre-back zip that closes it all. Then the tie belt, a careful hem in the shoes, and a final press. Take your time: this is the piece people will ask you about.

What you’ll learn
- How to line a sleeveless bodice so the neckline and armholes are clean inside and out.
- How to join a bodice to a trouser with a stayed waist seam.
- How to put a long invisible zip through a waist seam so the seam lines meet.
- How to finish, hem and press a floor-length one-piece.
At a glance
| Level | Skills practised | Time |
|---|---|---|
| Showpiece | Stay tape on bias edges, lined bodice, side-seam pockets, waist stay, long invisible zip, hand finishing, tie belt, blind hem | 12–18 hours |
Lessons this half uses: Module 6, Seam finishes: overlocked, zigzag, pinked and bound, Sewing darts and pleats, Side-seam and slant pockets, Side zips and invisible zips, Hems: blind, topstitched and faced, Pressing as you sew, and setting creases and Finishing touches and the final quality check.
Materials and quantities
For our worked-example woman (pattern figures in the previous lesson).
| Item | Amount | Notes |
|---|---|---|
| Fabric, 44–45 in (112–115 cm) | 3.25 m | Crepe, rayon, cotton, linen, chambray; georgette only with a full lining |
| Or fabric, 58–60 in (147–152 cm) | About 2.5 m | Check the tie-belt length fits |
| Bodice lining | 0.75 m of 44 in | Cotton voile, mulmul or lining cloth; or self-lining in light cloth |
| Invisible zip | 1, 24 in (61 cm) | For a 22 in (56 cm) opening |
| Light fusible interfacing | 0.25 m | Pocket openings and the zip allowances |
| Stay tape, 3/8 in (1 cm), or cotton twill tape | 2 m | V neckline and the waist seam |
| Pocketing or lining | 0.25 m | Pocket bags; self cloth is fine |
| Hook and eye, small | 1 set | Above the zip at the back neck |
| Thread | 2 spools, 100 m | Polyester, matched |
To scale: the trouser needs two leg lengths on 44 in cloth (each finished length + about 3 1/4 in, 8 cm); add about 0.5 m for the bodice and 0.25 m for pockets and belt, then 5% for shrinkage (Module 2, How much fabric to buy, gives 3–3.5 m on 44–45 in as a starting figure).
Cutting layout
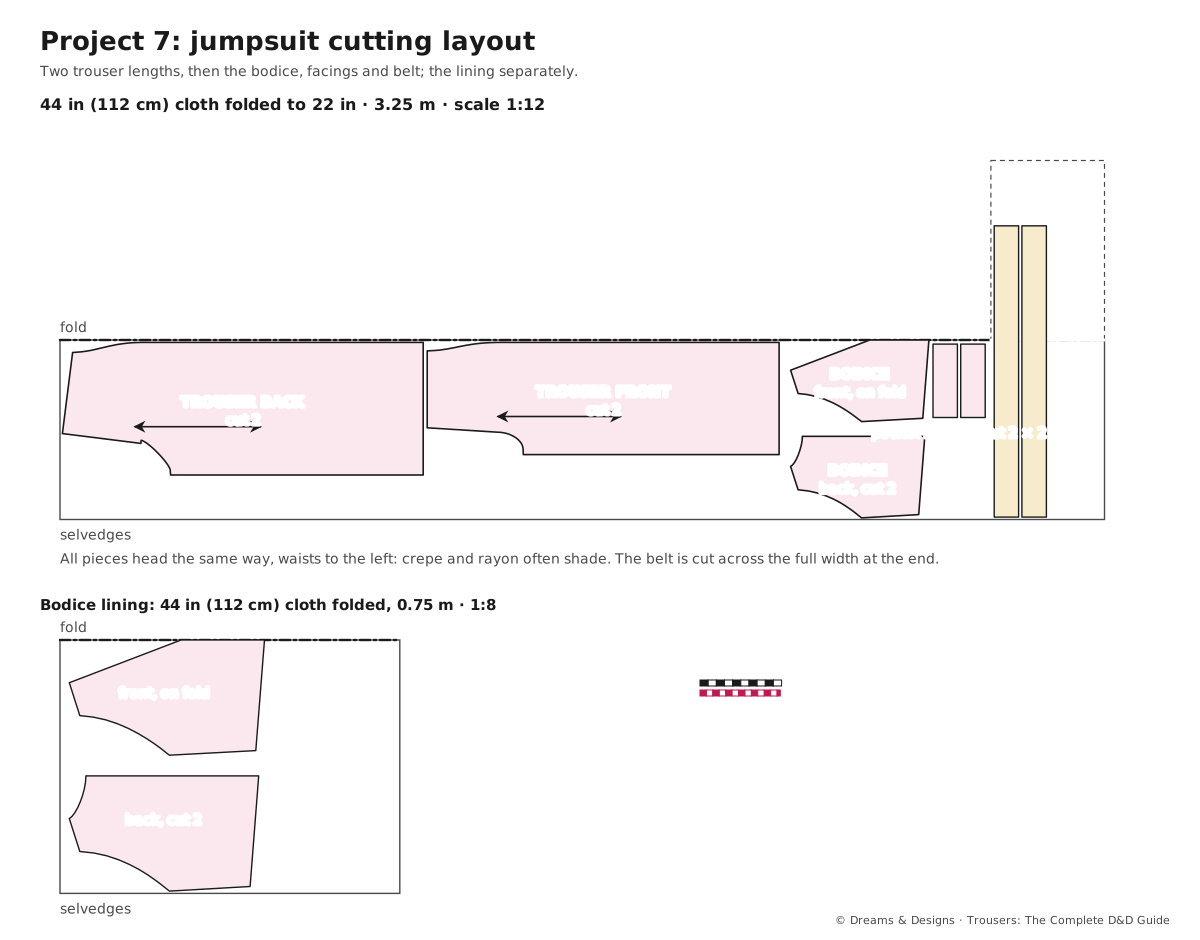
- Pre-wash and press the cloth and lining.
- Lay all pieces heading the same way; crepe and rayon often shade.
- Cut the trouser backs, then fronts, then the bodice (front on the fold), pocket facings and the two belt pieces.
- Cut the bodice front and backs again in lining.
- Mark notches at the waist (centre front, darts, side seams, centre back), the zip stop, pocket ends and the V point.
Step by step
1 · The bodice
- Stay the V neckline: fuse or hand-baste stay tape just inside the seam line, easing the cloth very slightly onto it so the V hugs the chest. Stay-stitch the armholes and waist edge.
- Darts in bodice and lining; press fashion-cloth darts towards the centre, lining darts towards the sides (less bulk).
- Shoulders: sew the fashion bodice shoulders and the lining shoulders separately; press open.
- Neck and armholes: lay bodice and lining right sides together. Sew the neckline at 3/8 in (1 cm), stopping 3/4 in (2 cm) from each centre-back edge. Sew each armhole the same. Trim, clip curves, and understitch the lining as far as you can reach.
- Turn: pull each back piece through its shoulder to the front. Press, rolling the seams slightly to the inside.
- Side seams: open them out and sew lining to lining and fashion cloth to fashion cloth in one run through the armhole join. Press open. Check: the armhole seams meet exactly at the underarm.
- Keep the lining free at the waist and the centre back: pin it up out of the way. It is finished by hand at the end.
2 · The trouser
- Pleats and darts: fold the front pleats towards the side and baste across the top; sew the back darts.
- Pockets (Side-seam and slant pockets): interface the openings; sew the facings and bags to the side-seam allowances.
- Side seams with the pockets; bar-tack the opening ends; finish and press.
- Inseams; finish and press.
- Crotch seam: one leg inside the other; sew from the zip stop, 7 in (18 cm) below the waist at the centre back, round to the front waist. Double-stitch the lower curve. Leave the centre back open above the zip stop.
3 · The waist seam
- Join: pin the fashion bodice (lining pinned up out of the way) to the trouser, right sides together, matching the centre front, darts to pleats and darts, side seams and the centre-back edges. Sew at 5/8 in (1.5 cm).
- Waist stay: sew a length of 3/8 in (1 cm) cotton tape cut to the pattern waist, 31 in (79 cm), into the seam allowance, so the heavy trouser cannot stretch the waist.
- Press the seam up towards the bodice. Check: the darts meet across the seam; the centre-back edges meet level.
4 · The zip and the finish
- Invisible zip (Side zips and invisible zips): fuse a strip of interfacing on both centre-back allowances. Sew the zip from the back neck seam line down to the zip stop, with the top stop 1/8 in (3 mm) below the neck seam line. Check: close it: the waist seam meets level across the zip, and the neck edges meet.
- Below the zip: close the short gap between the zip end and the crotch seam.
- Lining at the zip: fold the lining’s centre-back edges under and slip-stitch them to the zip tapes, clear of the coil. Finish the top corners at the neck by hand.
- Lining at the waist: turn the lining’s lower edge under and slip-stitch it over the waist seam, enclosing the seam allowances.
- Try on in the shoes. Check: the torso passes the sit, reach and bend tests; the V lies flat; the waist sits at the natural waist.
- Tie belt: join the two pieces; fold right sides together, sew the long edge and angled ends, leaving a gap; turn, press, close the gap. Make two thread-chain belt carriers, 1 1/2 in (4 cm) long, at the side seams over the waist seam.
- Hang the jumpsuit for a day, then mark the hem in the shoes, just clearing the floor. Finish the edge, press up 1 1/2 in (4 cm), and blind-hem by hand.
- Hook and eye at the top of the zip; final press with a press cloth; quality check (Finishing touches and the final quality check).
Fitting points
- Torso: sitting and reaching without pull at the crotch or shoulders; waist seam rides up no more than about 1 in (2.5 cm).
- Neckline: the V sits flat and does not slide open; the straps stay on the shoulders.
- Waist: the seam is level and at the natural waist; the belt sits over it.
- Legs: the wide legs hang straight from the hip; both hems level.
- Getting in and out: she can step in and close the zip, alone or with a pull loop.
Success check
- Neckline and armholes are smooth, with no lining showing on the outside.
- The zip is invisible, and the waist seam meets across it.
- Bodice darts and trouser pleats or darts meet at the waist seam.
- The lining is neatly hand-finished at the zip and the waist.
- The hem is level and invisible, just clearing the floor in the shoes worn.
Finished preview
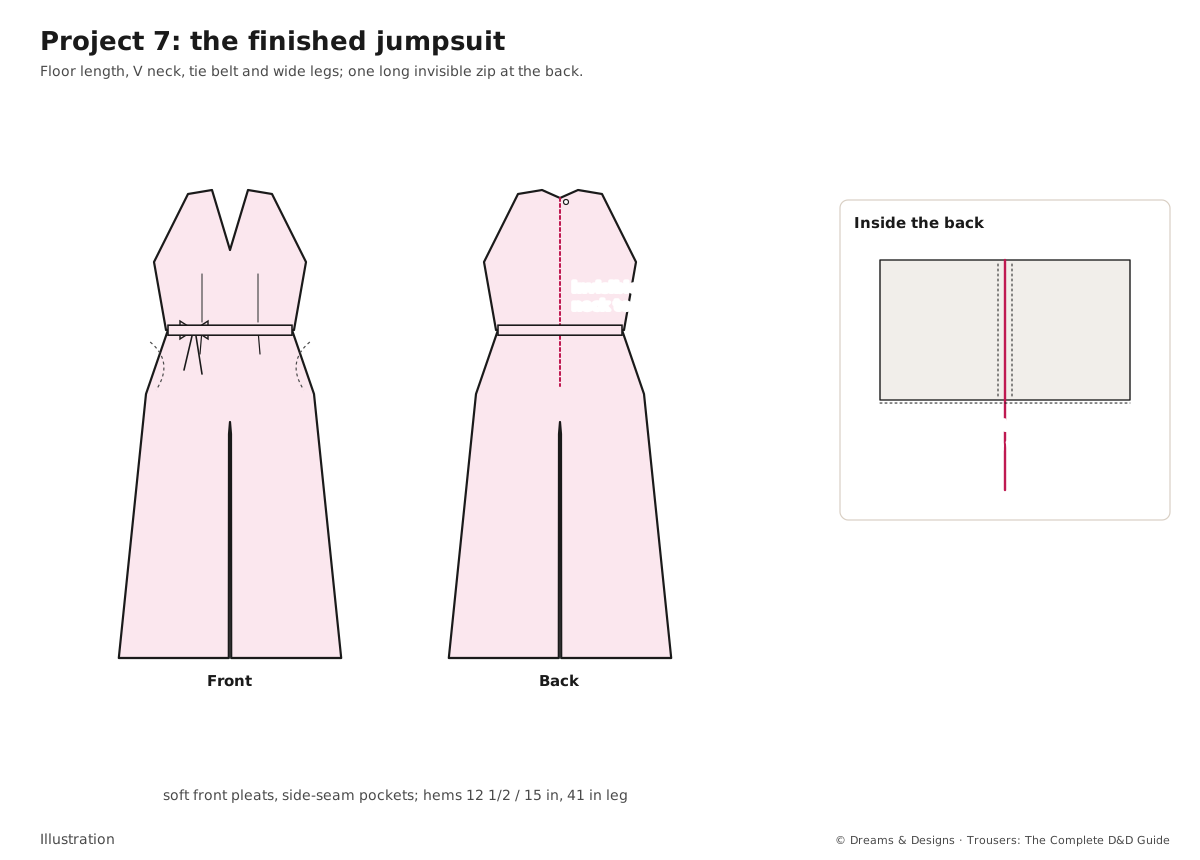
A floor-length jumpsuit with a soft V neck 7 in (18 cm) deep, 3 in (7.5 cm) shoulder straps and clean, lined armholes. The waist seam sits at the natural waist under a 1 1/4 in (3 cm) tie belt. Below it, soft front pleats open into wide legs, 27 1/2 in (70 cm) round at the hem, with side-seam pockets hidden in the seams. At the back, a single line: the invisible zip from the neck to below the waist, closed with a small hook.
Tips, tricks and hacks
- Understitch the lining on neck and armholes as far as the presser foot will reach; finish by hand with a prick stitch if needed.
- Trim the lining 1/16 in (1.5 mm) smaller at the neck and armhole edges; it then rolls to the inside on its own.
- Put the zip in after the waist seam, as here, so the seams meet exactly across it.
- Mark the waist seam on both zip tapes with chalk before sewing the second side.
- Add a ribbon pull loop at the zip top if she will dress alone.
- Hang the jumpsuit from the waist stay with ribbon hanger loops, not from the straps, so the bodice does not stretch.
- Press crepe on a towel with a press cloth; it marks easily.
- Thread-chain carriers are less bulky than fabric loops on a soft belt.
- Professionals hand-finish every lining edge on a showpiece; it is slow but invisible.
- Photograph the inside as well as the outside when it is done: the inside is where the skill shows.
Problems and how to fix them
The lining shows at the neckline
- Understitch further, or prick-stitch by hand through lining and allowances.
- Press with the seam rolled 1/16 in to the inside.
- Prevention: trim the lining slightly smaller at the edges.
The V neck stretched while sewing
- Run a hand gathering thread inside the seam allowance and ease it back onto stay tape.
- Steam it gently back into shape before re-stitching.
- Prevention: stay the V before any other step.
The waist seam does not meet across the zip
- Unpick one side of the zip and re-sew it to match.
- If the difference is tiny, ease it at the waist seam.
- Prevention: chalk the waist seam on both zip tapes first.
The zip ripples on the bias of the back neck
- Unpick, fuse interfacing on the allowance and re-sew.
- Ease the cloth onto the tape slightly, never stretch it.
- Prevention: interface both centre-back allowances.
The waist drops after wearing
- Check that the waist stay is caught in the seam all round.
- Add an inside elastic or a second tape at the waist seam.
- Prevention: always use a waist stay on a one-piece in drapy cloth.
The armhole seams do not meet at the underarm
- Unpick a few stitches either side and re-sew the side seam, matching the armhole seams first.
- Hand-tack the join from the inside.
- Prevention: pin the armhole seams together before sewing the side seam.
The hem is uneven on wide legs
- Hang for another day and re-mark from the floor with a helper.
- Trim to an even allowance before re-hemming.
- Prevention: always hang a drapy one-piece before hemming.
Variations: sizes, fabrics, Indian and occasion versions
- Parties and receptions: crepe or satin-backed crepe in a deep colour, with heels (Module 8, What to wear where: parties, black-tie, funerals, beach and gym).
- Weddings: silk or brocade with an embroidered V edge; Kasuti or aari work along the neckline suits a festive version.
- Day: cotton, linen or chambray, with flats and a denim jacket.
- Saree-style: a draped pallu stitched into the waist seam and secured at the shoulder.
- Front zip or buttons instead of the back zip, for easier dressing (Button plackets and side openings).
- Men’s and children’s one-pieces: see the previous lesson’s variations.
- A practical note: a one-piece must be fully removed to use the toilet; on long event days, a front zip or a two-piece look-alike may suit better.
Beginner mistakes
- Skipping the toile because the trouser block already fits.
- Sewing the neckline right to the centre-back edge, so the lining cannot be turned at the zip.
- Leaving out the waist stay on drapy cloth.
- Hemming before the jumpsuit has hung.
- Cutting pieces in different directions on crepe.
As a hobby, for earning, for teaching
As a hobby: a jumpsuit you made yourself is a talking point; keep the pattern and make a day version in cotton next.
For earning: jumpsuits for receptions and parties are premium orders with two or three fittings. Cost the fittings and hand-finishing time by the method in Part XII; the book gives no prices.
For teaching: a final project for a course; learners bring their tested trouser block and a bodice block, and spend one session on the toile alone.
Care and finishing
- Close the zip and turn the jumpsuit inside out before washing; wash gently or dry-clean as the cloth needs.
- Hang it by the inside hanger loops at the waist.
- Press the bodice over a ham and the legs flat, always with a press cloth.
Sources and uncertain points
- The trouser methods are the book’s Module 6 standard methods. The lined-bodice method is a standard dressmaking method, not drafted elsewhere in this book.
- Fabric and lining amounts are for our worked example; a teacher checks them against the real cloth.
- The one-piece practical note on toilets is from Module 7, Every trouser: one-piece.
Check yourself
- Can you line a sleeveless bodice and turn it through the shoulders?
- Did you sew a waist stay into the waist seam?
- Does the waist seam meet across the zip?
- Is the lining hand-finished at the zip and the waist?
- Did you hang the jumpsuit before hemming?
Share your work
We’d love to see it. Photograph the front, the back and the inside in daylight, then either:
- Send it to the studio on WhatsApp – the subject is filled in for you, and a teacher replies; or
- post it in #show-and-tell on the Bangalore Sewing Club Discord with the tag #trousers-p7.