A block is a plain, well-fitted trouser pattern with no style details: the base from which every other trouser is made. This lesson drafts the front of a women’s block, point by point, in inches with cm, using our worked-example woman. The next lesson drafts the back and checks the whole pattern.
What you’ll learn
- What a block is, and how it differs from a pattern.
- How to build the framework: waist, hip, crotch, knee and hem lines.
- How to place the centre front, crotch extension and crease line.
- How to shape the waist, front dart, side seam, inseam and hem.
Before you start
You need pattern paper about 50 in × 20 in (127 × 51 cm), an L-square, a hip curve, a French curve, a clear ruler, a sharp pencil and an eraser (see Module 2, Measuring, drafting and marking tools). Allow about two hours for front and back the first time. Draft without seam allowances; add them when the block is tested.
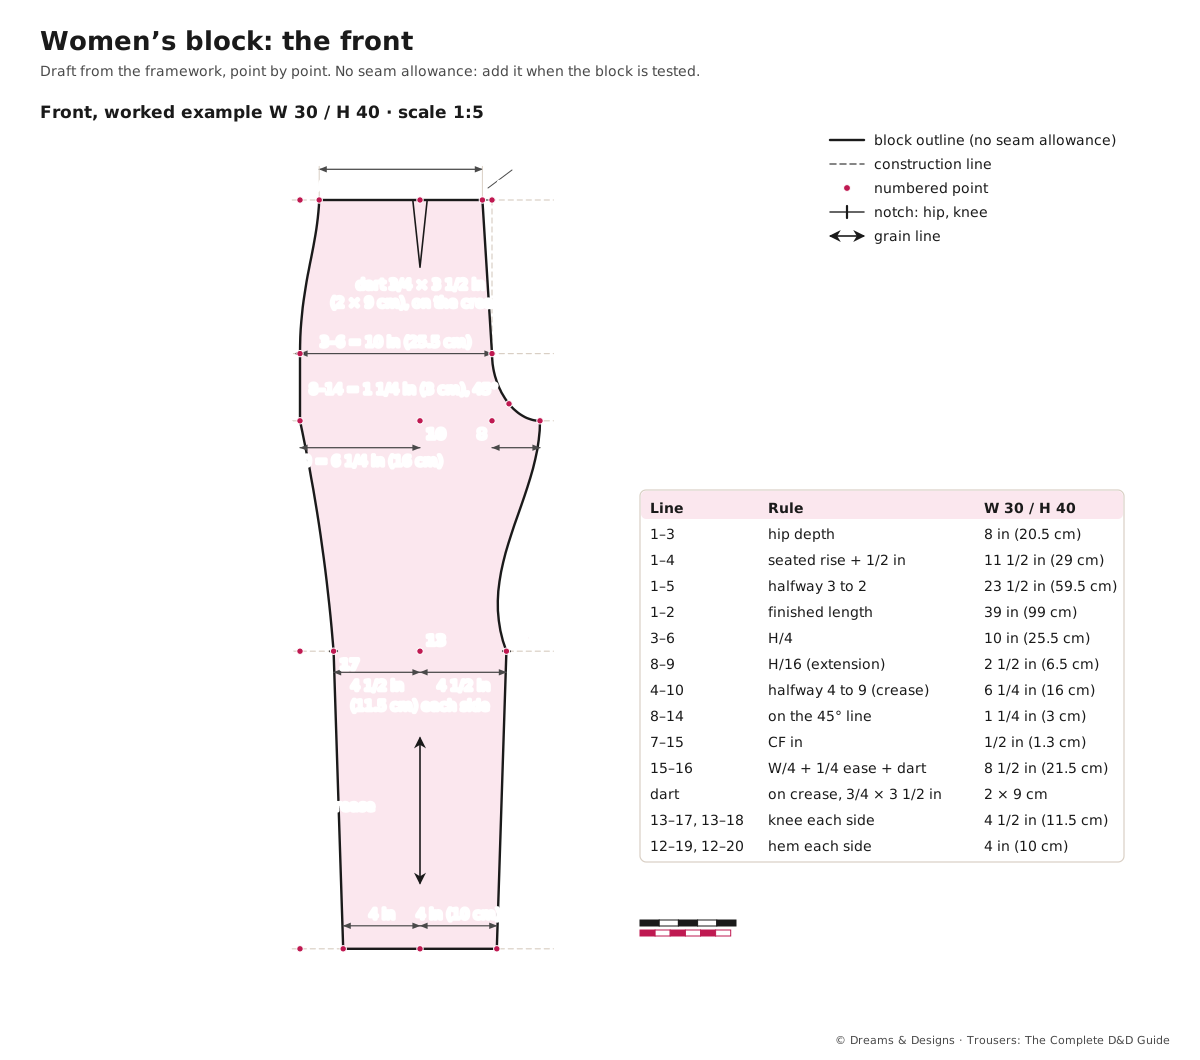
Worked example: waist (W) 30 in (76 cm), hip (H) 40 in (101.5 cm), hip depth 8 in (20.5 cm), seated rise 11 in (28 cm), finished length 39 in (99 cm).
The framework
- Point 1. About 2 in (5 cm) from the top and left edges of the paper. Draw a vertical line down from 1: the side line.
- 1 to 2 = finished length, 39 in (99 cm). Point 2 is the hem.
- 1 to 3 = hip depth, 8 in (20.5 cm). The hip line.
- 1 to 4 = crotch depth = seated rise + 1/2 in (1.3 cm) = 11 1/2 in (29 cm). The crotch line.
- Point 5, the knee line, is halfway between 3 and 2: 1 to 5 = 23 1/2 in (59.5 cm). Check it against the waist-to-knee measurement (23 in, 58.5 cm); within 1 in (2.5 cm) is fine.
- Square across to the right from 1, 3, 4, 5 and 2.
The front
- 3 to 6 = H/4 = 10 in (25.5 cm). Square up from 6 to the waistline (7) and down to the crotch line (8). This is the centre-front line.
- 8 to 9 = H/16 = 2 1/2 in (6.5 cm): the front crotch extension. Point 9 is the crotch point.
- Point 10 is halfway between 4 and 9: 6 1/4 in (16 cm) from 4. Square up to the waistline (11) and down to the hem (12). This is the crease line, and the grain line.
- From 8, draw a 45° line into the corner and mark 14 at 1 1/4 in (3 cm). Draw the crotch curve from 6, through 14, to 9.
- 7 to 15 = 1/2 in (1.3 cm) to the left. Join 15 to 6: the finished centre front.
- 15 to 16 = W/4 + 1/4 in ease + 3/4 in dart = 8 1/2 in (21.5 cm) along the waistline. Point 16 lands about 1 in (2.5 cm) right of 1.
- Draw the side seam from 16 to 3 with the hip curve, then straight down to 4.
- Dart: centred on the crease line at the waist, 3/4 in (2 cm) wide and 3 1/2 in (9 cm) long, parallel to the crease.
- Knee: 13 is on the crease at the knee line. Mark 4 1/2 in (11.5 cm) each side: 17 (side) and 18 (inside). Front knee = 9 in (23 cm).
- Hem: mark 4 in (10 cm) each side of 12: 19 (side) and 20 (inside). Front hem = 8 in (20.5 cm).
- Inseam: 9 to 18, curving in about 3/8 in (1 cm) at its middle, then straight 18 to 20. Side seam: 4 to 17 in a gentle curve, then straight 17 to 19.
A standard method: a D&D teacher checks the figures before you rely on them.
Why each point is where it is
- Crotch depth (+1/2 in): seated rise already includes the body’s depth; the half inch is sitting room, so the seam does not cut in.
- H/4 front width: the front is a quarter of the hip. The back gets 1 in (2.5 cm) more, so the whole block has 2 in (5 cm) hip ease.
- H/16 extension: the front extension wraps the body between the legs. For a 40 in hip, 2 1/2 in is typical for women; it grows and shrinks with the hip.
- Crease halfway: putting the crease halfway across the leg at the crotch line makes the leg hang straight. If it is off-centre, the leg twists.
- 1/2 in at centre front: the body curves in from hip to waist at the front too. Taking it at the CF stops the front from standing away from the tummy.
- Waist shaping: the hip-to-waist difference on the front (10 in at hip, 7 3/4 in needed at waist) is shared between the CF (1/2 in), the dart (3/4 in) and the side seam (1 in).
- Knee wider than hem: a slight taper from 9 in at the knee to 8 in at the hem reads as straight on the body; a truly parallel leg looks wider at the hem.
Variations
- In cm: use the same formulas on your cm measurements; use 1.3 cm for “+1/2 in”, 0.6 cm for “+1/4 in”, 2 cm for a 3/4 in dart.
- Bigger waist-to-hip difference (over 12 in, 30 cm): use two front darts, each no more than 3/4 in (2 cm), or move some shaping to a pleat.
- Small difference (under 8 in, 20 cm): reduce or omit the front dart; keep the CF and side shaping.
- Full tummy: draft as here, then use the tummy change in Fit changes on paper; do not guess it into the framework.
- Elastic waist: skip the dart and the waist shaping; take the side seam and CF straight up from the hip line.
- Left-handed drafters: draft the mirror image (side line on the right) if it is easier; the numbers do not change.
Planning and control
- Order of work: framework, centre front, crotch, crease, waist, dart, legs. Do not draw curves until every straight line is in.
- Accuracy: measure every distance twice, and work to 1/8 in (3 mm). A 1/4 in error at four seams is a full inch.
- Right angles: use the L-square at every “square across”; a waistline that is not square to the crease skews the whole leg.
- Curves: draw lightly first, then darken the one you keep. Turn the paper rather than your wrist.
- Labels: write “Women’s block FRONT, W30 H40, date, no seam allowance” on the piece before you cut it out.
Tips, tricks and hacks
- Draft the front and back on one framework in two colours, then trace them apart. Shared lines then match exactly.
- Write each formula on the paper beside its line; you will thank yourself at the toile fitting.
- Use a hip curve the right way round: the flatter end at the hip line, the curved end at the waist.
- Check the CF line from 15 to 6 is straight; a curve here shows at the fly.
- Walk the crotch curve with a tape on its edge and write its length (about 12 3/4 in, 32.5 cm, for our example).
- Square the waist at the CF and side: the waistline should meet both at right angles for 1/2 in (1.3 cm) before curving.
- Keep the dart on the crease for the block; it keeps the front leg balanced when you later turn the dart into a pleat.
- Professionals true the side seam by laying front and back together after drafting both, not before.
- Quarter-scale first: draft the block at 1:4 in a notebook to learn the order of points; it takes 15 minutes.
- Use dot-and-cross paper for the framework: the grid gives you right angles for free.
- Mark notches at the hip line on the side seam and at the knee on both seams.
Problems and how to fix them
The crotch curve looks flat or pointed
Cause: the curve does not pass through 14, or it meets 9 at an angle instead of flat.
- Redraw it through 14 with the French curve.
- Make it run level into 9 for the last 1/2 in (1.3 cm).
- Prevention: mark 14 before drawing any curve.
The front waist is too wide or too narrow
Cause: the dart was left out of 15 to 16, or added twice.
- Measure 15 to 16 minus the dart: it must equal W/4 + 1/4 in.
- Move point 16 along the waistline to correct it.
- Prevention: write the waist sum on the paper.
The side seam has a bump at the hip
Cause: hip curve placed wrongly, or point 16 too far in.
- Reposition the hip curve so it touches the side line just above 3.
- Move 16 out, and add the difference to the dart.
- Prevention: keep side shaping to no more than 1 1/2 in (4 cm).
The leg twists in the toile
Cause: crease line not halfway between 4 and 9, or not on the grain.
- Remeasure 10; redraw the crease.
- Re-cut the toile with the crease exactly on the straight grain.
- Prevention: draw the grain arrow on the crease line, full length.
The knee line is far from the real knee
Cause: long or short thigh compared with the lower leg.
- Move the knee line to the waist-to-knee measurement.
- Keep the knee widths; redraw the seams to the new line.
- Prevention: always compare the knee line with the body.
The front dart points at the wrong place
Cause: dart too long, or the tummy’s fullness is off the crease.
- Shorten the dart to end 1 in (2.5 cm) above the fullest point.
- Move it towards the side by up to 1 in.
- Prevention: check the dart on the toile, standing and sitting.
The inseam meets the crotch curve at a point
Cause: the inseam starts at 9 at the wrong angle.
- Start the inseam at a right angle to the crotch curve for 1/4 in (6 mm).
- Smooth the join with the French curve.
- Prevention: check the join after the back is drafted (see the next lesson).
Beginner mistakes and myths
- Adding seam allowance to the block. Blocks have none; they would compound at every change.
- Using bust-and-hip charts instead of measuring the hip depth.
- Myth: “The front and back are the same shape.” The back is wider, longer at the crotch and higher at the waist.
- Myth: “A block is a finished pattern.” It is a starting point; it is tested in a toile and then used to make styles.
- Rubbing out construction lines. Keep them faint; you will need them for every style later.
Practice drills
- Easy: draft the framework only (points 1–6) at quarter scale, three times, against the clock.
- Easy: draft the full front at quarter scale with the worked example.
- Medium: draft the front full size with your own measurements.
- Medium: draft a second front for W 26, H 36 (UK 10) and lay it over the first; see what moved.
- Hard: draft the front in cm from cm measurements without converting, and compare with your inch draft.
For hobby, earning and teaching
As a hobby: one good block of your own replaces many bought patterns; every trouser in this book can be made from it.
For earning: a studio keeps a tested block for each regular customer. Repeat orders are then quick and reliable.
For teaching: teach the framework as a separate first class, then the front, then the back. Learners who rush to curves lose the logic.
Care and finishing: keeping blocks
- When the block is tested and corrected, copy it onto card or heavy paper.
- Mark: name, measurements, date, “no seam allowance”, grain line, notches, knee and hip lines.
- Punch a hole and hang it on a pattern hook, or store it flat. Never fold a block across the crotch curve.
Sources and uncertain points
- The method is a standard, widely taught flat-pattern trouser draft, written for this book with D&D’s own working figures. Many schools use slightly different fractions (for example, a front extension of H/20 or a 45° measure of 1 1/2 in); results are close.
- All figures are to be checked by a D&D teacher on a toile before the block is relied on.
- Ease amounts suit woven, non-stretch fabrics.
Check yourself
- Can you build the framework from five measurements?
- Do you know why the crease is halfway between 4 and 9?
- Can you explain where the front waist shaping goes?
- Do you draft a block without seam allowance?
- Can you check the front waist sum?
Key terms
- Block (sloper): a plain, fitted base pattern with no style details or seam allowances.
- Framework: the right-angled lines a draft is built on.
- Crotch extension: the part of the pattern that reaches between the legs.
- Crease line: the vertical centre of the leg; also the grain line.
- Squaring: drawing a line at a right angle to another.
- Truing: checking and correcting seams so they match and meet smoothly.