The showpiece: a floor-length, sleeveless V-neck jumpsuit with wide legs, a waist seam, a tie belt, side-seam pockets and a long invisible zip at the centre back. It brings together everything in this book, and adds the one measurement no trouser has: the torso length, from the shoulder through the crotch and back. This lesson makes the pattern and tests it in a toile; the next one sews the real thing.
What you’ll learn
- How a jumpsuit pattern is made by joining a bodice to a trouser at the waist.
- How to measure and check torso length, the one fit point that makes or breaks a jumpsuit.
- How to line up darts and notches across a waist seam.
- How to make and fit a full toile: standing, sitting, reaching and bending.
At a glance
| Level | Skills practised (both lessons) | Time (both lessons) |
|---|---|---|
| Showpiece | Pattern combining, torso ease, dart matching, toile fitting, lined bodice, waist stay, long invisible zip, side-seam pockets, tie belt, blind hem | Pattern 2–3 hours; toile 3–4 hours; real jumpsuit 12–18 hours |
Lessons this project uses: Module 3, Women’s figures: tummy, seat and torso length; Module 4, The women’s block: the framework and the front, The women’s block: the back, the checks and the toile, From the block: taper, flare and wide legs and Darts, pleats and yokes on paper; Module 6, Side-seam and slant pockets, Side zips and invisible zips and Hems: blind, topstitched and faced; Module 7, Every trouser: one-piece (the jumpsuit entry).
The bodice: what this book does and does not give
This is a trouser book, so it does not draft a bodice block. You need a tested, fitted bodice block (sleeveless, with waist darts) from a bodice or blouse course, from a teacher, or traced from a well-fitting sleeveless woven top. This project gives the changes to make to it, with figures. The extra measurements below are added for this project; they are typical for our worked-example woman and are not in the Module 4 table.
| Measurement | Our woman | How to take it |
|---|---|---|
| Bust | 38 in (96.5 cm) | Round the fullest part, tape level |
| Front, neck point to waist | 16 1/2 in (42 cm) | From where the shoulder meets the neck, over the bust, to the waist elastic |
| Back, neck point to waist | 16 in (40.5 cm) | From the same point, down the back to the waist elastic |
| Torso (trunk) length | 59 in (150 cm) | From the neck point, down the front, through the crotch, up the back to the same point; tape snug, standing straight |
Check: front 16 1/2 + back 16 + crotch length 26 1/2 (Module 4) = 59 in. If your own figures do not add up within about 1 in (2.5 cm), measure again.
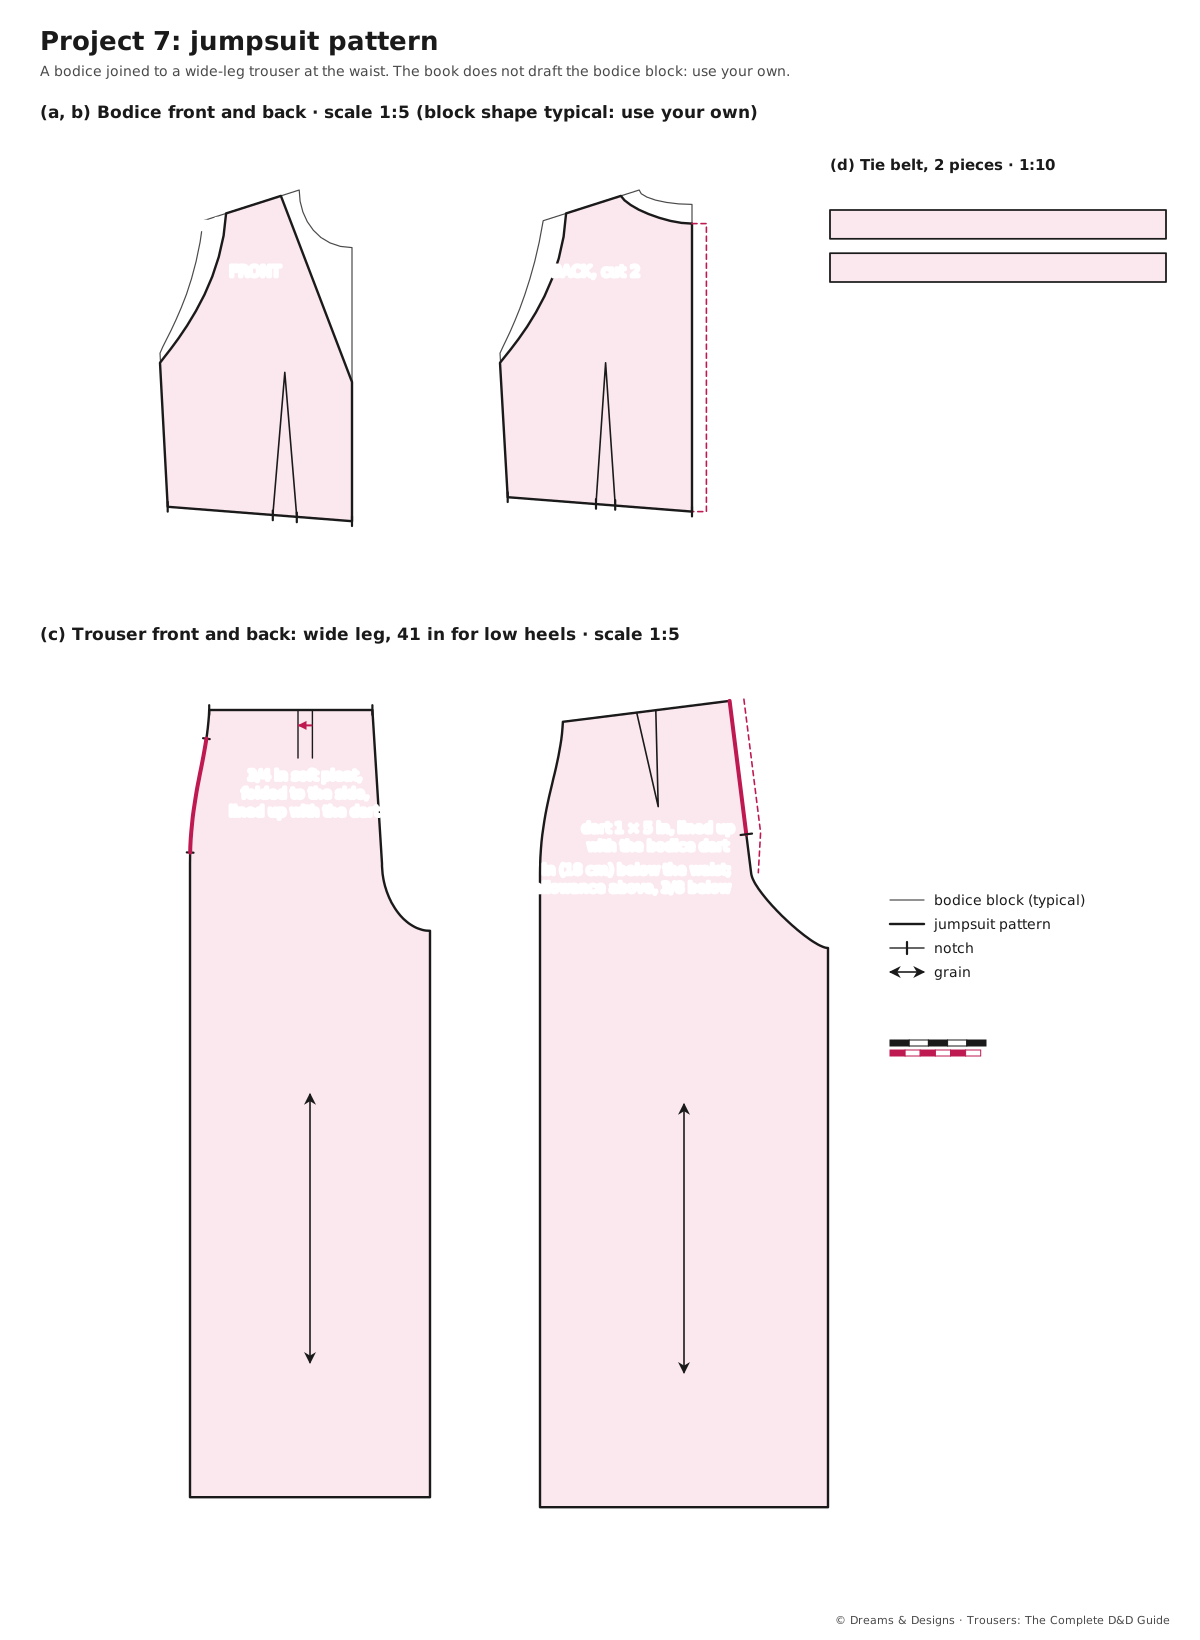
The draft
Bodice (from your bodice block)
- Neck: widen 1 in (2.5 cm) at the side neck point on front and back.
- V neckline: on the front, mark the centre front 7 in (18 cm) below the base of the throat; draw a straight or very slightly curved line from the new neck point to it. On the back, lower the centre-back neck 1 in (2.5 cm) and redraw the curve.
- Shoulder: 3 in (7.5 cm) long from the new neck point, front and back the same.
- Armhole: lower 1/2 in (1.3 cm) at the side seam for a sleeveless armhole, and redraw it smoothly to the new shoulder end.
- Torso ease: lengthen the bodice 3/4 in (2 cm) at the waist on front and back, parallel to the waistline. That adds 1 1/2 in (4 cm) to the torso length.
- Waist darts: keep them; they end in the waist seam.
- Centre back: a seam, for the zip, with 3/4 in (2 cm) allowance. The centre front is cut on the fold.
Trouser (from the women’s block)
- Wide leg (From the block: taper, flare and wide legs): side seam straight down from the hip line, inseam straight down from the crotch point; front hem 12 1/2 in (31.5 cm), back 15 in (38 cm).
- Length: 41 in (104 cm), to the floor in low heels; check in the shoes to be worn.
- Front dart: turn it into a 3/4 in (2 cm) soft pleat folded towards the side, and move it along the waist so it meets the bodice front dart (moving a dart or pleat sideways by up to 1 in, 2.5 cm, is fine: Darts, pleats and yokes on paper).
- Back dart: keep it (1 in × 5 in) and move it to meet the bodice back dart.
- Waist match: the bodice waist and the trouser waist must be the same length, each about 31 in (79 cm) round without darts: 1 in (2.5 cm) ease over the 30 in waist. True them on paper; adjust the side seams if needed.
- Zip: mark the opening on the centre back from the back neck to 7 in (18 cm) below the waist: about 22 in (56 cm). Use a 24 in (61 cm) invisible zip. Add 3/4 in (2 cm) allowance on the trouser centre back above the zip stop, tapering to 3/8 in (1 cm) on the crotch curve below it.
- Pockets: side-seam pockets, opening 6 in (15 cm) from 1 1/2 in (4 cm) below the waist seam.
- Tie belt: 3 in (7.5 cm) wide × 70 in (178 cm), cut in two pieces and joined at the centre back; finished 1 1/4 in (3 cm).
- Seam allowances: 5/8 in (1.5 cm) on shoulders, side seams, inseams and the waist seam; 3/8 in (1 cm) on the neckline, armholes and front crotch; 3/4 in at the zip; hem 1 1/2 in (4 cm).
The torso check on paper
Bodice front 16 1/2 + 3/4 in, bodice back 16 + 3/4 in, trouser crotch seam waist to waist about 27 3/4 in (The women’s block: the back, the checks and the toile): about 61 3/4 in (157 cm), which is about 2 3/4 in (7 cm) over the body’s 59 in. For a woven jumpsuit, about 2–3 in (5–7.5 cm) is a common starting ease; less pulls at the crotch when sitting, more bags at the waist. Teacher to check.
A standard method: a D&D teacher checks the figures before you rely on them.
Materials for the toile
- Calico or old cotton sheeting, about 3 m of 44 in (112 cm), of similar weight to the final cloth.
- A felt pen for the balance lines, a long zip or pins for the centre back, a 1 in tape for the waist.
The toile, step by step
- Cut bodice and trouser in calico with the seam allowances above; add 1 in (2.5 cm) at the side seams for fitting.
- Draw on the cloth: bust line, waistline, hip line, crotch line, knee line, and both crease lines.
- Sew with a long stitch: darts and pleats, bodice shoulders and sides, trouser side seams and inseams, crotch seam from the zip stop round to the front waist, then bodice to trouser at the waist, matching centre front, darts, side seams and centre back.
- Close the back with pins or a long basted zip.
- Fit standing, in the shoes: waist seam at the natural waist; bust, waist and hip lines level; creases hanging straight; no gape at the V neck; armholes not cutting in.
- Fit moving (the one-piece test from Every trouser: one-piece): sit on a chair, reach both arms overhead, bend to touch the knees, sit on the floor. Check: no pull at the crotch or shoulders; the waist seam does not ride up more than about 1 in (2.5 cm) when reaching.
- Mark changes with chalk and pins; photograph front, side and back.
- Transfer every change to the paper, one at a time. If you changed the torso length by more than 1/2 in (1.3 cm), sew a second toile.
Success check for this lesson
- The bodice and trouser waists are the same length and their darts meet.
- The torso length passes the sit, reach and bend tests.
- The V neck lies flat against the chest without gaping.
- The waist seam sits at the natural waist, level all round.
- Every change is on the paper pattern, labelled and dated.
Tips, tricks and hacks
- Measure torso length twice, with the person standing tall and then naturally; use the natural figure.
- Tape the V neckline on the paper pattern with a strip of stay-tape width drawn in; the bias edge must be stayed in the real cloth.
- Take a little out of the V if it gapes: a 1/4 in (6 mm) dart from the V edge to the bust point on the pattern, closed and redrawn.
- Use the same calico for the toile as for your trouser toile, so you can compare.
- Draw the waistline on the body with a tied elastic during the toile fitting.
- Keep the centre-back zip long enough to step in: a 24 in zip ends well below the waist.
- Fluid cloth hides small torso errors; a stiff one shows them. Choose the final cloth before you decide the ease.
- Professionals fit a jumpsuit in two halves first (bodice, then trouser), then together.
- A shoulder seam can absorb 1/4–3/8 in (6–10 mm) of torso-length change at the final fitting.
- Write the torso length and ease on the pattern; it is the number you will need next time.
Problems and how to fix them
It pulls at the crotch when sitting
- Add length at the waist seam: lengthen the bodice 1/2 in (1.3 cm) more.
- Lower the crotch curve 1/4 in (6 mm) at the back.
- Prevention: measure and check the torso length on paper first.
It bags at the waist
- Shorten the bodice at the waist seam by 1/2 in.
- Use an inside waist stay or elastic to take up a little length.
- Prevention: keep the torso ease within about 2–3 in for woven cloth.
The V neck gapes
- Pin out the excess as a small dart from the V edge towards the bust; transfer it to the pattern.
- Raise the V point 1 in (2.5 cm).
- Prevention: stay the V edge with tape in the real cloth.
The shoulders slide off
- Move the neck point back in by 1/2 in (1.3 cm).
- Shorten the shoulder seam at the armhole end.
- Prevention: keep the strap at least 2 1/2 in (6.5 cm) wide.
The armholes cut in or gape
- Cutting in: lower the armhole 1/4 in more.
- Gaping: take a small dart out of the front armhole towards the bust on the pattern.
- Prevention: start from a well-fitted sleeveless bodice block.
The darts do not meet at the waist seam
- Move the trouser dart or pleat to meet the bodice dart.
- If they cannot meet, make the trouser front a gathered or pleated waist instead.
- Prevention: notch the dart positions on both waists on paper.
The waist seam is not level
- Re-mark it on the body with a tied elastic, and redraw on the pattern.
- Check the trouser’s back rise: a low back pulls the seam down.
- Prevention: level the trouser on its own at the trouser toile stage.
Variations: sizes, fabrics, Indian and occasion versions
- Other sizes: from your own bodice and trouser blocks; the torso check is always the same method.
- Palazzo legs: use the Project 1 spread legs for a fuller, evening look; allow more cloth.
- Saree-style jumpsuit: a pallu draped on the form and stitched into the waist seam and at the shoulder (Module 7, Every trouser: one-piece; Module 5, Draped styles: cowl-front and wrap trousers).
- Sleeves or a collar: from your bodice block’s sleeve; a cap sleeve suits temple and family events (Module 8, What to wear where: religious places and modest dress codes).
- Men’s utility jumpsuit or boiler suit: the men’s block joined to a shirt block, with a front zip or button placket.
- Children’s summer jumpsuit: the child block with an elastic waist and button shoulders, no ties or cords (Module 3, Children’s trousers: safety).
- Playsuit: the same pattern cut to the thigh with a flared shorts leg.
Sources and uncertain points
- The trouser parts are the book’s Module 4 figures, from a standard method. The bodice is made from a block outside this book.
- The bodice measurements (bust, neck point to waist, torso length) are typical figures added for this project, not taken from Module 4.
- The torso ease (about 2–3 in) is a common starting point for woven jumpsuits, not a fixed rule. Teacher to check.
Check yourself
- Can you measure torso length and check it against the pattern?
- Do you know where the torso ease is added?
- Do the bodice and trouser waists match, darts and all?
- Did the toile pass the sit, reach and bend tests?
- Is every change on the paper?
Next lesson: Project 7: A jumpsuit – sewing and finishing. Share your work at the end of that lesson.