Grain is usually taught as a rule for cutting straight. For a designer it is also a choice. Turning the grain of a trouser piece changes how it hangs, how it stretches, and how a stripe or a border runs. This lesson uses straight grain, cross grain and bias on purpose: border prints along a hem, chevron stripes on a panelled leg, a bias leg that drapes. The basics of laying out are in Laying out and cutting: grain, nap and fabric layouts.
Teacher to check: angles and allowances are starting points, not yet checked by a D&D teacher.

What you’ll learn
- How each grain behaves in a trouser leg.
- How to rotate a grain line on a pattern safely.
- How to use a border or selvedge along a hem.
- How to design chevrons and mixed-grain panels without twisting the leg.
Three grains, three behaviours
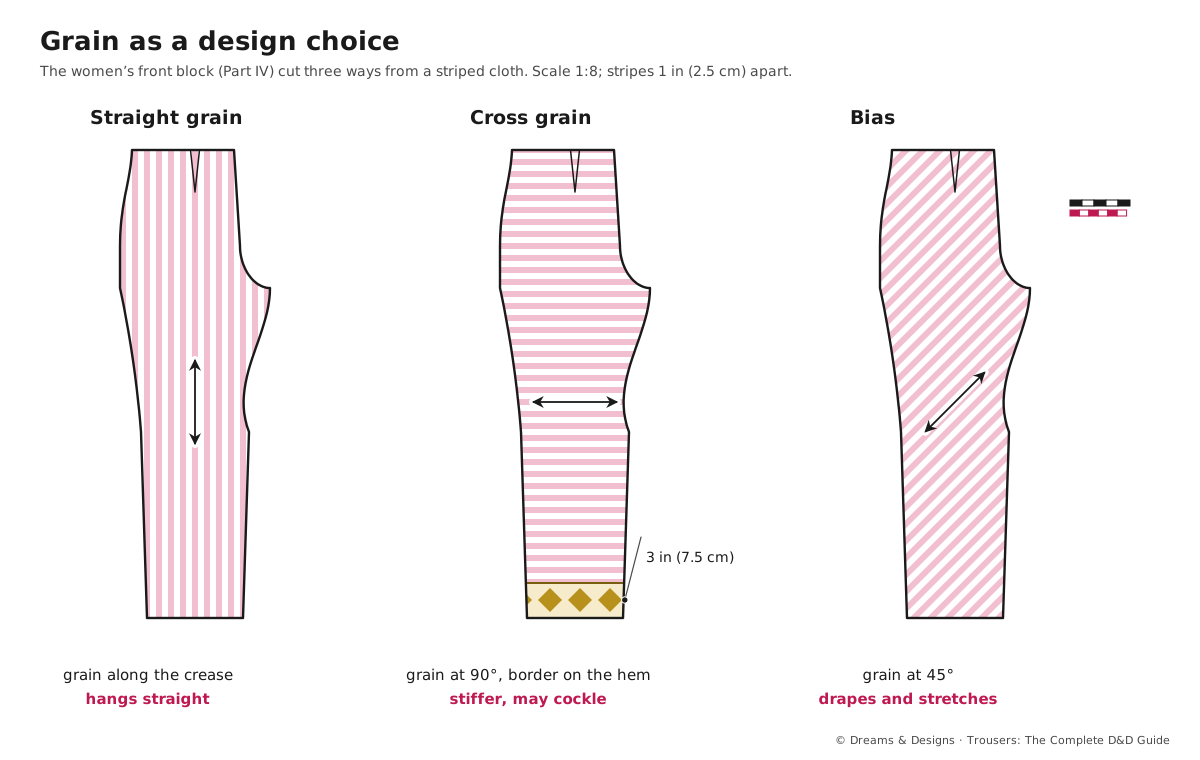
- Straight grain (lengthwise, warp): strongest and most stable. The leg hangs straight and holds a crease. The default for nearly every trouser.
- Cross grain (weft): a little more give, and it hangs a little differently. Used to put a border, a woven stripe or a selvedge where you want it, often along the hem or the side.
- True bias (45°): the most stretch and drape. A bias churidar clings and ruches; a bias palazzo swings. Bias grows in length and narrows in width as it hangs.
Step by step: rotating the grain on a pattern
- Start from a trued pattern with the grain line drawn along the crease.
- Draw the new grain line through the same point at the knee, at the angle you want (90° for cross grain, 45° for bias). Use a protractor or a 45° set square. Look for: the new line crosses the old one at the knee.
- Label the old line “crease” so it can still be pressed.
- For bias, adjust the pattern: narrow the leg a little and add length (see Planning below) after a test.
- Lay out with the new grain parallel to the selvedge. Bias pieces are cut single layer, one at a time, the second piece flipped.
- Stay-stitch the waist and any curved edges straight after cutting.
- Hang the cut pieces (pinned at the waist) for 24 hours before sewing bias legs.
- Re-mark the length and hem after hanging.
Using a border along the hem
Indian fabrics often have a woven or printed border (sarees, dupatta lengths, border prints). To run a border along a trouser hem, cut the leg on the cross grain so the border sits at the bottom. The leg width at the hem must fit within the border length, and the leg length within the fabric width. Check both before cutting.
Before you start, and what you need
- Prerequisites: a fitting block and a toile (Part IV); laying out and cutting (Part VI).
- Time: an hour to rotate and re-mark a pattern; overnight hanging for bias.
- Difficulty: beginner for cross grain; intermediate for bias and chevrons.
- Tools: pattern paper, a protractor or 45° set square, a long ruler, pattern weights, sharp shears or a rotary cutter, stay tape, a fabric marker.
- Budget: an old cotton saree is ideal for testing bias and border placement.
- Fabric: pre-wash and press first; bias tests are useless on unwashed cloth.
Variations
- Chevron legs: split each leg along the crease into two panels, cut at +45° and –45°, so stripes meet in a V.
- Bias yoke: a straight-grain trouser with a bias-cut yoke; stripes turn diagonal at the hip.
- Cross-grain waistband: stripes run up and down the band for contrast.
- Selvedge as a feature: place the selvedge on the outer leg as a finished slit edge or a visible stripe.
- Half-bias churidar: leg on the bias, top (seat) on the straight grain, joined at a seam below the crotch; a common studio method for stability (sources differ).
- Left-handed: no change in method; cutting direction is your choice.
Planning: the order of work
- Decide the effect: hang, stretch, stripe direction or border.
- Check the fabric: width, border position, print direction, nap.
- Lay the pattern pieces on a scaled sketch of the fabric to check they fit at the new grain.
- Plan matching points (notches) for stripes and chevrons.
- For bias: plan extra fabric (bias layouts use much more cloth) and time to hang.
Control: what to watch while cutting and sewing
- Never pull bias edges while sewing; let the feed dogs carry the cloth.
- Use a slightly longer stitch and a little stretch in the seam on bias, or the seam will snap.
- Match stripes by pinning at every notch, then at each stripe between.
- Press, do not iron: lift and lower the iron on bias.
Where you see this in Indian fashion
- The churidar is the best-known bias trouser in India; the bias lets it fit the calf and ruche at the ankle.
- Border placement is everywhere in Indian festive wear: saree borders on sharara hems, palazzo hems and kurta hems.
- Stripes and checks in handloom cottons and ikat are often turned for chevron effects in contemporary Indian ready-to-wear.
- Men’s wear: cross-grain border strips on kurta pyjamas and Pathani suits.
Women, men and children
- Women: bias legs and border hems suit festive and evening trousers.
- Men: keep formal trousers on the straight grain for a crisp crease; use grain play in pockets, waistbands or casual trousers.
- Children: straight grain is most durable for play; bias legs stretch and bag at the knee. Use grain play in small parts (pocket, cuff, patch).
Tips, tricks and hacks
- Mark the crease line even on bias pieces, so the leg can be pressed and checked.
- Cut bias single-layer; double layers slide.
- Use tissue paper under bias seams on slippery cloth; tear it away after.
- Cut a 10 in (25 cm) square on the bias and hang it to see how much it drops before committing.
- Chevrons need perfectly even stripes; check the stripe spacing across the width first.
- For borders, plan the hem with the border. Do not turn up the border; face the hem instead.
- Stabilise the waist of a bias leg with stay tape cut to the pattern length.
- Professionals true bias pieces after hanging, re-cutting the seam allowances.
- Use a walking foot or slightly lighter presser-foot pressure for stripes.
- Photograph the layout before you cut; it is easy to flip a bias piece the wrong way.
Problems and how to fix them
1 · The leg twists after washing
- Unpick the side seam and re-sew on the grain.
- Press the crease to the grain, not to the old crease.
- Prevention: keep grain lines exactly parallel to the selvedge; pre-wash.
2 · Bias legs are longer on one side
- Hang again and re-level the hem.
- Trim the longer side to match.
- Prevention: hang both legs 24 hours before hemming.
3 · Chevron stripes do not meet
- Unpick and re-pin at each stripe.
- Recut one panel if the error is large.
- Prevention: mark matching notches on both pieces; cut panels as a mirrored pair.
4 · Cross-grain leg cockles
- Press with steam and a cloth.
- Add a light interfacing to the hem area.
- Prevention: test the cross grain first; some cloths are weaker that way.
5 · The border does not fit the hem
- Join two border pieces at the inseam.
- Add a border band instead.
- Prevention: measure border length against hem width before cutting.
6 · Bias seams snap
- Re-sew with a slightly longer stitch and a little stretch.
- Use a narrow zigzag.
- Prevention: test seam stretch on scraps.
7 · The waist grows on a bias trouser
- Ease it onto a waistband cut to the pattern length.
- Add stay tape and re-sew.
- Prevention: stay-stitch the waist at once after cutting.
8 · The print runs the wrong way
- Recut the piece if fabric allows.
- Make the reversed piece a deliberate contrast panel.
- Prevention: mark print direction on every pattern piece.
Beginner mistakes and myths
- Mistake: rotating the grain without re-checking that the pieces fit the fabric.
- Mistake: sewing bias straight after cutting, before it has dropped.
- Mistake: turning a border up into a hem and losing it.
- Myth: “Bias makes any trouser fit better.” It changes drape and stretch; it can also bag at the knee and seat.
- Myth: “Cross grain is the same as straight grain.” It behaves differently in most woven cloth.
Practice drills
- Beginner: cut three 10 in (25 cm) squares (straight, cross, bias), hang them, and note the drop.
- Beginner+: cut a child’s pocket on the bias of a striped fabric and sew it to a straight-grain trouser.
- Intermediate: make a half-scale chevron leg in striped cotton.
- Advanced: make a full trouser with a saree border along the hem, cut on the cross grain.
As a hobby, for earning, for teaching
As a hobby: one striped fabric and three grains give three very different trousers.
For earning: turning a client’s old saree into trousers with the border at the hem is a popular studio request.
For teaching: the three-square hanging test is a memorable first lesson on grain.
Care and finishing
- Fold bias trousers over a padded hanger or store flat; hanging long-term stretches them.
- Wash striped and bordered trousers inside out, cold, to protect colour and border yarns.
Sources and uncertain points
- D&D ebook ch. 11 (grain, bias) and ch. 15 (drape and hand); general pattern practice.
- The half-bias churidar method is a studio practice; methods differ between tailors.
- How much bias drops depends on the fabric; always test.
Check yourself
- Can you describe how straight grain, cross grain and bias each behave?
- Can you rotate a grain line through the knee point?
- Can you place a border along a hem and check it fits?
- Do you hang bias pieces before hemming?
- Can you plan a chevron with matching notches?
Key terms
- Warp: lengthwise threads; the straight grain.
- Weft: crosswise threads; the cross grain.
- True bias: 45° to the warp and weft.
- Chevron: stripes meeting in a V at a seam.
- Selvedge: the woven edge of the fabric.