Pressing is half of sewing. Every seam pressed as it is sewn makes the next step easier and the finished trouser flatter; a trouser pressed only at the end never looks quite right. This lesson covers pressing during construction, pressing by fibre, and setting the centre crease that tailored trousers for women, men and older children are known for.
What you’ll learn
- What “press as you go” means at each stage of a trouser.
- How to press each fibre without shine, scorching or melting.
- How to set a sharp, lasting centre crease.
- When not to crease: jeans, palazzos, pyjamas and children’s play trousers.
Pressing is not ironing
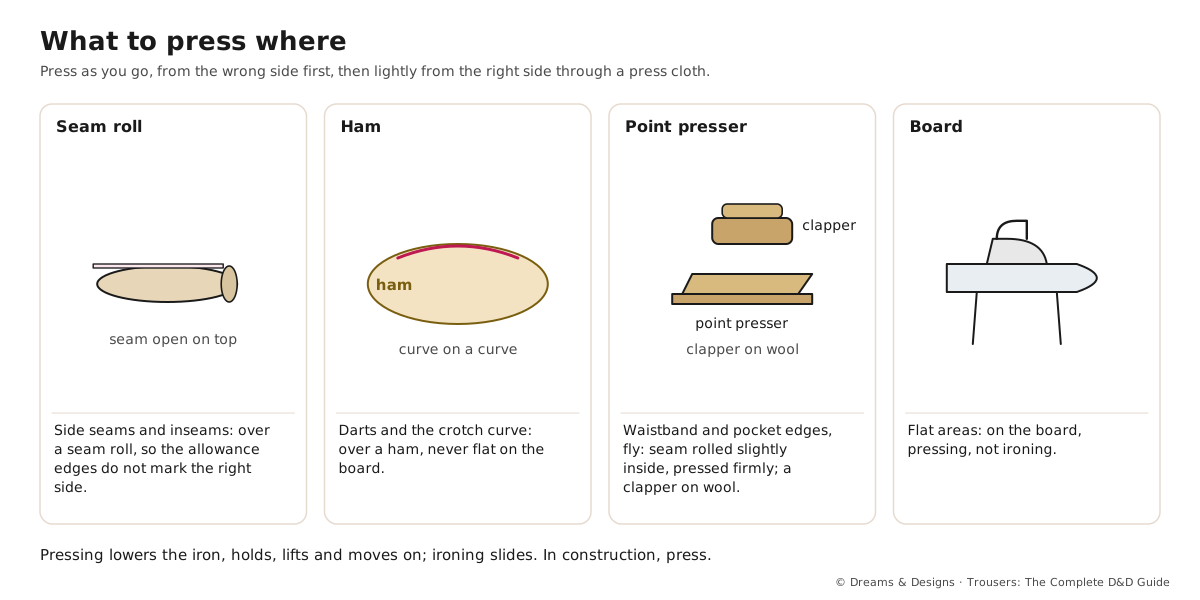
Ironing slides the iron to remove wrinkles. Pressing lowers the iron, holds, lifts and moves on, shaping and setting the cloth without stretching it. In construction, press, never iron.
Press as you go
- Every seam: press flat as sewn, then open or to one side, before another seam crosses it.
- Darts and the crotch curve: over a ham.
- Side seams and inseams: over a seam roll, so the allowance edges do not mark the right side.
- Pocket openings, fly and waistband edges: roll the seam slightly to the inside and press firmly; use a clapper on wool.
- Press from the wrong side first, then lightly from the right side through a press cloth (from the D&D ebook’s construction tricks).
Setting the crease, main steps
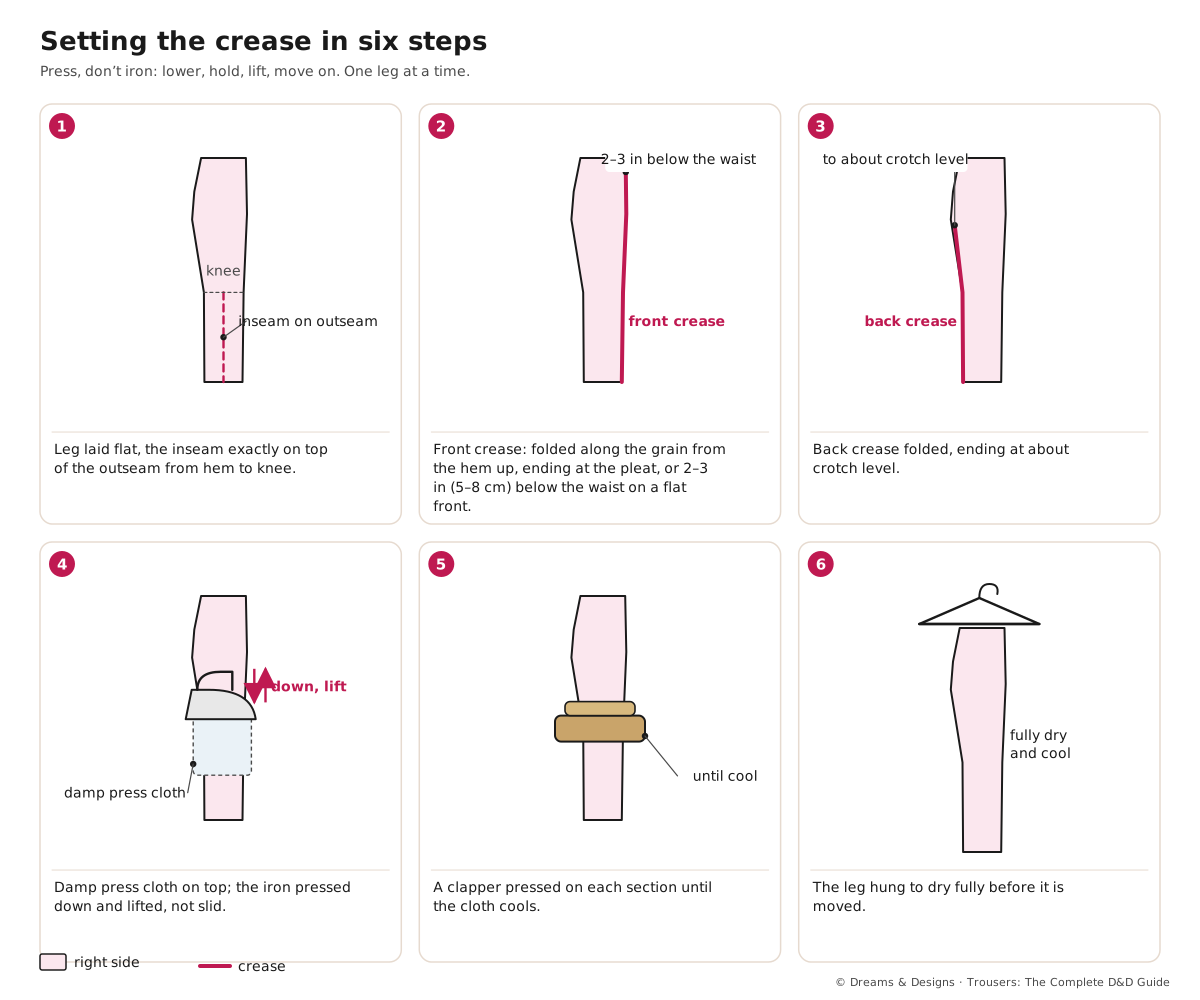
- Lay one leg flat, inseam exactly over the outseam from hem to knee.
- The fold at the front is the front crease. It should follow the grain and meet the front pleat, or fade out 2–3 in (5–8 cm) below the waist on a flat front.
- The back crease runs up to about crotch level.
- Cover with a damp press cloth. Press firmly, section by section; lift and lower.
- Press a clapper down on each section until the cloth cools; this sets the crease.
- Repeat on the other leg; let the trouser hang until fully dry and cool.
Teacher to check: a standard, widely taught method, in inches with cm.
Before you start: tools, and settings by fibre
- Tools: iron with steam, ham, seam roll, clapper, press cloths (cotton muslin and silk organza), a spray bottle. Home-made swaps are in Module 2, Cutting, sewing and pressing tools.
- Safety: stand the iron upright; keep the flex clear; children away from the board.
| Fibre | Heat | How |
|---|---|---|
| Cotton, linen, khadi | High | Steam or damp cloth; press cloth on dark colours |
| Wool, terry-wool | Medium | Lots of steam, press cloth always, clapper; never press dry |
| Silk | Low to medium | Dry or very light steam, organza press cloth; water can spot |
| Polyester, nylon blends | Low | Barely damp cloth, longer low-heat press |
| Rayon, viscose | Low to medium | Wrong side, press cloth; shines easily |
| Velvet, corduroy | Medium | Face down on a towel or needle board; steam from behind |
Pressing at each stage of a trouser
- After cutting: fuse interfacing; press stay tape.
- Darts and pleats: over the ham; pleats basted and pressed at the top only.
- Pockets: each seam before the next; slant edges rolled inside.
- Fly: from the inside, over a ham, after each step.
- Side seams and inseams: on a seam roll.
- Crotch: press the lower curve flat together, the upper part open, over a ham.
- Waistband: flat, then shaped over a ham.
- Hems: the fold before stitching, then lightly after.
- Final press: creases, waist, pockets; then hang.
Shaping wool by pressing
Wool can be gently shaped with steam: stretched in one place and shrunk in another. Tailors traditionally “shrink” the back leg below the seat and stretch the inseam a little so the back leg follows the body. This is an advanced tailoring skill; teacher to show. Even beginners can use steam to ease a little fullness into a waistband or to flatten a dart point. Synthetics do not respond the same way (D&D ebook ch. 46).
Variations: creases or no creases
- Tailored women’s and men’s trousers: front and back creases.
- School trousers: creases, often set with a permanent-crease finish on polyester blends.
- Jeans, chinos for casual wear, joggers: no crease.
- Palazzos and wide legs: usually no crease, or a soft one; pleats pressed only at the top.
- Salwars, pyjamas, churidars: no crease.
- Lasting creases: a line of hand stitching or a strip of fusible tape inside the crease (higher-end construction, D&D ebook ch. 46). Commercial “permanent crease” treatments exist; ask a finishing unit.
- Left-handed: work the board with the narrow end to your right, so the iron is in your left hand and the trouser is fed from the right.
Planning and control
- Set up the board next to the machine so pressing is never put off.
- Pressure: firm on wool and cotton; light on silk and pile.
- Moisture: damp, not wet; wet cloth can shrink or water-mark.
- Time: let pressed areas cool before moving; warm cloth crumples.
Pressing women’s, men’s, children’s and Indian trousers
- Women’s tailored trousers: creases on wool and crepe; soft or no creases on drapey rayon and silk palazzos.
- Men’s suit trousers: sharp front and back creases; the front crease starts at the pleat or just below the waist.
- Children’s trousers: school trousers creased; play trousers pressed flat only.
- Salwars and churidars: press kalis and ankle bands flat; never crease the legs; press Patiala pleats only at the waist.
- Festive trousers with zari or embroidery: press face down on a thick towel so the work is not flattened; low heat; organza press cloth.
Pressing in the monsoon
- Humidity softens creases; a clapper and full cooling matter even more.
- Let pressed trousers dry completely before folding, or mildew can form.
- Store pressed orders hung in a dry, airy place, covered with cloth, not plastic.
Removing a crease, or moving one
- Dampen the old crease with a spray bottle or damp press cloth (test first; wool and cotton respond best).
- Press it flat through the cloth, lifting and lowering, and let it cool.
- Find the new crease line on the grain, inseam over outseam.
- Set it with steam, pressure and a clapper.
Sharp creases on polyester blends may never come out fully; tell the customer before altering.
Tips, tricks and hacks
- Test on a scrap of the same cloth: heat, steam and press cloth.
- A clapper sets creases better than more heat.
- Silk organza press cloth lets you see what you press.
- For synthetics, a barely damp cloth and a longer, lower-heat press set creases without shine (D&D ebook ch. 47).
- Paper strips under seam allowances stop ridges.
- Check seams before pressing; pressing sets mistakes.
- Clean the soleplate regularly; residue marks cloth.
- Use distilled or filtered water in hard-water areas to stop spitting.
- Hang trousers by the hem after creasing.
- Remove chalk and tacks before pressing over them.
- What professionals do differently: they press more than they sew, and they set creases with a clapper and let the cloth cool.
Problems and how to fix them
Shiny marks on the cloth
- Steam lightly through a damp cloth and brush the nap up.
- Dab with a cloth dampened with a little white vinegar (wool; test first).
- Prevention: always use a press cloth on the right side.
Seam allowances show as ridges
- Re-press from the inside over a seam roll.
- Put paper strips under the allowances.
- Prevention: use the seam roll from the start.
Double crease lines
- Dampen and press the wrong crease out, then re-press on the grain.
- Steam and brush wool to relax it.
- Prevention: line up inseam and outseam before pressing.
The crease does not last
- Re-press with more steam and a clapper.
- Stitch or fuse a crease line inside.
- Prevention: let the crease cool fully.
Scorched or melted cloth
- Light scorch on cotton may wash out; test.
- Melted synthetic cannot be fixed; patch, or recut the piece.
- Prevention: test heat on a scrap.
Water spots on silk
- Dampen the whole area evenly and dry it.
- Press dry through organza.
- Prevention: no steam on silk unless tested.
Velvet pile is crushed
- Steam from behind and brush the pile up.
- Hang in a steamy bathroom.
- Prevention: press face down on a needle board or towel.
Beginner mistakes and myths
- Myth: more heat gives better creases. Steam, pressure and cooling do.
- Mistake: sliding the iron and stretching curves.
- Mistake: pressing everything at the end.
Practice drills
- Beginner: press five seams open over a rolled towel without ridges.
- Improver: press a dart and a crotch curve over a ham.
- Confident: set front and back creases on a wool trouser with a clapper.
As a hobby, for earning, for teaching
As a hobby: good pressing turns a beginner’s trouser into one that looks shop-bought.
For earning: a crisp final press is the first impression at handover; include pressing time in costing.
For teaching: press half of a sample, leave half unpressed, and let learners compare.
Care and finishing
- Re-press creases after washing; wool needs it less often.
- Store pressing tools clean and dry.
Check yourself
- Do you press every seam before crossing it?
- Do you know the heat for each fibre?
- Can you set a crease that lasts?
- Do you know which trousers should not be creased?
Quiz
- What is the difference between ironing and pressing? Answer: pressing lifts and lowers; ironing slides.
- What sets a crease? Answer: steam, pressure and cooling (a clapper).
- Where does the front crease end on a pleated trouser? Answer: at the pleat.
- How is velvet pressed? Answer: face down on a needle board or towel, steam from behind.
Key terms
- Pressing: lifting and lowering the iron to shape and set.
- Clapper: a wooden block that sets creases.
- Ham, seam roll: curved pressing cushions.
- Press cloth: a cloth between iron and garment.
- Crease line: the pressed fold down the centre of the leg.
Sources and uncertain points
- Main source: D&D’s own trousers ebook, chapters 46 and 47 (press as you go, crease setting, steam and wool, inside first, synthetics), with general, widely taught practice.
- Wool shaping methods vary between tailoring traditions. Teacher to check.