Every trouser is held together by its seams: two side seams, two inseams and the long curved crotch seam that takes more strain than any other seam in everyday clothes. This lesson teaches the three seams trousers use: the plain seam for almost everything, the French seam for fine cloth, and the flat-felled seam for jeans and workwear. Finishing raw edges is in the next lesson, Seam finishes: overlocked, zigzag, pinked and bound.

What you’ll learn
- Seam allowances, stitch length and stay-stitching for trousers.
- How to sew, press, trim and clip a plain seam, including the crotch.
- How to sew a French seam and a flat-felled seam, and where each belongs.
- Which seam suits women’s, men’s, children’s and Indian trousers.
Allowance, stitch and stay-stitching
- Seam allowance: 5/8 in (1.5 cm) is the common home-sewing standard; ready-to-wear often uses 3/8 in (1 cm). Tailored trousers keep wider allowances at the centre back and side seams for later alteration. Whatever you choose, keep it the same all the way along, or the trouser will not match its pattern.
- Stitch length: about 2.5 mm for most cloth; 3 mm for denim and topstitching; 2–2.2 mm on the crotch curve for strength.
- Stay-stitching: before anything else, sew one row of straight stitching 1/2 in (1.2 cm) from the edge on every curved or bias edge: the waist, the crotch curve and slant pocket openings. Sew in the direction that does not stretch, usually from the side towards the centre.
The plain seam, step by step
- Place the pieces right sides together, notches matched; pin at right angles or use clips.
- Sew on the seam line, with a few backstitches at each end (or leave long tails to tie on fine cloth).
- Check the seam from the right side before pressing: no puckers, no skipped stitches, the lines straight.
- Press flat as sewn, to settle the stitches.
- Press open (tailored trousers, side and inseams) or to one side (overlocked seams, jeans).
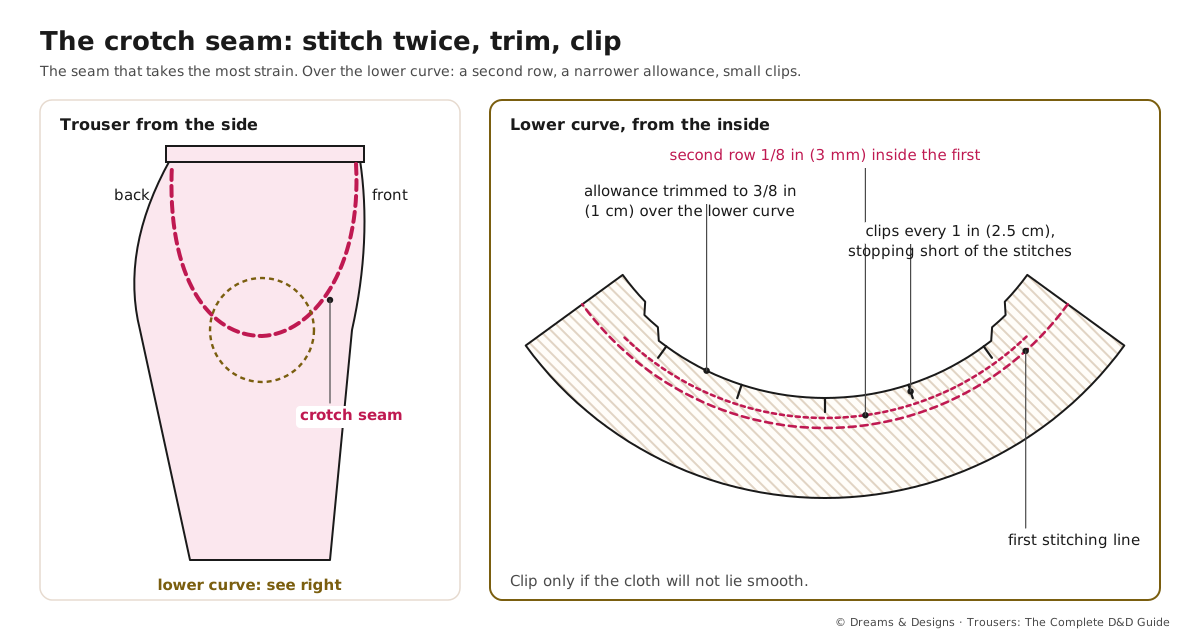
- On the crotch curve: sew a second row of stitching 1/8 in (3 mm) inside the first over the lower curve, trim to about 3/8 in (1 cm) there, and clip only if the cloth will not lie smooth.
Which seam where
| Seam | Where on trousers | Notes |
|---|---|---|
| Plain | Almost every trouser seam | Pressed open or to one side, then finished |
| French | Sheer and fine cloth: georgette, chiffon, silk palazzos, fine cotton pyjamas, unlined trousers | Straight seams only; too bulky on curves and thick cloth |
| Flat-felled | Jeans (inseam, back yoke, centre back), workwear, children’s play trousers | Very strong, no raw edges, two rows of stitching show |
Teacher to check: a standard, widely taught method, in inches with cm.
Before you start
- Prerequisites: cut and marked pieces (Laying out and cutting: grain, nap and fabric layouts).
- Time: a seam sample takes 10–20 minutes; a full set of trouser seams 1–2 hours with pressing.
- Difficulty: plain seam easy; French easy to moderate; flat-felled moderate.
- Tools: machine with a fresh needle of the right type and size, matching thread, seam guide or magnetic guide, iron, seam roll. A felling foot helps but is not needed. See Module 2, Interfacing, pocketing, thread and needles.
- Safety: fingers away from the needle; slow down over thick seams rather than pushing.
Step by step: the French seam
- Place the pieces wrong sides together (this feels wrong; it is right).
- Sew 1/4 in (6 mm) from the edge if your allowance is 5/8 in (1.5 cm).
- Trim the allowance to a little under 1/8 in (3 mm). Remove any whiskers of thread.
- Press the seam flat, then open, then fold the pieces right sides together along the seam, rolling the stitching exactly to the fold. Press.
- Sew 3/8 in (1 cm) from the fold, enclosing the raw edges. Look for: no whiskers poking through on the right side.
- Press to one side, towards the back of the trouser.
Total used: 1/4 in + 3/8 in = 5/8 in, so the pattern still fits. For a 3/8 in (1 cm) allowance, use 1/8 in then 1/4 in. On a pyjama crotch, sew a plain seam and bind it instead; a French seam on a tight curve puckers.
Step by step: the flat-felled seam
- Place the pieces right sides together, the back piece offset 3/8 in (1 cm) beyond the front if you want a built-in fold (factory method); or level, for the trimmed method below.
- Sew at 5/8 in (1.5 cm).
- Trim the lower (inner) allowance to 1/4 in (6 mm).
- Fold the wide allowance in half over the trimmed one, raw edge tucked under, and press.
- Press the whole folded allowance flat to one side, covering the trimmed edge.
- From the right side, sew close to the fold, 1/16 in (1–2 mm), then a second row 1/4 in (6 mm) away, so both rows show.
- Look for: even distance between the rows and no raw edges inside.
Which way does a jeans inseam fell? Conventions differ between makers; many classic jeans fell the inseam towards the front. Choose, and do the same on both legs.
Trimming, grading, clipping and notching
- Trim enclosed seams (waistband ends, facings) to reduce bulk.
- Grade: trim the layers to different widths, the one nearest the outside widest, so no ridge shows.
- Clip inward curves (the crotch, the waist edge under a facing) with small cuts towards the stitching, stopping 1/16 in (2 mm) short.
- Notch outward curves (the edge of a curved pocket facing) by cutting small V shapes out.
- Leave side seams and inseams of tailored trousers untrimmed; the allowance is for altering.
Variations, and left-handed sewing
- Mock flat-fell: sew a plain seam, overlock both edges together, press to one side and topstitch twice. Faster, and common on children’s trousers.
- Welt (single-topstitched) seam: like the mock fell with one row; used on casual trousers.
- Stretch seam: for knit joggers and leggings, use a narrow zigzag (0.5–1 mm wide), a stretch stitch, or an overlocker four-thread stitch so the seam stretches with the cloth.
- Salwar and pyjama: plain seams, often overlocked or turned and stitched; French seams on fine mulmul and silk.
- Men’s tailored trousers: plain seams pressed open, edges overlocked or bound; the centre back seam left wide.
- Left-handed: machines are built for the cloth to sit left of the needle. Left-handed sewers usually guide the cloth with the left hand in front and the right hand behind; nothing about the seams changes. Hand-sewn seams run from left to right.
Planning and control
- Order: stay-stitch first; sew darts and pockets on flat pieces; then side seams, inseams and crotch (full orders are in Order of construction: basic and pull-on trousers).
- Direction: sew side seams and inseams from hem to waist on both legs, or from waist to hem on both; the same way each time stops one leg twisting.
- Tension: test on a doubled scrap; the knots should sit hidden between the layers. If the top thread shows loops underneath, tighten the top tension a little.
- Speed: steady on straight seams, slow on the crotch curve, turning the cloth with the needle down.
- Pressure: lighter presser-foot pressure on soft cloth, more on denim.
Tips, tricks and hacks
- Put a strip of masking tape on the machine bed at 5/8 in from the needle as a seam guide.
- Stay-stitch the moment pieces are cut, before they are handled.
- Check, then press; once pressed, errors are hard to see (from the D&D ebook’s construction tricks).
- Double-stitch the crotch curve on every trouser; it is where seams split.
- Use a jeans needle (90–100) and a longer stitch on flat-felled denim seams.
- Hammer thick seam crossings lightly on a hard surface, through a cloth, so the machine can climb them.
- A folded scrap behind the foot (a “hump jumper”) keeps the foot level over bulky seams.
- Sew with the more flexible layer underneath; the feed dogs ease it in.
- For slippery cloth, put tissue paper under the seam and tear it away after.
- Press side seams over a seam roll so the allowance edges do not mark the right side.
- What professionals do differently: they sew the crotch seam last on tailored trousers, after both legs are complete, so the seam can be altered as one piece; and they never trim alteration allowances.
Problems and how to fix them
The seam puckers
- Lengthen the stitch slightly and loosen the top tension a little.
- Change to a finer, sharp needle and lighter thread.
- Prevention: test on a doubled scrap of the same cloth first, and do not pull the cloth while sewing.
The crotch seam splits
- Resew with a shorter stitch over the old line, 1 in (2.5 cm) beyond the split each side.
- Add a second row of stitching 1/8 in inside.
- Prevention: double-stitch the curve, and check the crotch length is not too short (Module 3, Fitting issues: rise, seat, crotch and thighs).
Whiskers poke through a French seam
- Unpick the second row, trim closer, and resew a little deeper.
- On a short stretch, a drop of fray stopper on the inside.
- Prevention: trim the first allowance to under 1/8 in and press before folding.
The flat-felled rows wander
- Unpick the top row and resew using an edge-stitch foot.
- Press the fold more firmly before stitching.
- Prevention: use a felling foot, or press and glue-baste before stitching.
One layer creeps, so the notches do not meet
- Unpick and repin at every notch; sew with a walking foot.
- Hand-tack the seam first.
- Prevention: pin closely, and keep the same seam direction on both legs.
The seam allowance shows through as a ridge
- Press again over a seam roll, through a press cloth.
- Grade the allowances if the seam is enclosed.
- Prevention: press as you go, from the wrong side first.
Skipped stitches on stretch cloth
- Change to a stretch or ballpoint needle.
- Use polyester thread and a slight zigzag.
- Prevention: always match needle type to the cloth.
Beginner mistakes and myths
- Myth: backstitching is needed on every seam. Seams crossed by another seam later do not need it; tied ends are neater on fine cloth.
- Myth: a smaller stitch is always stronger. Very small stitches can perforate cloth and tear it.
- Mistake: skipping stay-stitching, then finding the waist has stretched.
- Mistake: pressing only at the end.
- Mistake: French seams on a curved crotch.
Practice drills
- Beginner: sew six plain seams on cotton scraps at exactly 5/8 in; measure each with a ruler.
- Improver: make a seam sampler card: plain open, plain to one side, French, mock fell.
- Confident: sew a true flat-felled seam in denim with two even rows, and a double-stitched crotch curve on a child-size trouser.
As a hobby, for earning, for teaching
As a hobby: a seam sampler card is a reference you will use for years.
For earning: neat, straight seams and clean insides are what customers notice when they turn a trouser inside out; it is part of your quality promise.
For teaching: start every trouser class with plain seams on paper (no thread) to train straight sewing, then cloth.
Care and finishing
- Finish raw edges soon after sewing (next lesson).
- Check crotch seams on children’s trousers after every few washes; resew small breaks at once.
- Keep sampler cards labelled with cloth, needle, thread and stitch length.
Check yourself
- Do you stay-stitch every curved edge before sewing?
- Can you sew a French seam that uses exactly the pattern’s allowance?
- Can you sew a flat-felled seam with two even rows?
- Do you double-stitch the crotch curve?
- Do you check a seam before pressing it?
Quiz
- How do you start a French seam? Answer: wrong sides together.
- Where are flat-felled seams usual? Answer: jeans and workwear (inseam, yoke, centre back).
- Why stay-stitch? Answer: to stop curved and bias edges stretching.
- Why leave tailored side seams untrimmed? Answer: so they can be let out later.
Key terms
- Seam allowance: distance from stitching to cut edge.
- Stay-stitching: a row of stitching that holds a curved edge in shape.
- French seam: a seam that encloses its raw edges, sewn twice.
- Flat-felled seam: a strong seam folded and stitched flat, two rows showing.
- Mock flat-fell: plain seam overlocked and topstitched to look felled.
- Grading: trimming layers to different widths.
- Clip, notch: small cuts that let a curved seam lie flat.
Sources and uncertain points
- Main source: D&D’s own trousers ebook, chapters 41 and 47 (seams, stay-stitching, check before pressing), with general, widely taught sewing practice.
- Seam allowance widths differ between home patterns, factories and tailors. Teacher to check D&D’s standard.
- The direction a jeans inseam is felled varies by maker; it is a convention, not a rule.