Darts and pleats turn a flat piece of cloth into a shape that follows the body from waist to hip. On trousers, back darts shape the seat, front darts or pleats shape the tummy and hip, and pleats add room and movement. This lesson is about sewing them well. Drafting them is in Module 4, and decorative pleats of every kind are in Module 5.

What you’ll learn
- How to mark, sew, tie off and press a trouser dart.
- How to fold, baste and press front pleats, forward and reverse.
- Where darts and pleats usually sit on women’s, men’s and children’s trousers.
- How to keep both sides of the trouser matching.
Where they sit
- Back darts: one or two on each back leg, usually 3–5 in (8–12 cm) long. Women’s backs often have two, because the waist-to-seat difference is larger; men’s usually one.
- Front darts: short, 2½–4 in (6–10 cm), on flat-front women’s trousers.
- Front pleats: on men’s and women’s pleated trousers, the main pleat folded from the crease line so the crease runs straight down from it.
- Children’s trousers: usually no darts; elastic and a straighter cut do the shaping.
- Salwar and pyjama: no darts; gathers or pleats into the waist casing, or the Patiala’s many pleats.
The dart, step by step
- Mark the dart legs at the waist and the point with dots (tailor’s tacks or chalk). Chalk a line from each leg to the point.
- Fold the dart along its centre, right sides together, legs matched. Pin across.
- Stitch from the waist edge towards the point. Over the last 1/2 in (1.2 cm), sew right beside the fold, so the dart melts away into the cloth.
- Sew off the fold at the point. Do not backstitch at the point.
- Tie the thread tails in a double knot and trim to 1/2 in.
- Press the dart flat as sewn, then over a ham: back darts towards the centre back, front darts towards the centre front. Thick cloth: slash and press open.
The pleat, step by step
- Mark the fold line and the placement line at the waist with snips 1/8 in (3 mm) deep.
- Bring the fold line to the placement line, folding the direction your pattern shows.
- Baste across the top within the seam allowance.
- Press the pleat lightly near the top only, or down the leg if it continues into a crease.
- If the pattern says so, stitch the pleat down a short way from the right side, or on the inside.
Teacher to check: a standard, widely taught method, in inches with cm.
Before you start
- Prerequisites: marked pieces; Prints, checks and stripes, and marking the pieces.
- Time: 15–30 minutes for all darts and pleats on a trouser.
- Difficulty: easy to sew, harder to press well.
- Tools: chalk, tailor’s tacks, pressing ham (or a rolled towel), press cloth, clapper for wool.
Forward, reverse and double pleats
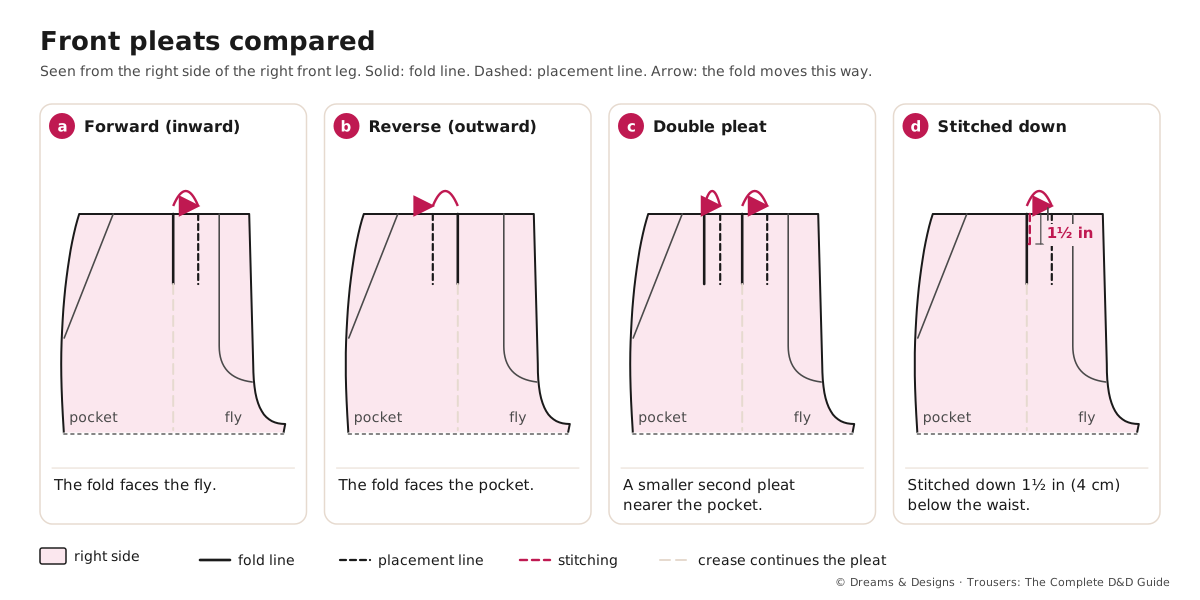
- Forward (inward) pleat: the fold faces the fly. Classic in many British and Indian men’s tailored trousers. Sources differ on which is “traditional” where.
- Reverse (outward) pleat: the fold faces the side pocket. Common in Italian-style and many modern trousers; it can lie flatter when standing.
- Double pleat: a main pleat at the crease and a smaller one between it and the pocket.
- Both sides mirror: the left and right legs fold as mirror images.
- Released pleat: stitched down a short way, then released, so it opens over the hip.
- Women’s soft pleats on palazzos and wide trousers are often unpressed, giving drape instead of a sharp line.
Variations, and left-handed notes
- Double-pointed (contour) dart: used in one-piece trousers such as jumpsuits at the waist; sew from the middle to each point.
- Dart in a lining: sew it as a tuck, a small soft fold, for ease (Module 2, Shrinkage, pre-washing and lining).
- Darts in sheer cloth: use the “thread-the-bobbin” method: thread the bobbin thread up through the needle and tie it to the top thread, so the dart is sewn from point to waist with no knot at the point.
- Darts in checks: the lines must chevron evenly; place the dart centre on a line.
- Pleats with a lining or pocket bag: catch the pleat into the pocket stay (see Side-seam and slant pockets) so it hangs straight.
- Left-handed: sewing is the same. When folding pleats on the table, it can be easier to work the right leg first, then mirror the left; check the fold directions are mirrored.
Planning and control
- Order: darts and pleats are sewn first, on flat pieces, after stay-stitching and before pockets.
- Matching: lay the two back legs together after sewing; the darts must be the same length and position.
- Control: slow near the point; use the needle-down setting and turn the hand wheel for the last stitches.
- Pressing: press from the wrong side first, then a light press from the right side through a press cloth.
Tips, tricks and hacks
- A strip of masking tape from leg to point gives a straight sewing guide on cloth that will not take chalk.
- Tie, don’t backstitch, at the point; backstitching makes a lump.
- Put a strip of paper under the dart when pressing to stop its outline showing on the right side.
- Curve the dart slightly outwards for a fuller seat or inwards for a hollow below the waist; mark this on the pattern first (teacher to check).
- Press over a ham, never flat on the board; a dart makes a curve and needs a curve to press on.
- Slash thick darts (wool, denim) to 1/2 in from the point and press open for less bulk.
- Baste pleats across the top right away; unbasted pleats shift while you sew pockets.
- Continue the front pleat into the crease when pressing; it should be one line.
- Use a clapper on wool pleats for a sharp, lasting fold.
- Check both sides together before going further; mismatched darts are obvious from behind.
- What professionals do differently: they shape darts slightly by pressing (shrinking the fullness at the point with steam on wool), so the dart vanishes completely.
Problems and how to fix them
A bubble or pucker at the dart point
- Unpick the last 1 in (2.5 cm) and resew, tapering more gradually along the fold.
- Steam-press the point over a ham; on wool, shrink the bubble with steam.
- Prevention: sew the last stitches right beside the fold and off the edge.
The darts are different lengths
- Resew the shorter one to match.
- Check the pattern marks were transferred correctly.
- Prevention: mark with tacks through both layers at once.
The dart shows as a ridge on the right side
- Press again with paper under the dart.
- Slash and press open on thick cloth.
- Prevention: press over a ham, through a press cloth.
The pleats fall open or gape
- Check the fit: gaping often means the trouser is tight across the hip (Module 3, Fitting issues: how to diagnose, and the waist).
- Stitch the pleat down 1–1½ in (2.5–4 cm), or add a pocket stay.
- Prevention: fit the trouser in a test version first.
The pleats fold in different directions on each leg
- Unpick the basting and refold.
- Mark the direction with an arrow on each piece.
- Prevention: arrows on the pattern, and checking before stitching.
The crease does not continue from the pleat
- Re-press the crease starting from the pleat fold, following the grain.
- Check the pleat was placed on the crease line.
- Prevention: mark the crease line when cutting.
Dart thread knots pull out
- Rethread the tails into a needle and take two tiny stitches into the dart fold.
- Add a drop of fray stopper on the knot.
- Prevention: tie a double knot and leave 1/2 in tails.
Beginner mistakes and myths
- Myth: darts are only for women’s trousers. Men’s tailored trousers usually have back darts too.
- Mistake: sewing to the point in a straight line, then stopping abruptly, making a pucker.
- Mistake: pressing darts flat on the board.
- Mistake: pleats left unbasted.
Practice drills
- Beginner: sew six darts on cotton scraps and press three each way over a rolled towel.
- Improver: sew a pair of matching back darts on two layers and compare them laid together.
- Confident: fold and baste a double pleat front on wool, press the crease from the pleat to the hem.
As a hobby, for earning, for teaching
As a hobby: clean darts are the first sign a trouser was made with care.
For earning: converting pleated trousers to flat fronts, or moving darts for a better fit, are skilled alterations customers ask for.
For teaching: let learners sew a dart in paper first, then in cloth; paper shows clearly how a dart makes a 3D shape.
Care and finishing
- Re-press pleats after washing from the pleat fold downwards.
- Hang pleated trousers by the hem or folded on the crease, not crushed in a drawer.
Check yourself
- Can you sew a dart with no bubble at the point?
- Do you know which way to press back and front darts?
- Can you fold a forward and a reverse pleat?
- Do your left and right darts and pleats match?
Quiz
- Should you backstitch at a dart point? Answer: no; tie the threads.
- Which way does a reverse pleat open? Answer: towards the side pocket.
- Why press over a ham? Answer: the dart makes a curve and needs a curved surface.
- Do children’s trousers usually need darts? Answer: usually not; elastic and a straighter cut do the shaping.
Key terms
- Dart: a stitched, tapered fold that shapes cloth.
- Dart legs, point: the two marked lines and the tip.
- Forward (inward) pleat, reverse (outward) pleat: pleats opening to the fly or to the pocket.
- Pocket stay: an inner piece that holds pleats and pockets flat.
- Pressing ham: a firm, curved cushion for pressing shaped areas.
Sources and uncertain points
- Main source: D&D’s own trousers ebook (drafting and pressing chapters), with general, widely taught practice.
- Which pleat direction is “traditional” differs by country and tailor; both are correct.
- Dart lengths are typical starting points; the pattern decides. Teacher to check.