This last lesson of Part IX brings everything together. You can design your own trouser from a blank page, or start from an old one and make it new: wide jeans into culottes, a worn salwar into a child’s pants, a saree into palazzos, a fitted trouser into a Roopanthara piece. Almost anything about a trouser can change. Three things must not: balance, grain and the crotch. Keep those, and the new trouser will hang, move and fit.
Teacher to check: allowances and insert sizes are starting points.


What you’ll learn
- What can change in a trouser, and the three things that must not.
- How to read an old trouser before remaking it.
- Five upcycling methods, with worked examples.
- A checklist for designing your own trouser from scratch.
The three things that must not change
- Balance: the trouser hangs straight. The side seams fall plumb from the hip; the hip line is level front and back; the legs do not swing forward or back. Balance is lost when front and back are cut unevenly, or when one seam is shortened and the other is not.
- Grain: the crease (or centre of each leg) runs along the straight grain, unless a different grain is a deliberate design (see Designing with grain, cross grain and bias). Off-grain legs twist, often only after washing.
- Crotch: its shape and length, front and back, and the top of the inseam. This is the part of the fit frame that most often goes wrong in a remake.
Everything else (leg width, length, silhouette, pockets, waist treatment, details, colour and surface) is free to change.
Reading an old trouser, step by step
- Try it on the wearer. Does the waist, seat and crotch still fit? If not, the remake must start by fixing them (Part XI, Alterations) or be cut into a smaller garment.
- Check the cloth: wear at the knees, seat and inner thighs; fading; stains. Plan around weak areas.
- Find the grain along each leg (look at the weave). Mark it with chalk.
- Measure the points of measure (see Design development: flats, spec sheets, tech packs and collections).
- Decide: remake as a trouser, cut down to a smaller trouser (a child’s), or harvest the cloth for another garment.
Five upcycling methods
- Re-shape the leg: taper, widen with inserts, crop, add a cuff.
- Re-detail: new pockets, a new waist treatment, piping, topstitching.
- Re-surface: overdye, print, embroider, patch.
- Transform: Roopanthara on a well-fitting trouser.
- Re-cut: unpick fully and cut a new, smaller garment from the pieces.
Worked examples
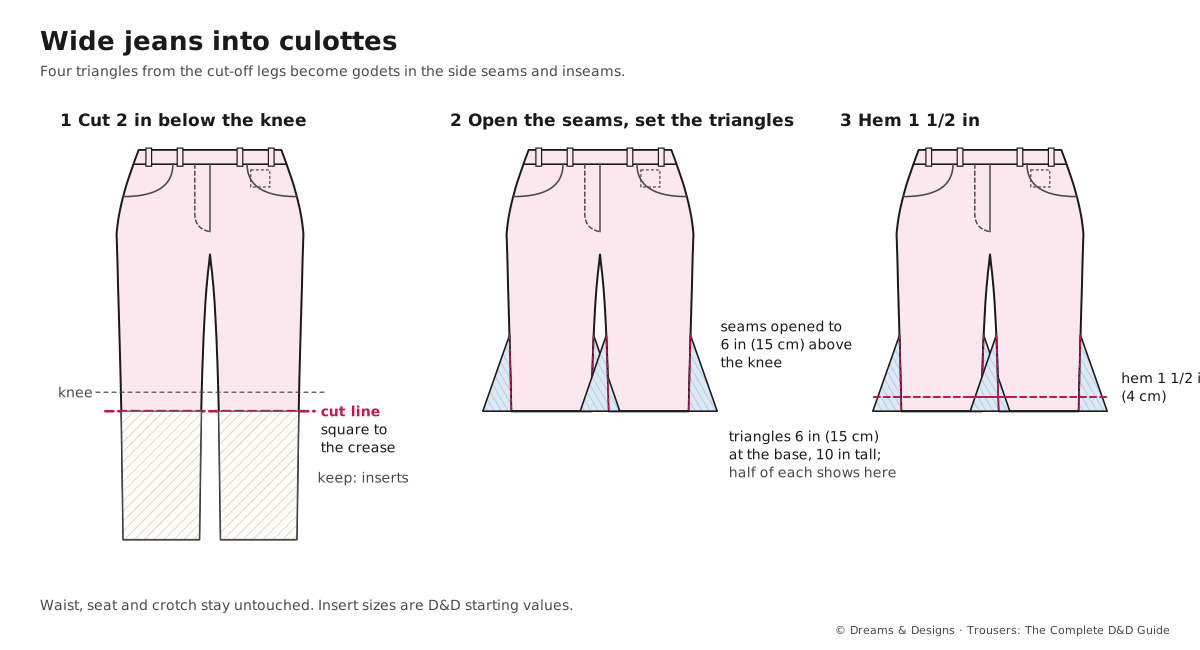
Wide jeans into culottes
- Cut the legs 2 in (5 cm) below the knee, square to the crease; keep the cut-off parts.
- Open the side seams and inseams from the hem to 6 in (15 cm) above the knee.
- Cut four triangles from the cut-off parts, 6 in (15 cm) wide at the base and 10 in (25 cm) tall.
- Set the triangles into the opened seams like godets.
- Hem 1½ in (4 cm). The waist, seat and crotch are untouched.
A saree into palazzos
- Check the saree’s strength; old silk can split.
- Lay the palazzo pieces on the cross grain so the border runs along each hem (four pieces).
- Keep the pallu for a waist tie, pocket bags or a contrast band.
- Cut the waistband from the body of the saree.
- Line with soft cotton if the saree is sheer.
An adult salwar into a child’s pants
- Unpick the salwar fully; press the pieces.
- Lay the child’s pattern on the largest pieces, on grain.
- Use the mohri as a ready-finished hem band if it fits.
- Elastic waist; no cords for small children.
A fitted trouser into a Roopanthara piece
- Confirm the fit on the wearer.
- Map the fit frame and design lines directly on the trouser.
- Work Level 1 or 2 from Roopanthara Cutting: worked examples and graded exercises, using cloth from a second old trouser for inserts.
Designing your own trouser: a checklist
- Write the brief: who, what for, which climate and occasion.
- Choose the silhouette family and the fit.
- Choose the fabric (Part II) and colour story (Part VIII).
- Choose the cut (grain, panels, yokes, special seams).
- Choose the details: waist, closure, pockets, hem.
- Choose any treatment or embellishment, with honesty labels.
- Apply the elements and principles: one focal point, unity.
- Sketch, then draw flats.
- Make the pattern from your fitted block, keeping balance, grain and crotch.
- Toile, fit, correct, then cut the real fabric.
Before you start, and what you need
- Prerequisites: the rest of Part IX; alterations basics (Part XI).
- Time: from two hours (re-detail) to two days (re-cut).
- Difficulty: beginner (re-detail, re-surface) to advanced (Roopanthara upcycle).
- Tools: a good seam ripper, chalk, pattern paper, a steam iron, a press cloth.
- Budget: upcycling is the budget option; the cloth is already yours.
Where you see this in Indian fashion
- Re-cutting old sarees into children’s clothes is a long household tradition.
- Heirloom remakes before weddings are common studio work.
- Upcycling labels and designers in India work with offcuts, old garments and saree waste (see Transformation in Indian fashion: fusion, sculptural and upcycled work).
Women, men and children
- Women: sarees, dupattas and salwars are rich sources; jeans to culottes is a favourite.
- Men: old trousers into shorts; dhotis into dhoti pants; formal trousers re-detailed.
- Children: adult garments re-cut into children’s trousers; check strength at the seat and knees and follow safety rules.
Tips, tricks and hacks
- Wash and press the old garment before planning.
- Photograph it before you unpick.
- Unpick, don’t cut, when you need the full piece.
- Keep the original hems and pockets if they can be reused.
- Mark the grain on every unpicked piece straight away.
- Use the worn parts for facings and pocket bags.
- Combine two old trousers for contrast panels.
- Professionals check the crotch first on every remake.
- Keep a label inside that says what the trouser was before; clients love it.
- Know when to stop: cloth too weak to wear is better as a quilt.
Problems and how to fix them
1 · The remade trouser twists
- Re-cut the leg on grain.
- Re-sew the side seam to balance.
- Prevention: mark grain before cutting.
2 · It hangs forward or back
- Re-level the hip line by adjusting at the waist.
- Re-balance the side seams.
- Prevention: change front and back equally.
3 · The crotch pulls after the remake
- Restore the original crotch curve.
- Add a gusset.
- Prevention: never re-cut the crotch casually.
4 · Old cloth tears
- Back with a light fusible.
- Patch as a design.
- Prevention: test strength before remaking.
5 · Faded lines show where seams were
- Overdye.
- Cover with topstitching or trim.
- Prevention: plan new seams over old lines.
6 · Not enough cloth
- Add contrast panels.
- Shorten the design (culottes, shorts).
- Prevention: lay out the pattern before unpicking everything.
7 · The saree border runs out before the hem
- Join border pieces at the inseam.
- Use the border only on the front.
- Prevention: measure the border before cutting.
Beginner mistakes and myths
- Mistake: starting a remake from a trouser that never fitted.
- Mistake: cutting off-grain to fit the pieces.
- Myth: “Upcycled means second-best.” Well-made upcycled trousers are often the most treasured.
- Myth: “Designing your own is only for experts.” With the checklist, a beginner can design a simple, original trouser.
Practice drills
- Beginner: re-detail an old trouser with new pockets and piping.
- Intermediate: turn wide jeans into culottes.
- Advanced: design your own trouser with the checklist and make it.
As a hobby, for earning, for teaching
As a hobby: upcycling is creative, thrifty and kind to the planet.
For earning: remake services (heirloom sarees, jeans into new styles) are increasingly asked for; plan time generously, as unpicking is slow.
For teaching: “bring an old trouser” workshops are inclusive and popular.
Care and finishing
- Wash remakes gently; old cloth is weaker.
- Reinforce stress points (crotch, pocket corners) with bar tacks.
Sources and uncertain points
- D&D ebook ch. 62 (extending garment lifespan) and ch. 67 (circular fashion); general alteration practice.
- Insert sizes are D&D starting values.
Check yourself
- Can you name the three things that must not change?
- Can you read an old trouser before remaking it?
- Can you turn jeans into culottes without touching the crotch?
- Can you design your own trouser using the checklist?
Key terms
- Balance: how straight and level a trouser hangs.
- Upcycling: remaking into something of higher value.
- Re-cut: unpicking and cutting a new garment from the pieces.
- Harvest: taking usable cloth from an old garment.