Here you drape a basic straight trouser, front and back, on a form with legs. The result is a moulage: a draped block that should match, closely, the flat block you draft in Part IV. Doing both is the fastest way to understand why the crotch curve has the shape it has.
Teacher to check: cloth sizes, ease amounts and the step order are a standard method, not yet checked by a D&D teacher.
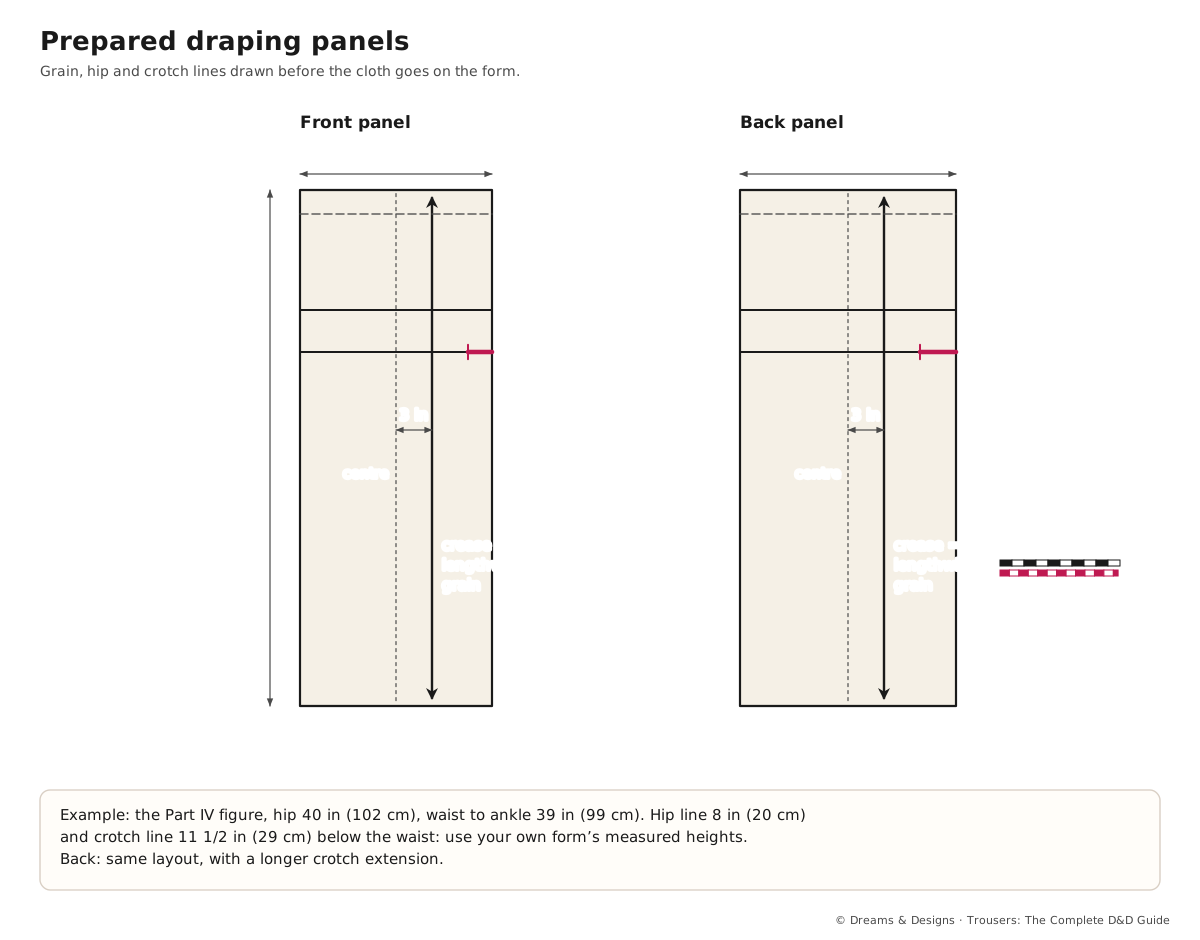
Photo: Draping the front: pin the crease, the hip line, the ease tuck and the dart.
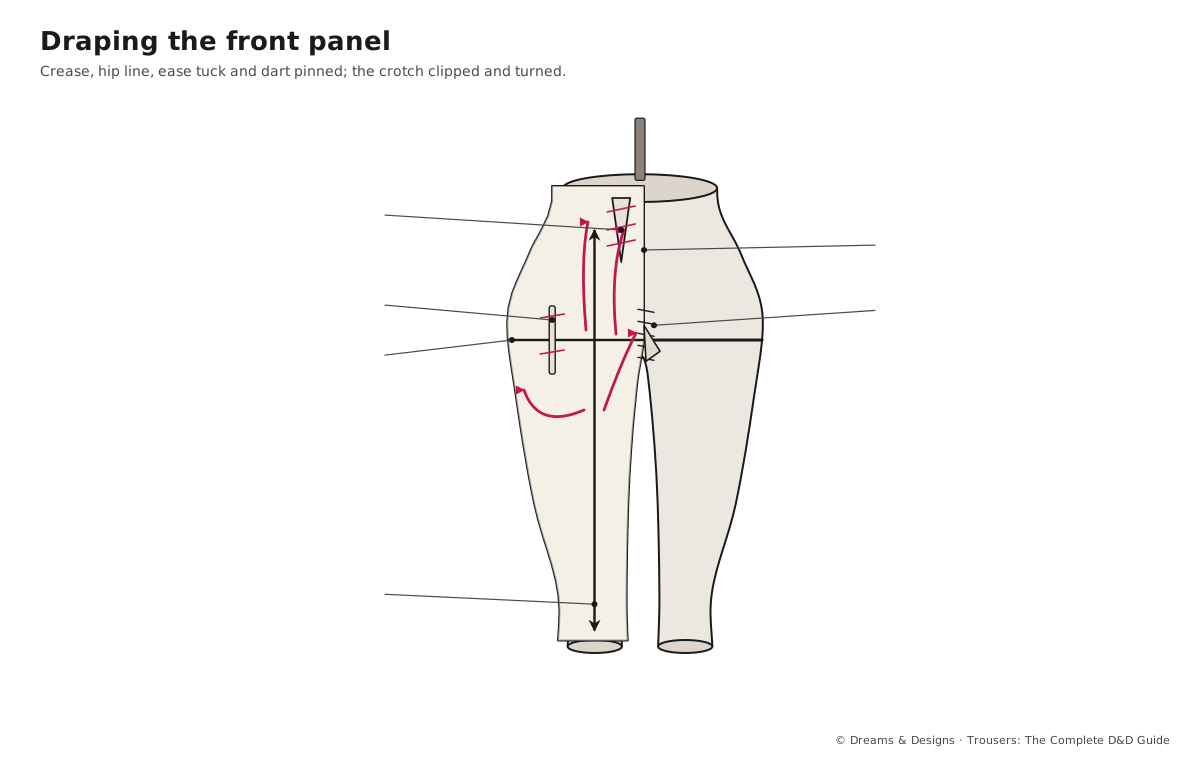
Photo: Draped (solid) against drafted (dashed) crotch curves.
What you’ll learn
- How to prepare front and back panels with grain, hip and crotch lines.
- How to drape the front and the back, including the crotch between the legs.
- How to add wearing ease while draping.
- How to compare your drape with the flat block.
Before you start
- A taped, padded form with legs (see Draping basics: the form, padding and grain).
- About 2 m (2¼ yd) of pre-washed markin, torn and squared.
- Time: two to three hours for a first drape, including truing. Difficulty: intermediate.
- Safety: work with pins pointing away from your hands; clip into the crotch allowance with small snips, never long shears near the form.
Step by step: the front
- Prepare the panel as in the drawing: crease line on the lengthwise grain, hip line and crotch line across.
- Pin the crease line to the centre of the front leg at the hip, knee and ankle. Look: the grain hangs plumb.
- Match the hip line to the hip tape and pin along it from the crease to the side seam.
- Add ease: pinch a vertical tuck of about 1/8–1/4 inch (3–6 mm) at the hip between the crease and the side, and pin it.
- Smooth up to the waist at centre front and pin. The cloth will stand away above the hip at the side: pin the excess into one dart, or two small ones, pointing down to the high hip.
- Shape the front crotch: at the crotch line, clip into the allowance towards the form in small steps, so the cloth turns under between the legs. Pin it up the centre front line. Look: no pull lines from the crotch to the hip.
- Mark the inseam down the inside of the leg and the side seam along the tape, keeping equal widths on each side of the crease for a straight leg.
Step by step: the back
- Pin the back crease line to the centre of the back leg; match the hip line.
- Add ease at the hip as for the front, a little more (about 1/4 inch, 6 mm) because the seat moves more.
- Smooth up to the waist, pinning the excess into one or two back darts, longer than the front ones.
- Shape the back crotch: it is longer and deeper than the front. Clip and turn the allowance between the legs until the cloth lies smoothly under the seat. The centre back slopes outward towards the waist.
- Pin back to front at the side seam and inseam. Check from all sides, then mark and true (see Draping basics: marking and truing onto paper).
Draping compared with the flat draft
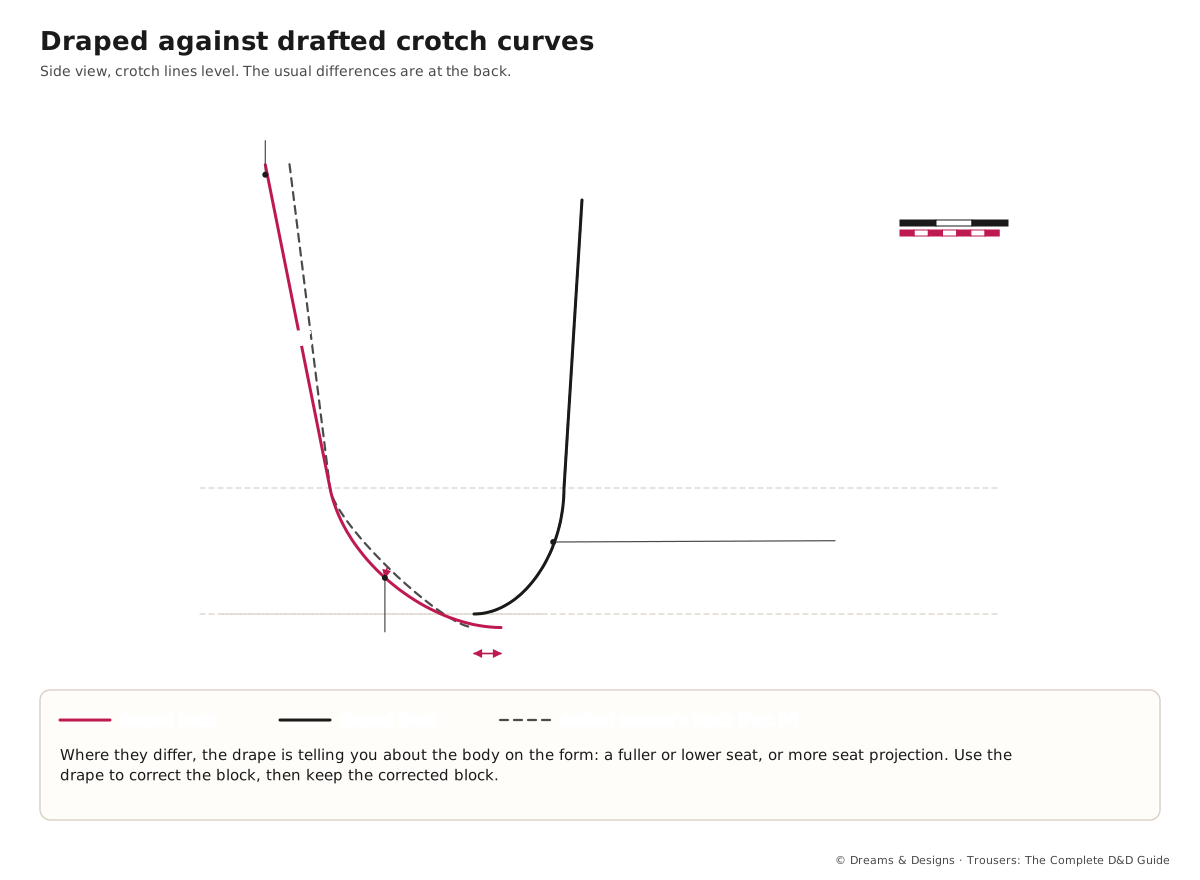
Lay your trued drape over the block you drafted in Part IV. They should be close. Where they differ, the drape is usually telling you about the real body on the form:
| Area | Drape often shows | What it means |
|---|---|---|
| Back crotch extension | Longer than drafted | Fuller or lower seat than the formula assumed |
| Back scoop | Deeper, rounder | Seat sits low; check against the person |
| Centre back angle | Steeper slope | More seat projection |
| Front darts | Smaller or none | Rounder tummy uses up the waist difference |
| Side seam | Curves forward | Hip shape; true it smoothly |
A flat draft is quicker, repeatable and easy to grade. A drape fits one body closely and reveals shape. Use the drape to correct your block, then keep the corrected block.
When draping beats drafting
- Fluid and asymmetric styles: cowl fronts, wrap trousers, dhoti pants, draped shararas (see the draped styles lessons next).
- Unusual bodies: a strongly asymmetric hip, a prosthetic limb, a seated wearer’s shape on a padded form.
- Design development: trying a fold or a pleat in cloth before deciding the pattern.
- Bias trousers: bias cloth stretches; draping shows how it settles.
Drafting wins for structured, symmetrical trousers (suit trousers, jeans, uniforms), for grading across sizes, and for children’s wear, where forms are rare.
Variations: women, men and children
- Women: front darts are often small; most of the shaping is at the back. A curvy figure may need two back darts.
- Men: leave a little more room in front of the crotch; pin the front waist into a pleat instead of a dart if the style is pleated. The back waist is often drafted to split at centre back for altering (see Part IV, The men’s block).
- Children: drape on a padded small form with generous ease; replace darts with an elastic back waist. Add growth room in the hem, not the drape.
- Leg shapes: once the straight leg is trued, taper or flare it flat on paper (see Part IV, Every silhouette from the block).
Control: tension and smoothing
- Smooth with flat hands from the grain line outwards, never by pulling an edge.
- Keep the cloth relaxed, not taut: taut cloth makes a trouser with no ease.
- Clip the crotch in small steps, about 1/2 inch (1.3 cm) apart, stopping 1/4 inch (6 mm) short of the seam line.
Tips, tricks and hacks
- Drape the back first if the seat is the hard part; some teachers prefer it.
- Remove the form’s far leg if it detaches; the crotch is much easier to reach.
- Use a mirror behind the form to see the back while you work on the front.
- Pin the grain at three points (hip, knee, ankle) before anything else.
- Pinch ease, don’t guess: a pinned tuck is visible and can be measured afterwards.
- Mark the crotch point with a circle; it is where front and back meet and where most errors start.
- Drape a short trouser first (to the knee) to learn the crotch without handling long legs.
- Professionals drape the top and draft the legs: the legs are simple; the time goes into the seat and crotch.
- Compare every drape to your block and write the differences on the block.
- Test sitting: cut the toile and sit on a low stool in it before trusting the back crotch.
Problems and how to fix them
1 · Diagonal pull lines from crotch to hip
- Clip the crotch allowance a little more and let the cloth settle.
- Lengthen the crotch extension.
- Prevention: keep the hip line level while shaping the crotch.
2 · The leg twists
- Re-pin the crease line to the leg centre and redraw the seams.
- Make the inseam and side seam equal in distance from the crease.
- Prevention: check grain at hip, knee and ankle.
3 · The back is too tight when sitting
- Add more ease at the seat.
- Lengthen the back crotch and raise the centre back waist.
- Prevention: sit-test the toile before truing the final pattern.
4 · Folds under the seat
- Reduce the back crotch length at the inseam.
- Shorten the back extension.
- Prevention: check the form’s seat padding against the person.
5 · Waist darts point to the wrong place
- Re-pin them aiming at the fullest point of the hip or tummy.
- Split one large dart into two.
- Prevention: mark the fullest points on the form before draping.
6 · The front crotch hangs in a pouch
- Shorten the front extension.
- Lower the front waist slightly.
- Prevention: drape the front crotch close to the form, then add ease separately.
7 · The drape does not match the block at all
- Check the form padding against the measurements used for the block.
- Check the grain on both drape and block.
- Prevention: drape and draft from the same set of measurements.
8 · The crotch allowance tears when clipped
- Patch with a small piece of fusible on the back and re-clip.
- Leave a wider allowance next time.
- Prevention: stop clips 1/4 inch (6 mm) short of the seam line.
Beginner mistakes and myths
- Mistake: pulling the cloth tight to the form. You get a second skin, not a trouser.
- Mistake: clipping too far into the crotch.
- Myth: “A good drape needs no toile.” Every drape needs one; the form cannot move.
- Myth: “Draping is slower, so it’s worse.” It is slower for basics and faster for fluid styles.
Practice drills
- Beginner: drape a knee-length front only; true the crotch curve.
- Intermediate: drape a full straight trouser, front and back; make a toile.
- Advanced: drape the same trouser on the form padded for two bodies (flat seat and full seat) and compare the back crotch curves side by side.
As a hobby, for earning, for teaching
As a hobby: draping your own trouser shows you your own shape in cloth; many sewers find it changes how they fit everything.
For earning: a draped block for a client with an unusual figure can solve fittings a formula never will. Charge for the time as pattern development, not as a stitching job (see Part XII, Costing as a method, labels, protecting designs).
For teaching: have half the class draft and half drape the same body, then compare. The discussion teaches the crotch better than any lecture.
Sources and uncertain points
- D&D ebook ch. 40: draping (moulage) as an alternative for fluid or asymmetric styles; ch. 37 for the block it is compared with.
- Ease amounts and whether to drape front or back first vary between schools: teacher to check.
Check yourself
- Can you prepare a front panel with crease, hip and crotch lines?
- Do you know how to clip and turn the crotch between the legs?
- Do you add ease by pinning a tuck at the hip?
- Can you name three things a drape shows that a draft may miss?
- Do you know when to draft instead of drape?
Key terms
- Moulage: a draped block, the draped equivalent of a drafted block.
- Crease line: the centre of each leg, on the lengthwise grain.
- Crotch extension: the part of the pattern that reaches between the legs.
- Ease tuck: a small pinned fold that adds wearing room.
- Clipping: small cuts into a seam allowance so it can turn a curve.