Gathers draw a long edge into a shorter one in many tiny soft folds. Shirring is several rows of gathering, usually sewn with elastic thread, that turns a flat panel into a stretchy, textured one. On trousers they make paperbag waists, gathered palazzos, harem ankles and shirred waistbands that fit many sizes, for women, men and children.
Teacher to check: gathering ratios and machine settings are general starting points, not yet checked by a D&D teacher.

What you’ll learn
- How to gather by machine, evenly, with the right amount of cloth.
- How to sew elastic shirring on a home machine.
- How to use gathers and shirring at the waist and the ankle of a trouser.
- Which fabrics gather well, and how to keep children’s shirring safe and comfortable.
Gathering
The ratio is how much cloth you gather into each unit of finished length. Light cloth takes more; heavy cloth less.
- About 1½ times for cotton and linen (soft fullness).
- About 2 times for voile, rayon and lawn.
- About 2½ to 3 times for chiffon and georgette.
- Set the longest straight stitch, about 4–5 mm, and loosen the top tension slightly.
- Sew two rows inside the seam allowance, about 1/4 inch (6 mm) apart, leaving long thread tails. A third row just below the seam line gives even more control.
- Divide the edge and the band it joins into quarters and mark both.
- Pull the bobbin threads from both ends, sliding the gathers until the marks meet. Wind the tails round a pin in a figure of eight to hold them.
- Spread the gathers evenly with a pin, then sew on the seam line with the gathered side up.
- Remove any gathering thread that shows on the right side.
Elastic shirring
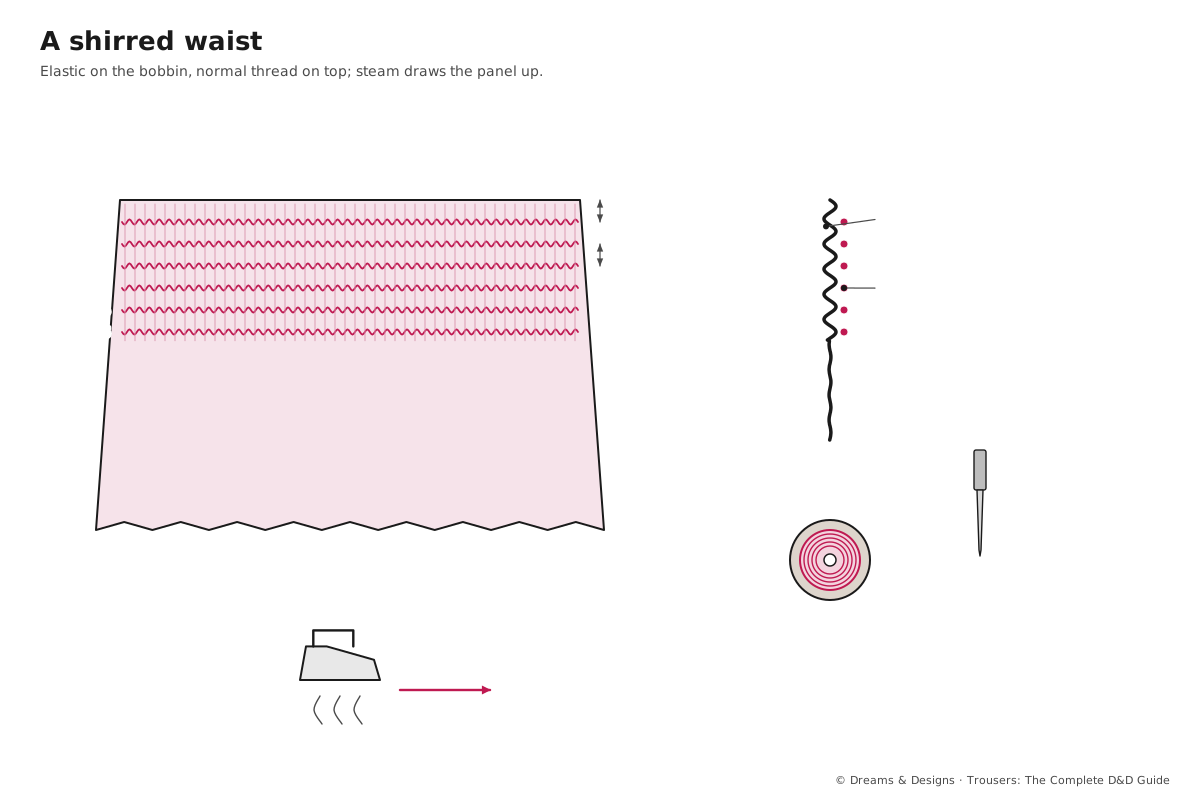
- Wind shirring elastic onto the bobbin by hand, firmly but without stretching it. Use normal thread on top.
- Set a long stitch, about 3–4 mm. Test on a scrap of the real cloth.
- Mark the first row with a fabric marker, then sew rows about 1/4–1/2 inch (6–13 mm) apart, using the edge of the presser foot as a guide. Stretch the shirred rows flat as you sew each new row.
- Knot the elastic ends at the seam, or sew the rows in a spiral so there is only one start and one end.
- Steam the shirring from above, without touching it with the iron. The elastic shrinks and the panel draws up.
On trousers
- Shirred waists on palazzos, pyjamas and children’s trousers: a soft, stretchy waist with no casing.
- Shirred ankles on harem trousers and joggers in woven cloth.
- Paperbag waists: a gathered frill above a waistband or tie.
- Gathered palazzos and shararas: fullness gathered into a waistband.
Where you see these in Indian fashion
- Gathered salwars and Afghani salwars; gathered sharara and gharara below the knee seam.
- Shirred-waist cotton palazzos and pyjamas sold widely as easy everyday wear.
- Children’s cotton pyjamas and frocks with shirred waists and backs.
- Men’s kurta pyjamas with a gathered nada waist.
Variations
- Gathering over a cord: zig-zag over a strong thread or dental floss and pull the cord; it never breaks, good for heavy cloth.
- Gathering with an overlocker: raise the differential feed to its highest setting.
- Clear elastic gathering: stretch clear elastic while sewing it to the edge; good for knits.
- Half-shirred waist: flat front, shirred back.
- Left-handed: no change; mark rows on the side you can see best.
Women, men and children
- Women: shirred waists adapt to monthly and pregnancy changes; place shirring at the natural waist or just below.
- Men: gathered nada waists on pyjamas; shirring is less common but useful for lounge and sleep trousers.
- Children: shirring is soft and has no cords to catch, which suits young children. Keep it gentle: test that two fingers slide easily inside the waist. Use cotton-covered elastic where possible; it survives hot washes.
- Older and seated wearers: a shirred back waist gives room when seated without a tight band.
Control: tension and speed
- Sew gathering rows at an even, medium speed; stopping and starting makes uneven pulls.
- If shirring is too loose, wind the bobbin a little firmer, or tighten the bobbin case slightly (some machines only; check the manual).
- Keep the cloth flat ahead of the needle by stretching the previous rows.
Before you start, and what you need
- Prerequisites: straight seams, changing stitch length and tension on your machine.
- Time: 30 minutes to sample gathers; an hour for a shirred waist panel.
- Difficulty: beginner.
- Tools: strong thread, a contrast thread for gathering rows, shirring elastic, spare bobbins, a fabric marker, pins, a steam iron; optional gathering foot or an overlocker with differential feed.
- Cloth: cotton lawn, voile, mulmul, rayon, light linen and georgette gather well; denim and heavy twill do not.
- Safety: keep fingers clear of the needle when easing gathers under the foot; steam shirring with the iron held above, never on, your hand.
Step by step: a paperbag waist
- Add 2–3 inches (5–7.5 cm) above the waistline on the front and back patterns for the frill, plus a casing allowance.
- Fold the top edge down to the inside by the frill height plus the casing, and press.
- Stitch the casing: one row at the waistline and one row 1¼ inches (3 cm) above, leaving a gap for elastic.
- Thread elastic into the casing; the cloth above it stands up as a gathered frill.
- Add belt loops and a self-fabric tie on the casing line for adults; for small children, skip the tie.
- Steam the frill upright; do not press it flat.
Tips, tricks and hacks
- Gather in sections: long edges gather more evenly in quarters, each with its own threads.
- Use a contrast bobbin thread for gathering rows, so you pull the right thread.
- Pin at right angles across gathers, every inch.
- Sew with gathers on top so you can see and smooth the folds.
- Steam shirring from above; it draws up a surprising amount.
- Sew shirring in a spiral on a tube: no ends to knot.
- Test shirring on the real cloth; how much it draws up changes with weight.
- Professionals stay the gathered seam with a narrow tape so it cannot stretch.
- Wind several bobbins before starting a big shirred panel.
- Add elastic in a casing behind shirring for heavier trousers; the shirring is decorative, the elastic holds.
Problems and how to fix them
1 · Gathering thread breaks
- Pull from the other end; use the second row.
- Gather over a cord instead.
- Prevention: use strong thread in the bobbin.
2 · Gathers are bunched in places
- Slide them evenly with a pin before sewing.
- Divide into more sections.
- Prevention: mark quarters on both edges.
3 · Tucks or pleats appear in the seam
- Unpick that part and re-sew slowly.
- Sew with gathers on top.
- Prevention: pin closely and use a third gathering row.
4 · Shirring does not draw up
- Steam it well.
- Wind the bobbin more firmly.
- Prevention: test on the real cloth first.
5 · Shirring is too tight
- Unpick a row or two.
- Wind the bobbin more loosely and space rows wider.
- Prevention: measure a test panel before and after steaming.
6 · Shirring elastic snaps after washing
- Re-shirr the broken rows.
- Add a hidden elastic casing behind.
- Prevention: wash cool; avoid hot dryers.
7 · A shirred child’s waist leaves red marks
- Unpick a row to loosen it.
- Space the rows wider.
- Prevention: test the two-finger rule on the child.
8 · The gathered seam is thick and stiff
- Trim and grade the seam allowances, the gathered layer narrowest.
- Press the allowances towards the flat piece, not the gathers.
- Prevention: use a lower gathering ratio in heavier cloth.
9 · Shirring puckers unevenly across the panel
- Steam again, evenly, over the whole panel.
- Re-sew any row where the elastic ran out or was wound loosely.
- Prevention: wind all bobbins the same way, with the same tension, before starting.
Beginner mistakes and myths
- Mistake: gathering heavy cloth at a high ratio; the seam becomes a thick ridge.
- Mistake: stretching shirring elastic while winding the bobbin.
- Myth: “Shirring needs a special machine.” Most home machines shirr with hand-wound elastic.
Practice drills
- Beginner: gather the three ratio strips from the drawing and sew each to a band.
- Intermediate: shirr a 10 inch (25 cm) square with eight rows; measure before and after steaming.
- Advanced: make a child’s shirred-waist cotton trouser with a shirred ankle.
As a hobby, for earning, for teaching
As a hobby: shirred cotton trousers are fast, comfortable and forgiving to fit.
For earning: shirred-waist children’s and lounge trousers sell well in sets; sizing is simple because the waist stretches.
For teaching: gathering is a core skill; teach it on straight strips before curves.
Care and finishing
- Wash shirred garments cool and dry flat or hung; heat weakens elastic.
- Steam gathered seams; do not press the folds flat.
Sources and uncertain points
- D&D ebook ch. 23 (elasticised palazzo waists), ch. 26 (joggers), ch. 42 (waistbands); general sewing practice.
- Bobbin tension advice varies by machine: check the manual.
Check yourself
- Do you know the gathering ratio for cotton and for chiffon?
- Can you sew two gathering rows and spread them evenly?
- Can you wind and sew shirring elastic?
- Do you know the two-finger test for children’s waists?
Key terms
- Gathers: small soft folds drawing a long edge to a shorter one.
- Ratio: cloth length before gathering divided by finished length.
- Shirring: rows of gathering, often with elastic thread.
- Paperbag waist: a gathered frill standing above a waist tie or band.